About Me
Hello everyone! My name is William Dylan Domeyer and I’m from Orlando, Florida. I’m a recent grad from the University of Central Florida with a degree in visual art and emerging media. I spend my time honing my skills and learning new techniques and workflows to advance my pursuit of mastery in digital art.
I had fallen in love with concept art during my early years of college and decided to pursue a career as an environment concept artist. It wasn’t until over a year or two later that I started to pick up 3D and became more and more fascinated by the potential it offered.
Early on in my artistic education, I was taught completely traditionally with charcoal and paint. It wasn’t until years later that I eventually made the switch to digital. So when I first attempted 3D modeling I was quite put off by it due to its rigid workflows and techniques, as well as the requirement that I have a much higher technical understanding than just knowing how to use a Wacom tablet and Photoshop. The more time I spent with and around 3D art the more my demeanor changed towards it, until eventually the power expressed in a 3D design over just a flat 2D one began to enchant me. Yet the technicality of the medium still felt like it was greatly limiting my creativity compared to sketching and painting with 2D mediums.
All that changed when I was exposed to Oculus Medium on the Rift. At first it looked too good to be true, and had heard it compared to other sculpting software such as ZBrush. Once I became more familiar with the program I realized that it was a completely different entity altogether but shared similarities. Oculus Medium has revolutionized my artistic process and allows me to sketch in 3D with almost limitless freedom. That aspect combined with its ability to ‘import models as clay’, and to create and import custom stamps for kitbashing makes it an ideal program for pre-production work and concept sketches!
Exploring New Workflows
I normally do more cyberpunk and sc-ifi themed pieces such as Neon Slums – Hover Tug and Neon Slums – Mobile Vending Bar. While I was browsing Sketchfab collecting photoscans for recent sculpts, I began to gather a few Nordic themed models into a Collection. When I was finally ready for a break from sci-fi, I opened up the Nordic collection to get inspired, and got started on this piece.
Forest of Souls kitbash by William Domeyer on Sketchfab
With this piece I intended to “stand on the shoulders of giants” and rely much more heavily on models available on Sketchfab to create a more detailed scene quickly so that I could get to the painting stage of the project with as little technical hold up as possible. This is an amazing workflow that I feel is underused in environment art!
The Idea/Inspiration
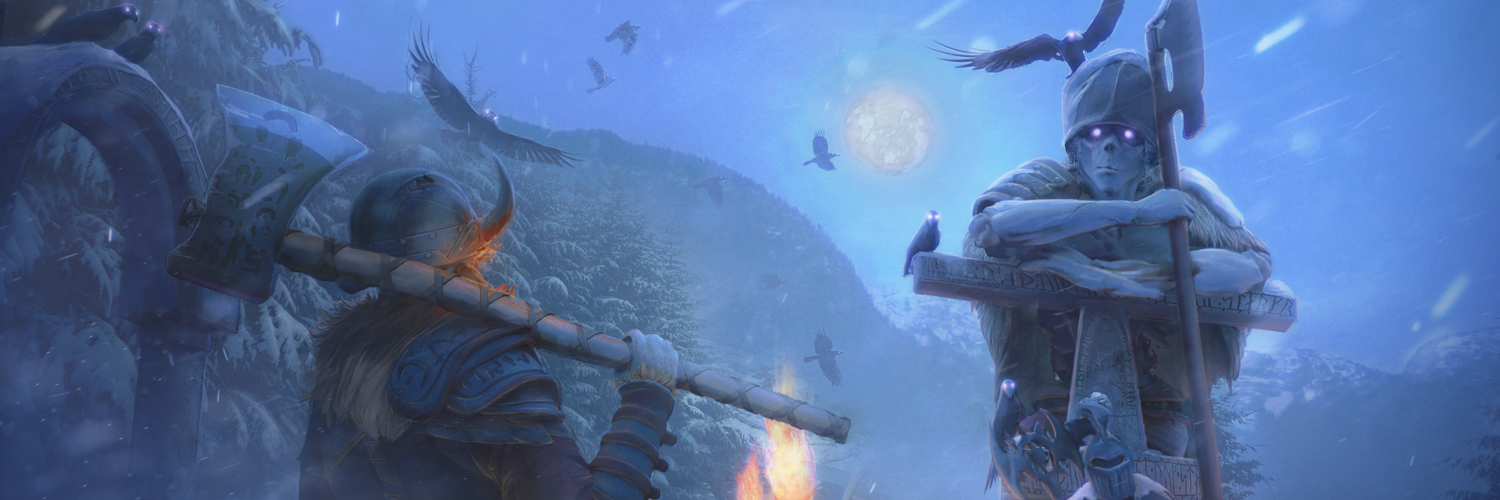
So originally when I was collecting models, I came accross Ion_omat’s Altar Ruins, Mrrobot’s Old Knight Speedsculpt, and 3DTay’s Viking/Medieval Game Character! Immediately I had the idea to create an ominous faceoff between two undead warriors chosen by the gods to do battle for eternity in the Forest of Souls. I imagined that the gods would grant their chosen champions with an ethereal item that would let their withered bodies continue to fight after being cut down over and over again. Once I had the concept laid out, I started on the process of making it tangible.
Having a little bit of knowledge of Norse themes, I began looking for other models that would support the three initial models I chose, such as ravens, bones, axes, and Norse themed clothing. In total I used 11 different models from Sketchfab as well as custom stamps and sculpting inside Medium, but I cover the process of putting the 3D scene together in the next section.
The Tools
For this scene I used relatively few tools to keep my workflow streamlined. As for a quick breakdown, I use either Meshlab or Blender to make sure all models from Sketchfab are in an OBJ format.
Oculus Medium is the workhorse for the 3D portion of the project; it’s where I put everything together and roughly paint on colors and texture.
Sketchfab is crucial in my process to display the VR sculpt, get feedback, and experiment with colors, lighting, and camera angles. (Being able to quickly alter settings in real time allows for much more creativity when exploring potential looks for the piece)
Next comes Keyshot for setting up a fixed camera angle and render passes.
Finally Photoshop is where it all comes together into the finished painting!
Be kind to your Eyes
The Oculus Medium default studio has a bright skybox, with the ground plane and bloom enabled. While these settings can be useful for displaying your sculpt in VR, I find that longer exposure to the bright studio produces significant strain on my eyes, and the ground plane causes clipping. So my first step is to edit the studio settings and create a cool neutral backdrop to work on with the skybox, ground plane and bloom all disabled. I make sure to save the world settings as default so it will load my edited version of the studio every time I boot up Medium.
The 3D Process
I start by importing the models that will make up the environment from Sketchfab using the ‘Import mesh as clay’ button in the file menu.
The general breakdown of my process is: Ruins and Statue -> Mushroom -> Characters -> Fallen Snow -> Ravens and Details -> Emissives
I arrange the models into a diorama-like setting and start to figure out where the characters will fit into the scene. The knight statue was a photoscan from comic con, so it needs to be repainted to fit into the ruins. I approach it like painting a miniature figure, first laying in a base color then slight color variations and after I paint on edge wear and moss to separate forms.
I had the idea to make the giant look haggard and rest on the main altar of the scene as if he’s been there for a long time. Since I had the head already set, I sculpt out a rough skeleton for the giant to get his posture just right for resting on the altar. Once I have the rough volume I import Splodeman’s Northern Outsider, then split up the model and use various parts to detail the scene such as his boots, cloak, axe, and shoulder pad. This process allows me to get very close to my intended idea of the giant in a matter of minutes.
By placing the giant in the middle of the circle, I know the Viking should be on the outside looking in to enforce the narrative within the scene.
I like to keep the mantra of Remix, Reuse, and Recycle in my head, and I had always been told to work smarter not harder. So I try to put that into practice when it comes time to adding detail to the Viking. I already have the giant completed so I borrow some of his pieces and alter them to fit with this smaller champion. The helmet on the Viking is actually the same as the giant’s, just with a few scratches and horns added!
After the environment was set and the characters added to it, all there is left to do is painting touch ups and detailing such as banners, the ravens, and the snow layer covering the scene. The last step is to add an emissive layer for the fire and glowing eyes.
Throughout the detailing phase I often use a workflow of importing photoscans then converting them into stamps to be reused within Oculus Medium.
Creating Stamps from Photoscans
Take the ravens in the scene for example. I import only a few different types of raven and crow models and then for each import I clean up any artifacts from the scan and stamp them into my custom palette in order to populate the scene. Below is a short loop to demonstrate the process of importing and creating a stamp!
After the scene is finished enough for my liking, I go through every single layer making sure there are no blanks or duplicates and that everything is named and grouped accordingly. This saves so much headache down the line when editing materials in both Keyshot and Sketchfab!
Here is a brief glimpse of my layer organization and grouping.
Layer Organization
Another little tip is to keep moveable parts, such as arms and legs on characters, on different layers so that they can be easily posed later on or tweaked to fit the final scene.
Exporting from Medium
The final step inside Oculus Medium is to export the finished model. When I go to Export, Medium has the option to choose file type between FBX and OBJ, reduce mesh resolution, and to choose the way textures are exported, either as texture maps or vertex colors. I’m exporting with texture maps since I am importing the model into Sketchfab and want multiple materials. As for the resolution, I’ve found you can reduce triangles up to 10% without much visual difference in the exported model. Depending on the complexity of the model, the triangle count can be even further reduced to work within Sketchfab’s file size limit.
Once the export is finished I zip all the contents of the export together and upload to Sketchfab!
Bringing it into Sketchfab
When the upload is finalized and the model has been processed, it almost feels like Christmas morning. To take that brand spanking new model and beautify it with the 3D editor gives me more than just a little satisfaction. I feel it makes the results from Oculus Medium really shine! I begin by straightening the model and slapping on a background image and then enable ground shadows and choose an HDRI (my personal favorite is Footprint Court). I go on to tweak materials and enable the emission layer.
Next comes the fun part, post processing! While the mesh from Medium is far from ideal, using some tweaks here can go a long way; enabling SSAO, grain, and sharpness together can help reduce some of the jagginess of the mesh. I also apply slight amounts of chromatic aberration, vignetting, then crank up the bloom!
Once all the effects have been applied I use both Tone Mapping and Color Balance to adjust both the values and colors of the scene. This is where I experiment the most and begin to plan ahead for the colors and mood of the painting.
Adding the narrative to the scene with annotations has become one of my favorite parts of the Sketchfab process, and greatly helps convey the context to the audience.
After setting up the scene in Sketchfab, experimenting with 3D settings and finally adding annotations to show off important parts and add context of the model, I have reached a major milestone in the project. At this stage Sketchfab offers another great opportunity to send the model around to get critiques and feedback without having to do a bunch of renders or screen grabs. After getting input back and tweaking the model on Sketchfab I’m ready to start the second part of this project, the final painting!
The Paint-Over Process
Keyshot
When importing the model into Keyshot, my intention is not to make the model as beautiful as it was in Sketchfab, but to instead set up the camera angles and composition that I will use for the rest of the project. This can be a time consuming process due to having to tweak aspects of the model and re-export to get the perfect composition. For this scene it took me around 16 different cameras until I found the perfect angle and composition. Once I have the camera set, I begin adjusting material properties, as well as add in area lights. Once everything is ready for the render, I enable most passes even if I end up throwing some of them out. I would much rather have more than needed, than have to stop and re-render various passes later on in the process.
Beginning the Painting
From the process of uploading to Sketchfab to starting to paint over the base render, it can often feel as though the model has regressed visually due to not having all of the wonderful settings inside of Sketchfab’s 3D editor applied, but this is where all the pre-planning and hard work pay off. After doing some test renders in Keyshot, I print a page of 8-10 small thumbnails of the render and crudely draw over them with a sharpie to get a good idea of the value structure and mood of the piece. The sharpie helps prevent detailing and overthinking.
Since the site is focused more on 3D art I’ll keep this section on digital painting quite brief, but if anyone has any questions or would just like to learn more about my approach and process, feel free to send me a message or get in contact with me through various social media platforms. With that being said, let’s get into it!
Deep Dive into Photoshop
When I start the painting, I arrange the render passes together and cut up the clown/material ID pass into separate layers so that I can easily select parts by holding Ctrl and clicking the layer thumbnail. This allows me to quickly pull up selections without having to toggle any layers on or off. The first stage is to adjust values and color while adding a background that fits the time of day, camera lens and perspective. Next I add back in the lights from the render and start painting them into the scene better. Once the render is more cohesive, I begin layering in photo textures to add visual interest and a hint of realism to the scene. During each process, color balances and value grouping is being applied to keep the results uniform.
The final stage is to add effects, such as bloom, particles like snow, and fog to push everything back. In the final version the fog has been reduced and a lens correction added. The final values and colors become more unified and pump up the warmth in the scene to direct your focus to the main ruins where Odin’s Axe is embedded into the altar below the giant.
Closing Thoughts
When I was first introduced to Sketchfab through an intro to Maya class in college I was impressed by the quality of settings and the inspirational work all over the site, but it wasn’t until almost half a year later that I truly appreciated the power Sketchfab offers to artists. When I create an environment, vehicle, or character, their backstory and narrative quickly become the most interesting part of the process to me. Trying to relate that aspect to another person when they look at my work was always a difficult undertaking and more times than not the person would interpret the work completely differently than I had intended or struggle to understand it at all. Using Sketchfab’s annotation feature has completely changed the way I display my art. Now when I upload a model, I can provide narration right along with what the viewer is looking at to add clarity and context. This adds a whole extra level of detail to my work that previously only existed in my mind and short paragraphs in the bio. Make sure you check out the annotations for yourself in the scene below!
While annotations are the feature that appeals to me most, Sketchfab has countless benefits to digital artists, specifically those that work in VR like I do.
Sketchfab has truly become a platform that I depend on almost daily to showcase my work with the amazing built in 3D editor, as well as provide inspiration and assets for me to continue creating more refined work! It also offers amazing accessibility to VR artists as the medium is still limited to other VR users, and by uploading sculpts onto Sketchfab they are easy to share with anyone who has access to a computer or smartphone! Another aspect I’ve completely fallen in love with is the community that surrounds Sketchfab. It is such a positive environment in which to receive feedback and grow creatively. That combined with the generosity shown through the amount of models available for use and the frequency of community based events and competitions, truly makes Sketchfab a paradise for digital artists.
I sincerely thank anyone who has taken the time to make it to the end of this article! I know it is far from most people’s typical workflow, but I hope you were able to glean something from my process. And if you have any questions please don’t hesitate to reach out! I would also like to thank the staff behind Sketchfab for the constant support, acknowledgement, and opportunity to share both my art and process with the entire community! You can follow my 2D work on ArtStation and on Instagram.


