Hi everyone! My name is Iván Batalla, I’m a 3D modeler from Spain who began his journey in the 3D field around 3 years ago. Currently, I’m a Concept Art student, although most of my knowledge regarding 3D was self-taught, or better said, learned through a ton of YouTube tutorials.
My work is usually focused on realtime rendering, mostly on Sketchfab. From time to time, I also enjoy creating video animations and still renders. I also do a little bit of 3D printing whenever I have the chance to put my hands on a printer. I use Blender as my main software, with the help of Quixel Suite and Substance Painter for texturing.
Currently, I’m developing my skills making optimized low-poly models for real time applications, as my goal would be to work for the videogame industry. Talking about low poly, let’s get into my latest model, the Medieval City Pack Demo.
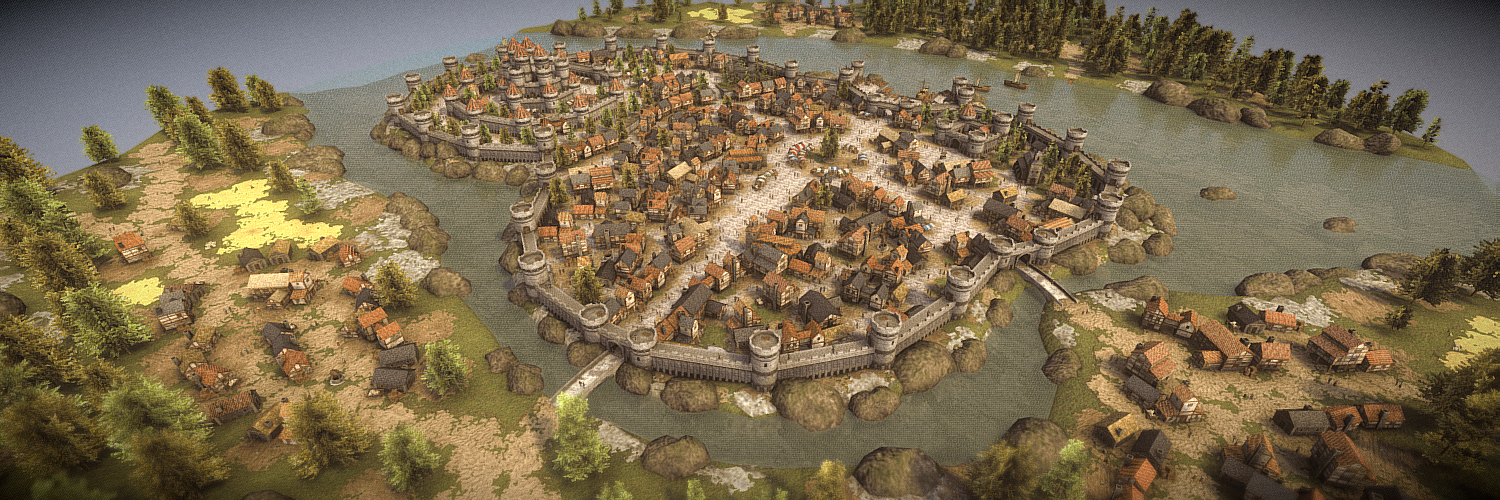
The City of Avanta
The idea of this model came from my love for all kinds of medieval related elements: swords, lances, armors, castles, dragons… Every time I play an open-world video game inspired by a medieval environment, I spend quite a few hours just walking around, exploring every city, every village, every forest… (that’s The Witcher 3, basically. That game was probably my main inspiration). So I think it was a natural step to dream about creating my own environments as soon as I became interested in 3D modeling. Some of my first models were ugly castles never finished… as a beginner I couldn’t do a decent job on them.
The point is, with my current knowledge I thought I was prepared for this. Also, as I wanted to create a pack for my Sketchfab Store, I decided to create a low poly pack of medieval houses to be sold here. My original plan was just to create a couple of buildings, and nothing more, but while I was working on them, I began to think about how to display the pack and grab people’s attention. How could I display the pack’s capabilities?
My answer to that question was: “Create a whole city using it”. So, after I finished the houses, I began working on every other thing that was needed to create a full environment: market stands, barrels, boxes, carts, ships, bridges, stone walls, trees, terrains, soldiers, villagers…. The pack grew quite a bit, and it ended up being a full medieval pack. Once every piece was finished, it was time to use them to create my city, the city of Avanta.
Let’s get started. Give me some models!
The modeling process for this project was, for the most part, very simple. As you can see in the image, the low poly building is basically a cube extruded a couple of times. And the high poly one is another cube with a few more extrusions for the windows and the door, and a few other cubes used as wood planks. Very simple, but quite effective; they have 104 and 3540 tris respectively.
All the buildings were made basically the same, but with different structures. The ships, for example, were a bit more difficult, as they have rounded shapes, and the same can be said about the characters.
On my workflow, I started by modeling the basic shape of the low poly building. I added as many loops as I thought necessary to get the right shape. Once it was finished, I duplicated it two times; one was the backup model, and the other would become the high poly one. Then, I modified the original one by collapsing all the unneeded vertices and triangulating the topology, dropping the polycount. “AAAAAH, TRIANGLES!!!” some might say. Well, every quad on every model is calculated as two triangles anyways, but with a quad I don’t have control over the direction of the diagonal. In low poly models, that diagonal can drastically change the shape and volume of the face/model on non-planar faces, so I prefer to have control over it. It’s not going to be animated or subdivided or whatever anyways…
After that, I made all the details of the high poly. I added some loops to create, for example, the windows or the door, without worrying too much about the resulting topology. As long as the shading was correct, it was okay for me, as it was just for baking purposes. Other parts, such as the wood planks used to support the buildings, were added using simple cubes or basic primitives and placing them in the desired place.
The final touch to both high and low poly was to add some sharp edges to control the smooth shading. For buildings it was basically the same as leaving a flat shading, but for models with rounded shapes, such as boats, cart wheels, barrels, weapons or armors, it was quite important.
 Notice how the blue lines (sharp edges) on the wireframe result in sharp borders on the left model. The model on the right doesn’t have any sharp edge, resulting in a weird shading.
After that I needed to unwrap the model, which was quite easy given the low polycount of the models and their simple shapes. And, to be honest, it’s something that I enjoy quite a lot (which doesn’t happen that often, apparently).
Time to paint it!
To begin the texturing process I added simple materials to each part of the high poly model. For example, I used a plain brown for the wood planks, blue for the windows…all without any textures. After that, I baked the colors, the ambient occlusion and the normals from the high-poly to the low-poly into 1024×1024 textures to get the following result:
 Using those 3 textures, I can replicate the look of the high-poly model on the low-poly model (which is the one shown here).
Then I exported the low-poly building as a .fbx object, and loaded it into a texturing software, Quixel Suite. Here, the ID mask, which had been baked before with the colors, allowed me to isolate the different parts of the model to assign different materials to each part. I used some materials from Quixel’s default library, and others created with textures from textures.com. Most of them needed some tweaking to get the right look.
All the buildings were textured using Quixel, but at some point during the project, I bought Substance Painter and used it as well on some other assets for the environment. Both are great softwares, with their own advantages.
Once the model was finished, I exported all the maps to .png images and began with a new building. After I had all of them, I reimported all the .fbx files into a new Blender project, and joined all of them into the same object, which would allow me to work on all UVs at the same time. While preserving the original UVs, I created a new one to create an atlas texture with every building contained on it. I manually placed every single UV island from the original UVs onto the new one to make an unwrap as optimized as possible.
To make it even more optimized, I reused some of the assets. For example every building had at least two different types of roofs, but they shared the same main body. So I deleted every repeated part from the atlas, leaving only the roofs, which were different, and one main body. That allowed me to save a huge amount of texture space.
Then I just baked every texture into the new map, so I had a single Albedo, Roughness, Metallic, Normal and AO map containing every building.
As a result of my workflow making the UV atlas, all the meshes for the buildings were merged into a single object, so once the baking process was finished, I had to make them separated objects again. That way I could have an individual pivot point for each building, instead of a global one. To finish the set I exported everything into the same .fbx file, the “building library”.
The same process was repeated to create the remaining assets, ending with a total of 4 texture sets for the full project: main buildings, market assets, environment assets and people.
Moving into Sketchfab
When everything was finally modeled, I started creating the final scene of the city. It was time consuming, as it’s quite a big scene, but very easy. I created the basic terrain using the grass plane from my pack, and then added a lot of alpha planes over it to add rock and dirt surfaces, pavement for the city, pathways, water… After that, I placed all the buildings for the city and the three villages, the towers, the walls… Once I was satisfied with the layout, I finished it by adding trees, rocks, boxes, barrels, carts, and people, of course. I also created a global UV map to bake a global AO, but this time I let Blender do the job for me with an automatic unwrap.
I exported the whole city as a .fbx file and uploaded it to Sketchfab. Setting up the 3D editor was quite simple. The materials were completely straightforward, I just needed to plug in the proper textures without any further tweaking. The lighting setup took a bit longer because I kept changing it until I was satisfied, and in the end I used two directional lamps and the HDRI “Road in Dordogne” with shadows enabled. I also used the new Ground Shadows feature, although in this particular case it’s not very noticeable; it just adds a bit of AO under the model, like if it was floating above a transparent ground.
Where I spent way more time was on the post-processing filters section, adding a little bit of everything. The Screen Space Reflections works really well with the water reflections; I had already used it on water for previous models, and it adds a lot to it. The SSAO helped a bit with the ambient occlusion. I didn’t wanted to overdo it, so it’s not very intense. I enabled the Depth of Field because with the scene’s size I wanted to give some extra sense of depth while moving through it. With the Tone Mapping I decreased the contrast a little bit, just to fake the effect of an atmospheric fog, and I used the Color Balance to give it an orange look, trying to make it slightly closer to the sunset. Other filters, such as Vignette and Sharpness add the final touch to the scene.
To use another of Sketchfab’s capabilities, I added annotations for some of the key points of the model. That way I could add a little bit of context for the city, guiding the viewer from the main street to the market and the castle.
And that’s pretty much it. After so many hours of work, I could explore my own city and get lost inside it (which actually happened once). I also set the VR settings to start on the main street, so if you have a headset, it might be interesting to explore it that way, but if you are like me and don’t have one, remember that you can change the navigation mode to first person view on the viewer and explore it as if it was some kind of video game!
Thank you for reading it through the end! And thank you to the Sketchfab team, for the amazing tool and community they have created, and for the chance to write this Art Spotlight. I hope you like it!
Here are my Twitter and Instagram, where I try to upload some of my works.


