Hi! My name is Facundo, perhaps better known as Funkfz. I am a 3D generalist from Buenos Aires, Argentina. I started doing 3D four years ago, learning from YouTube, Facebook and other web sites. I am always trying to push myself to learn new things and avoid staying on the same thing for a long time. Some weeks I try to improve my modeling, then my texture work, then my animation skills, all with the objective of being a better artist. If you want to see more of my work you can follow me on Instagram.
Now it is time to talk about my art work….
Look for something that inspires you
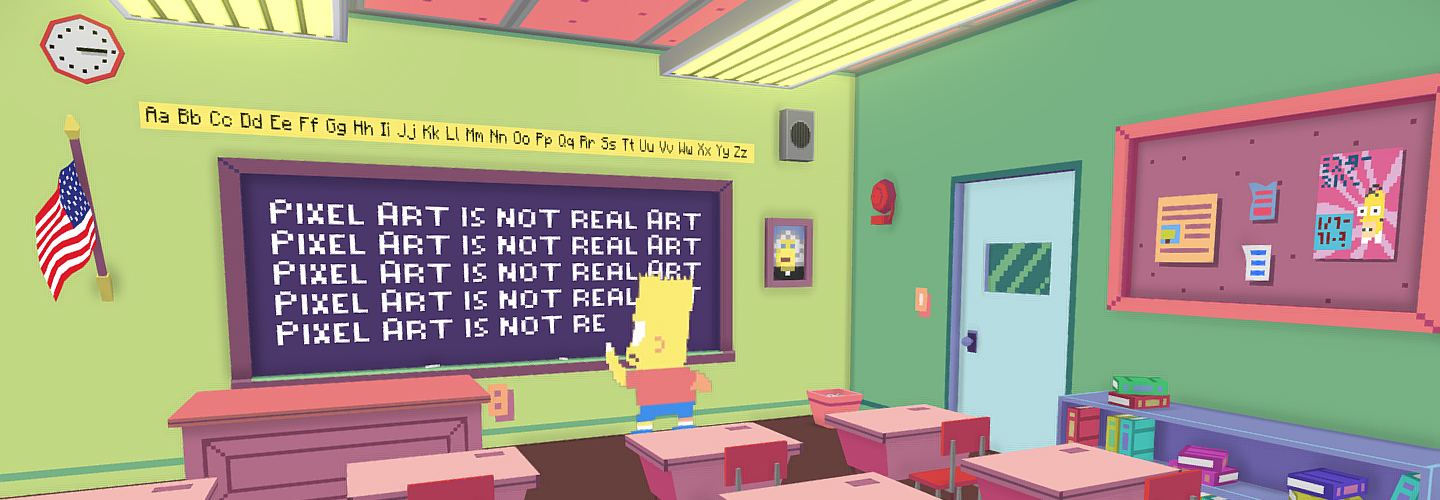
I am very big fan of The Simpsons. I always use quotes from dialogue of the program to represent situations of my routine (it sounds weird but this is something pretty normal in Argentina). I am also a big fan of pixel art textures. So, after seeing this couch gag made by Paul Robertson and Ivan Dixon, I decided to represent one of the environments with 3D graphics.
Looking for a good reference
“Pixel art is not real art” hahaha so funny! After seeing that part of the video I decided that Bart’s classroom was going to be the environment to create.
So I Google searched for images of Bart’s classroom and I saved them in a folder on my PC to use them as reference.
Modeling
I modeled the whole scene using low poly geometry, using planes and cubes as a starting point. No fancy tools were used. Just normal box modeling stuff (scale, rotate, extrude, etc…).
Environment set up and materials in Blender
No lights were used in the scene. Everything was set to shadeless. In my case I used Blender and Cycles, so I enabled ambient occlusion and set the factor to 1.
The materials are very simple, just a diffuse node mixed with a transparent node controlled by a black and white texture as mask. This allowed me to control transparency of some objects.
It is very important to remember to change the second option of the image texture node from linear to closest. This helps avoid blurred textures.
UVs and texturing
This was the trickiest part of the process. There is no golden rule for this part. Just remember that we are going for a low res style, so try not to use too much space in the UVs with each object. It is important that we can see the pixels at the end. Remember to apply scale before unwrapping your model (ctrl+A in blender).
My normal workflow for this part is unwrapping the object I want to texture. Then with the Blender paint tools I draw the contour of the UVs and save the texture. Then I import the texture to Aseprite and finish the texture there. For more info about this process you can check my youtube channel. I have lots of timelapses and tutorials about this on YouTube.
Try to keep your textures as an atlas (many objects using the same texture) as this will reduce your materials so your PC has to process less data. Remember to always use square textures (256×256, 512×512, 1024×1024 etc…).
Sketchfab set up
These are the settings that I use in Sketchfab. Just play with the values until you find something you like.
While in Blender you will need a black and white image to use as a mask (black=100% transparent; white=100% color). To control opacity in Sketchfab you can use the same image that you use as diffuse color to control it. Just use a PNG image with transparency enabled and control the opacity from there. So, for example, if you want some part of the texture to be 100% transparent, just erase that part of the texture and leave the transparent background behind.
Also remember to choose the nearest option in the filter mode to avoid blur, just as in Blender.
I hope this guide is useful to you. Sorry about my English…remember that I am from Argentina so my native language is Spanish, not English. If you have any questions, you can write to me on my Instagram and I will answer you as soon as I can.
Thank you for reading and thanks to Sketchfab for giving us the ability to show our work in this amazing way.


