In Art Spotlight, we invite Sketchfab artists to talk about one of their designs.
Hello guys! My name is Juan Puerta and I am Spanish Character artist, currently working at Good Game Studios in Hamburg (Germany). You can check more of my stuff on my Artstation.
I’ve been doing 3d design for about 12 years now. I have worked in low budget movies in Spain, archviz, advertising industry, I even had my own company with some friends…but it was only about 3 years that I really decided to specialize in character art. Since then I’ve had the opportunity to work on creating 3d characters for miniature printing, and now directly for the videogame industry. I feel very lucky and grateful to be able to do what I love for a living. So before I go on I want to thank God for everything!. Also my wife and kids for being what drives me forward; and also a very special thank you to Rich Diamant, Patrick Murphy and Judd Simantov for being my mentors and teaching me what I needed to get in the industry.
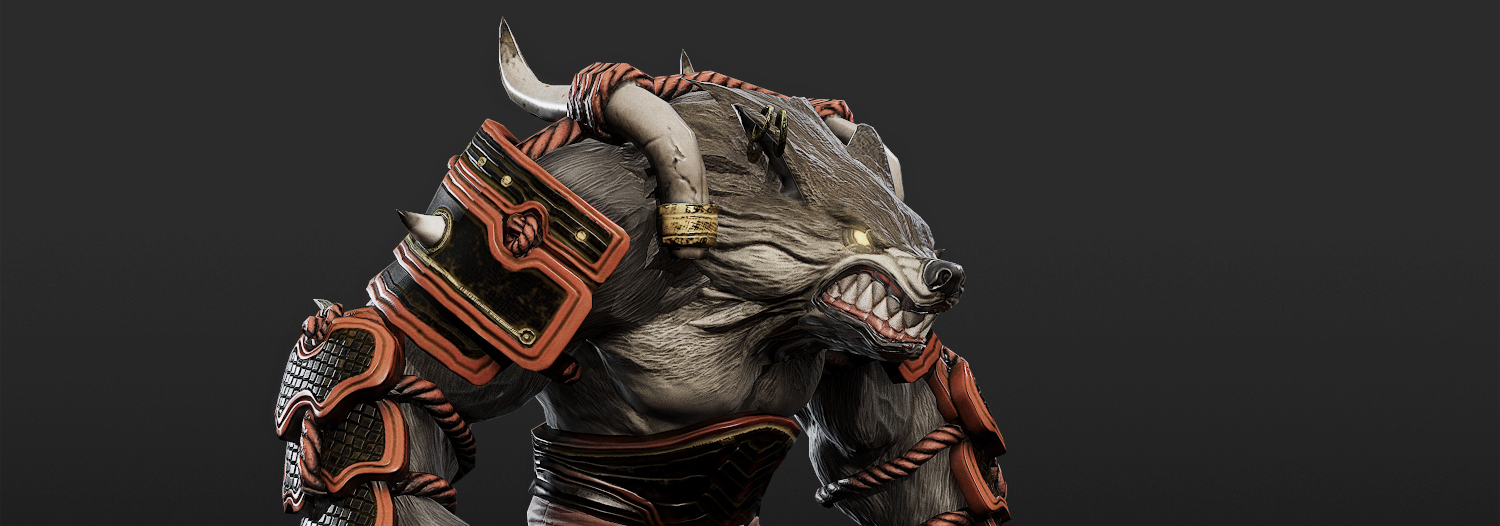
Ok, moving on ☺, about this wolf guy piece, it all started when I saw the amazing design that Andre Meahla did on Artstation, I felt in love with that, and I just had to do it. And this is a very important thing to me when it comes to personal work, I really need to create something that inspires me and makes me want to do it the best I can.
Sculpting
One of the cool things with this concept is that you can see the character without the armor, so it was very nice to figure out the proportions of the body. On every character I make I always create its body, even if it is not going to be seen due to armor or whatever, but creating the full body character really helps to define the placement of the stuff later. If this part is not done right not matter how cool is the stuff on it, it will not look ok.
I started from a Sphere in ZBrush, and went from there figuring out the proportions and using dynamesh all the time. There are not many tricks when it comes to sculpting, just try to get the proportions right, pay attention to the anatomy and the silhouettes, forget about all the details until it looks great without details and then you can add them 😉
Retopology and UV’s
I wanted to keep this model as low as I could, but without losing quality. My aim was to go under 10K but in the end it was 14K. For retopo I used topogun. I try to keep it simple, doing a retopo of each piece individually, so I made upper body and arms in one object, then the legs, arm pads… and so on. As I said I wanted to be as low as possible, so I kept everything pretty low, just trying to maintain the silhouettes of every object. For the ropes, I just created a cylinder surrounding the real ropes, I knew the baking would work fine, since I had tried this before.
Once I get this done, I pass on to the UV’s. I use Unfold3d for this, to me it’s the best tool for UV’s. It is very simple and gets the job done fast and easy. I follow the same approach as for retopo, keep it simple. I just go piece by piece go to unfold, open it and bring it back. For this model I wanted to use just one set of UV’s. So what I did to keep quality in the texture was to get mirrored UV’s in most of the objects. The only ones that I did not do this, is in those which are not symmetric. Then I just attach all the objects into 1 and start ordering the UV’s the best I could.
Baking and Painting
For baking and texturing I use Substance Painter. It’s not for making propaganda but this software is just amazing, the best thing since Zbrush to me. So did all the baking here, which is superfast and easy to do. If I’m having some baking troubles I might bake the objects apart and then put the baked textures together in Photoshop. Once the baking is done, the fun begins. I’m not going to go into a lot of details since the allegorithmic guys have a lot of tutorials on how to use Substance Painter. I mostly create folders for each part that has the same material and use mask to affect exactly what I want to be affected by that material. Later I always add a bit of dirt to all the parts with some of the mask generators. I also painted some details by hand, which is really cool to do here, because you can paint the normal map and make every detail you want without sculpting!. When finished I just export all my maps in PBR, this means, a diffuse, metalness, roughness, and an emissive map for the eyes.
Once I’ve got these maps I like to go into Photoshop and start playing with the diffuse texture. For a kind of more stylize character as this one I like baking a bit of the information from the AO, Cavity map, and also a Light map. This is not very complex to do. Important thing, try to colorize all the maps, don’t use them in black and white, because this kills the texture. To do this simply go to Hue/Saturation adjustment and press on colorize. Just play with it, and you can get some pretty cool results combining all this stuff.
Getting the work on Sketchfab
This was my first time using Sketchfab and I have to say I was delighted by it. The first thing that I love is that you can use you PBR textures without a lot of tweaking, you just need to plug in there the maps and you get a cool result. It’s great when things just work.
Also being able to put my character animated in here was a blast!!, I just made a super simple rig in max with the biped, and animated a simple idle pose. My surprise was that I exported the fbx, get it into Sketchfab and it simply worked, it just felt like sorcery man, so cool. I also love all the Post-Effects that you can use to enhance the look of your model. And make sure to use the lights and shadows, as this will make your character more real; you get to use up to three lights in Sketchfab, which is more than enough to create a pretty cool lighting. Overall I think it is really great to be able to showcase your work in sketchfab, and now even have it animated, that’s just awesome. We all love to check out wires, textures and take a look at how everybody does things, specially recruiters. This is just a great way to showcase your stuff.
So I guess this is an Overview of my workflow, it is the first time I do something like this so I hope it is ok, and you enjoy it.
Thanks for reading, and take care guys.
Juan Puerta.
Thanks Juan!
You can follow Juan here on Sketchfab and on ArtStation, and visit his personal and work websites.


