Hi, I’m Christian Le Roux, 3D Artist at Sketchfab Paris. I was a Character, Environment and Level Artist at Ubisoft before I joined the Sketchfab Team. You can see my personal work in my Sketchfab portfolio. My interests are modeling, textures and tools/new technology. I work in general with 3ds Max, UvLayout and Substance.
We recently added support for height maps to Sketchfab and in this tutorial I will explain how to use them for a nice displacement effect. I will be using 3ds Max, Substance Painter and Substance Designer to create a railroad with Pebbles in the background.
I’ll start by creating the railroad model in 3ds Max, and Substance Painter and Designer to turn the model into a heightmap (among others) that we can then apply to a material in Sketchfab.
Please keep in mind : this technique is frequently used for “tileable” textures, mostly for ground and organic, which repeats in Y and X axes.
My example with railroad is more specific, it’s just to explain”how it works”, so, it’s preferable to keep this technique just for the real “tileable” texture, example, here, my pebbles.
Let’s Start!
In 3ds Max, first create a square plane, (Standard Primitives), e.g. x256 y256 z0 and apply a material with flat color, e.g. R0 G60 B255.
Create the base railroad parts and adjust to match to reference, you can use a plane or box or another standard primitive, I use one box, e.g. :

Add few loop, extrude or bevel, you can use the FFD (Free-Form Deformation) modifiers or make this by yourself.

Then, add details as needed:
Clone your objects until the entire surface of your plan is covered. Be careful with the spacing, keep in mind : when we turn this into a texture, it must tile.

To create the “high poly” of the railroad, for example on my red part, I will apply two modifiers to help bevel the edges: “Chamfer” and “TurboSmooth” modifiers (I use “Chamfer” with smoothgroups option).
PS : Don’t forget to apply different material color to your “categories” of objects, this one is very useful when you need create mask quickly.
Now export the two parts of your model to separate FBX files:
- A (left). Your Plane (name_low)
- B (right). Your Plane with Railroad (name_high)
Baking textures in Substance Painter
Now it’s time to bake your different maps! In Substance Painter this is very straightforward:
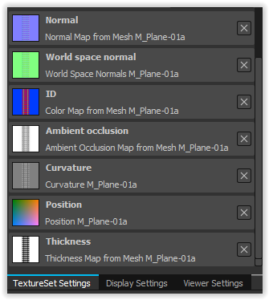
TextureSet Settings > Bake textures > Load your “name_high” Meshes > Bake
For more information about this process, see the Painter documentation.
When you’re done, export all textures from Substance Painter to Designer.
Creating the Ground Material
We’ll now create the ground material using Substance Designer:
Import your Painter’s textures in Designer, in your graph. You can get some example graphs on Substance Share. I will create a kind of pebbles/stone to my background and blend it.
Create (or download) your background graph. Alternatively, you can use Photoshop or another software to create your texture, of course.
Blend your background graph with your Painter Textures:
Finally, export your Substance Designer Texture: Right click on your graph in the explorer panel and export outputs as bitmaps.
Bringing it together in 3DS Max
I’ll now prepare our mesh for using the displacement map. Each pixel in your texture is going to be a “height” information, the “Height Map” is a grayscale, ie. it has shades of gray. According to the shades of your pixel, it will determine if your vertex is going to be high or low.
For a displacement map to work, I add a subdivision modifier to prepare a finely subdivided mesh – Sketchfab can’t do this for you in real-time (this is a limitation of WebGL). I will create a plane of one million vertices for the example.

Publishing on Sketchfab
I won’t go into detail for all the settings of this scene, just the displacement map part: in the Materials tab in the 3D editor, select the ground/rails material and load the height map into the Displacement slot.
Carefully set the Displacement value – my Railway displacement value is set to 5. If you go too high, crazy things will happen 🙂
- Displacement Value 5
- Displacement Value 100
Final result
That’s it! I hope you found this introduction to Displacement Maps on Sketchfab useful. If you have any questions please feel free to write a comment or contact me.


