To celebrate the release of 3DF Zephyr Free we are re-publishing this tutorial from our friends over at 3dflow.net on how to get started with this software!
Check out the results in the embed below and if you use this tutorial be sure to upload your own version of the cherub and share with us by dropping a link to yourversion in the comments.
https://sketchfab.com/models/f0ca8e8ffb2445e4843ff7096fe07895
In this recipe, you will learn the basics and you will see how easy it is to turn your pictures into accurate 3D models with 3DF Zephyr.
3DF Zephyr is a powerful tool that requires a lot of computation power. Though not mandatory, a CUDA device is recommended as well as a high amount of memory.
Step 1 – Getting ready
Creating 3D Models from pictures requires a good dataset. You can follow this tutorial with your own pictures or try it with our sample dataset. If you want to take your own pictures, please follow these base guidelines that will teach you the best practices to acquire a dataset.
If you want to use our dataset, please download this zip file and extract it so that you can use it in Zephyr.
![]() Download 3DF Zephyr Tutorial 1 Dataset – Cherub (531MB)
Download 3DF Zephyr Tutorial 1 Dataset – Cherub (531MB)
n.b. This dataset includes more than the 50 image limit 3DF Zephyr Free allows but you will still get great results loading in the first 50 images.
After preparing your dataset, install 3DF Zephyr on your computer and that’s it! That’s all you need to start using 3DF Zephyr.
Step 2 – Creating a new project
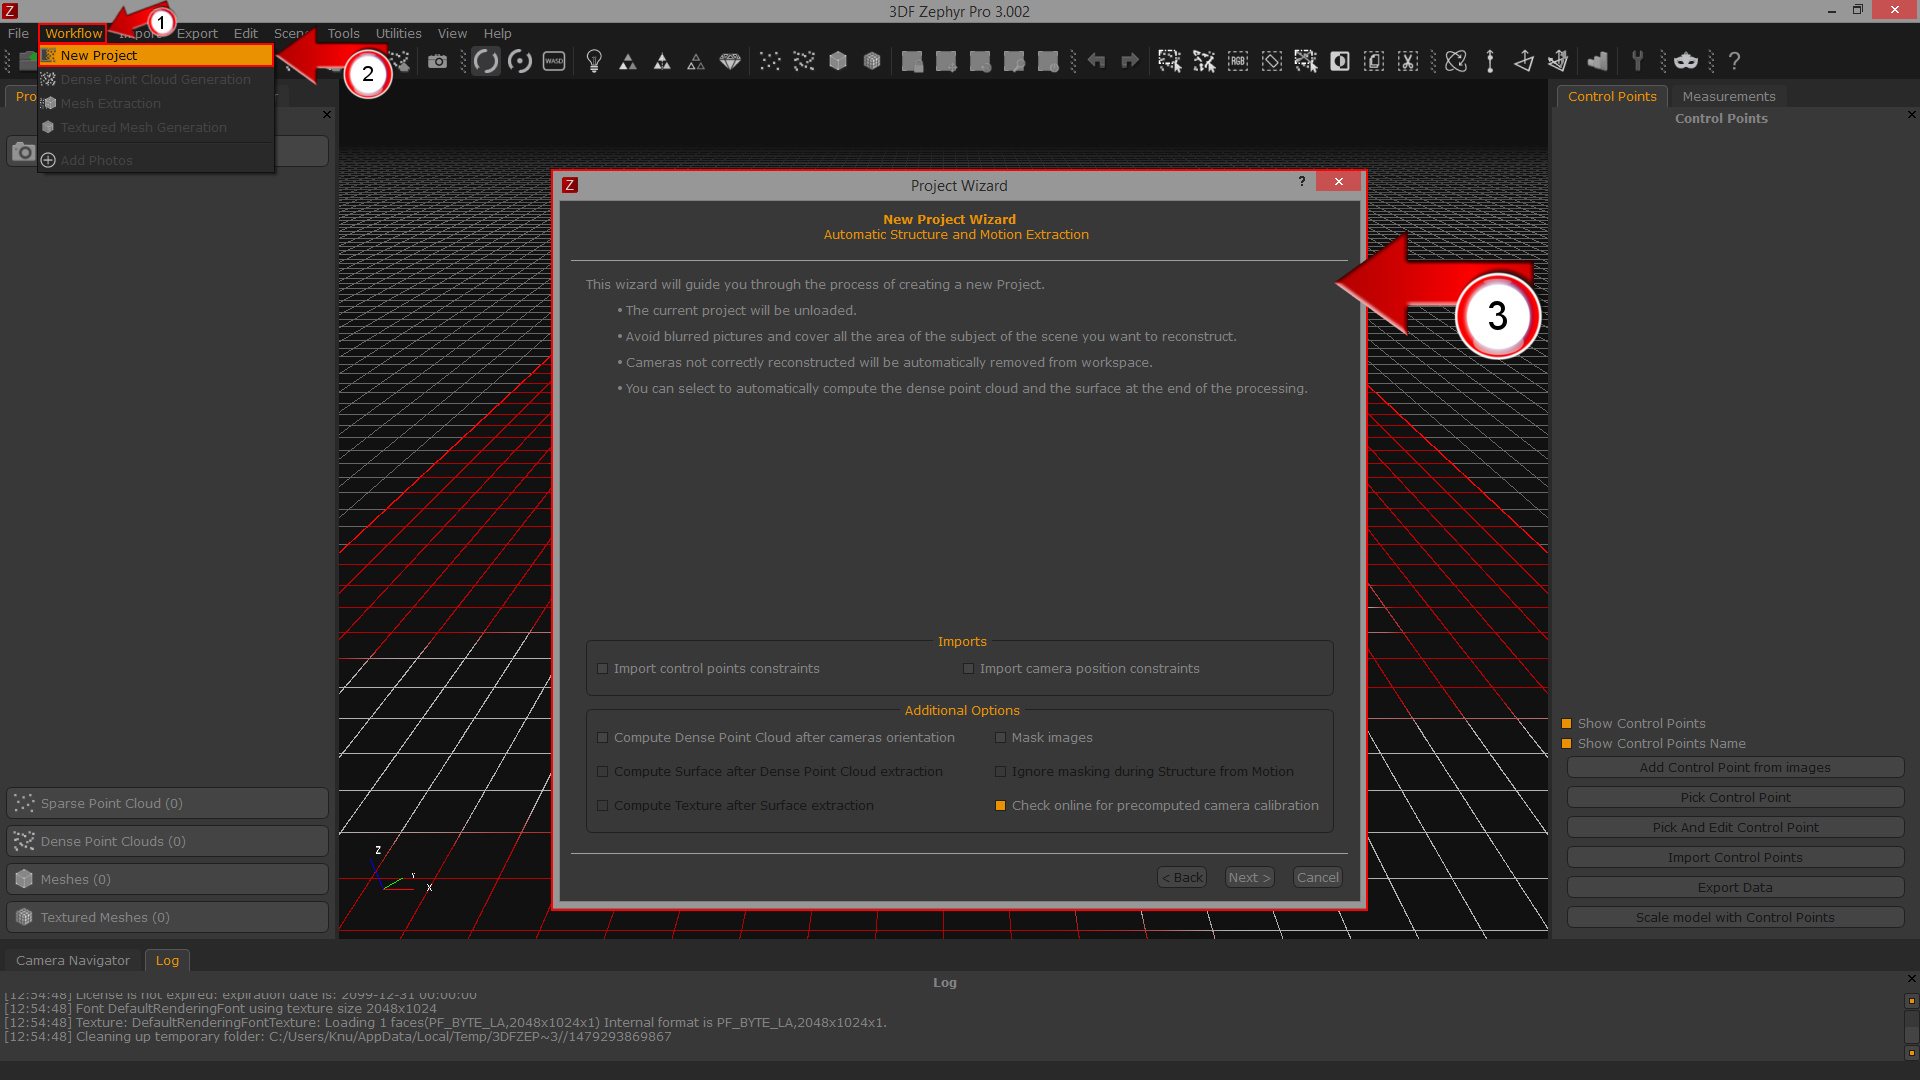
To create a new project,click “Workflow” (1) and then “New Project” (2) . The “Project Wizard” (3) screen will appear which will guide you through the process of importing your pictures.This phase is critical for the scene reconstruction, so please feed 3DF Zephyr a good dataset: blurred images and dataset with no overlapping pictures are examples of bad data for 3DF Zephyr. You can learn more about the most common guidelines on this quick guide titled “how to acquire pictures for 3DF Zephyr“.
To continue, in the “Project Wizard” screen click “Next” in the lower right corner.
Protip: there two options in the lower left corner of the Project Wizard (3) that allows you to automatically compute the dense cloud and the surface. This is useful for bigger dataset. Leave them unchecked as in this tutorial we’ll walk you through both those steps. Another option (checked by default) allows Zephyr to download camera calibrations where available: we suggest to leave this option on – although Zephyr is completely autocalibrated, the online camera calibration can speed up the first phase and help with some fisheye lenses.
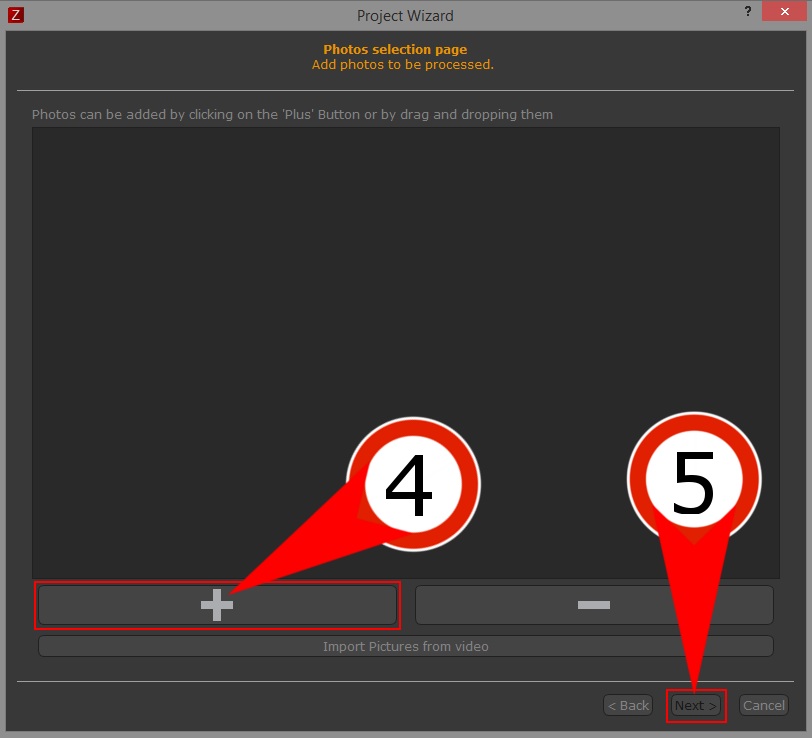
This next window is the “Photo selection page“, in which we need to add the photo that we want 3DF Zephyr to process. Click on the “plus sign” (4) and browse to the directory where your dataset is located. Select all the images you previously extracted and then click open (or drag and drop images directly from the windows explorer)The “next button” (5) will now be clickable. Click it and you’ll get to the next window, which will allow you to assign camera calibration parameters to loaded pictures.
Protip: advanced users can add a previously generated manual camera calibration (if available) by checking the option in the lower left corner of this window.
You will be now taken in the “Camera Calibration Page” Window. This topic won’t be covered in this tutorial, so just click “Next“.
You are now ready for the first computation phase. Here’s a brief explanation of what will happen: Zephyr will analyze each image and find the features of the images (points of interests that the computer can understand) and compare each image with (usually a subset of) the other pictures: this is done to set the cameras in the correct position. Before doing that though, it’s necessary to tell Zephyr which settings to use. For the this tutorial, we will use the preset mode with Close Range/Default settings.
Step 3a – camera orientation and sparse point cloud generation, preset mode
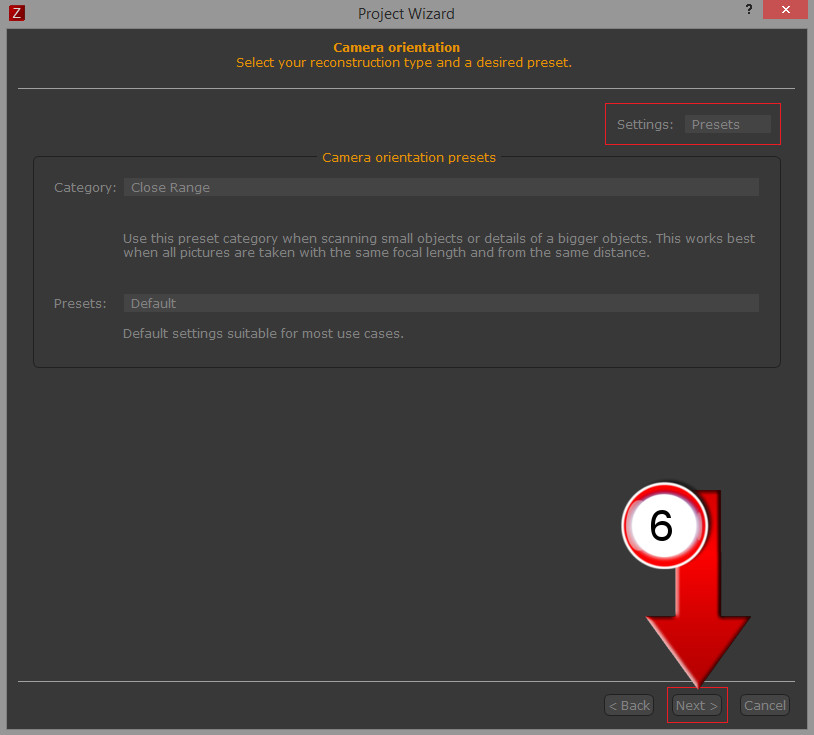
The preset mode window will appear.
The preset mode allows you to pick optimal settings for most cases, depending on the application scenario (dropdown menu “category“) as well as the accuracy and computation speed required (dropdown menu “presets“). For this specific case for example, you can pick close range as category and default as preset and then experiment with different settings.
We will anyway have a quick look at the reconstruction settings: you can switch to advanced mode using the drpodown menu in the top right corner and selecting “advanced” and proceed to step 3b. Otherwise, you can click the “Next Button” (6) and then “Run”, which will start the computation which will take you directly to step 3c.
Step 3b – camera orientation and sparse point cloud generation, advanced settings
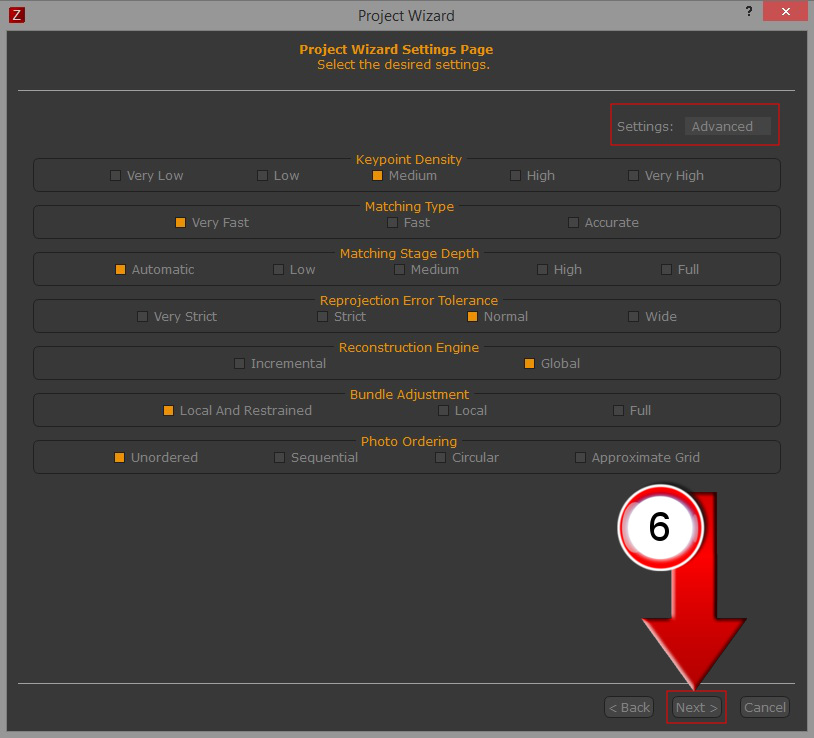
The advanced windows setting allows you to tweak and control every aspect our reconstruction engine. We will discuss these advanced parameters in another tutorial, although you can also find an in-depth explanation in the manual as well.
Use again the dropdown menu in the top right corner to go back to preset mode, select Close Range and Default and then click hte “Next” Button (6).
When you click the “Next Button” (6) you will be ready to start the computation and you will be presented with a “Run” button. This phase will output a sparse point cloud and the will do the camera orientation. Click run to start the computation.
Step 3c – Reconstruction outcome
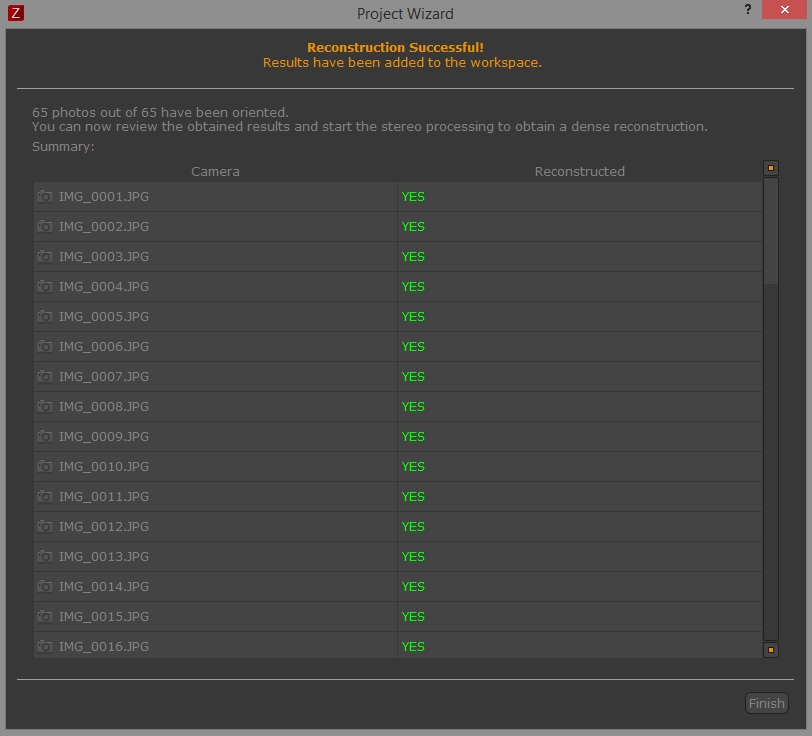
After a while, you should see a “Reconstrucion Successful!” dialog. This window will tell you how many (and which) images were correctly oriented. Double clicking the filename will open the appriopriate picture in your default image viewer. This is especially useful when dealing with large datasets to quickly understand which cameras weren’t reconstructed succesfully.
Click “Finish” in the lower right bottom of the screen. Congratulations!
You have generated your first sparse point cloud in 3DF Zephyr.
Step 4 – Moving around
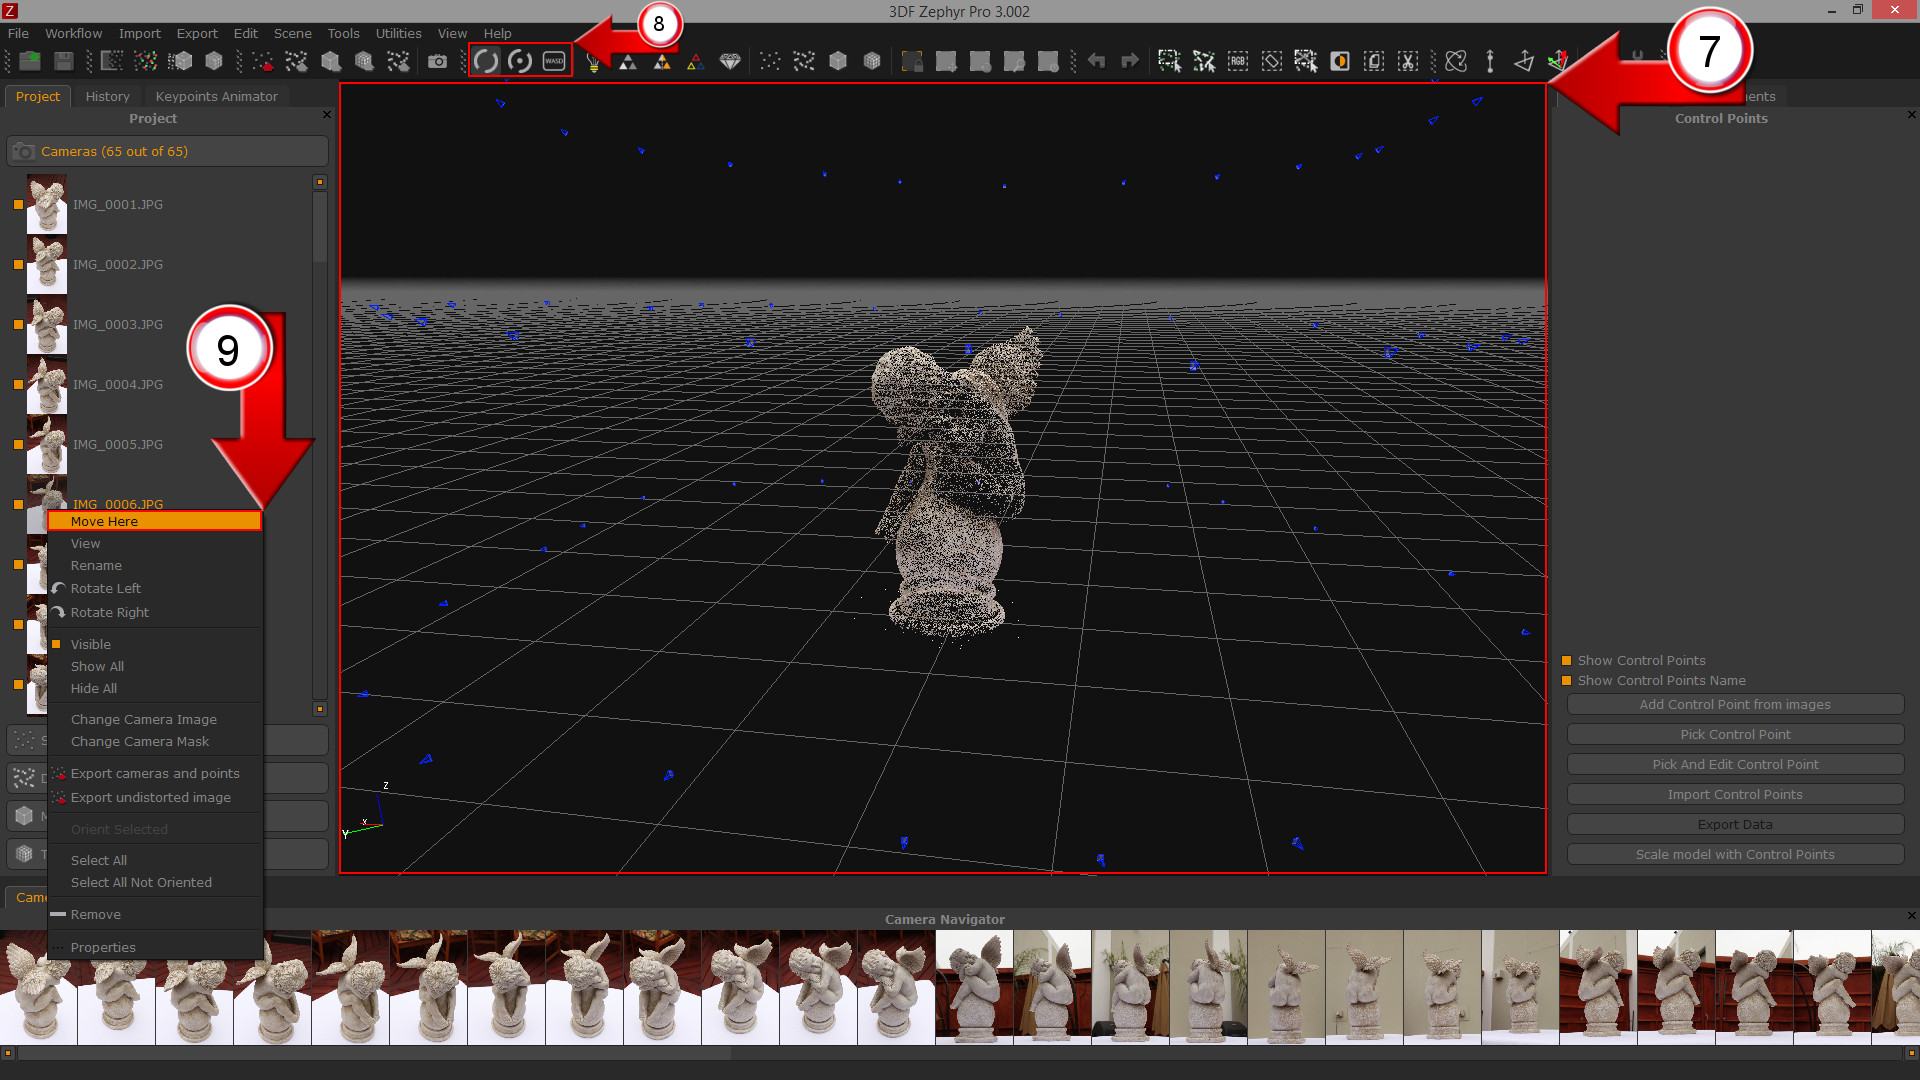
Before moving to the next step, lets learn the basics to navigate the scene, which is rendered at the center of the screen (7).
By default, you can navigate the scene in orbit view mode: while hovering the mouse cursor on the scene (7) hold left click and then move your mouse to look around. To zoom in/out simply use the mousewheel. You may also pan the view by keeping left control pressed and moving the mouse cursor.Zephyr offers three navigation systems that can be selected with their respective icon (8) or from the Scene > Camera submenu.
The orbit view mode with pivot behave exactly like the orbit view mode, however, the pivot is not the center of the reconstruction but picked every time on the model on the cursor position.
The free look mode uses the classic first person shooter WASD keys; Holding the left mouse button and moving the mouse allows you to rotate the camera and the ‘q’ and ‘e’ keys allow you to move respectively Up and Down.
You can also move quickly to a camera position by right clicking on a camera and then left clicking on “Move here” (9) or by using the camera navigator at the bottom of the screen.
Step 5 – Dense point cloud generation
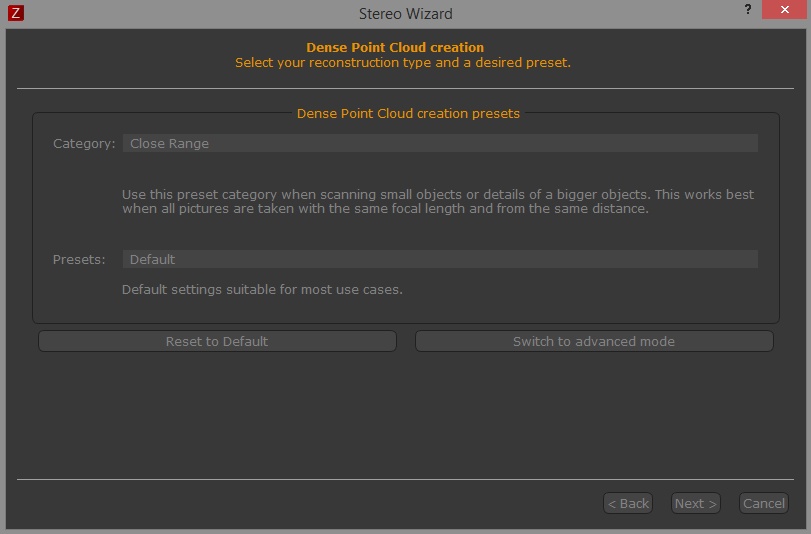
Now that the cameras are positioned, we can extract the dense point cloud of our 3D model. This time, from the “Workflow” (1) Menu choose Dense Point Cloud Generation. The “Dense point cloud Generation Wizard” will appear, click “Next” in the lower right corner of the screen.
At this stage, 3DF Zephyr will compute depthmaps and extract the dense point cloud.
These settings can significantly change the quality of the output as well as the computation time needed and every aspect can be tuned in the advanced window, but right now just leave again the preset Close Range/Default and then click “Next” in the lower right corner of the screen.
Click “Run” to start the dense point extraction (second phase of computation to create the 3D mesh).
Once the dense point cloud generation has completed, click finish to proceed to step 6, where we’ll be able to extract the mesh.
After the computation, a “Dense point cloud generation successful” dialog should appear: click “Finish” in the lower right corner of the window. You can navigate the scene of your new dense point cloud or proceed to the final phase of the computation.
Step 6a – Mesh extraction
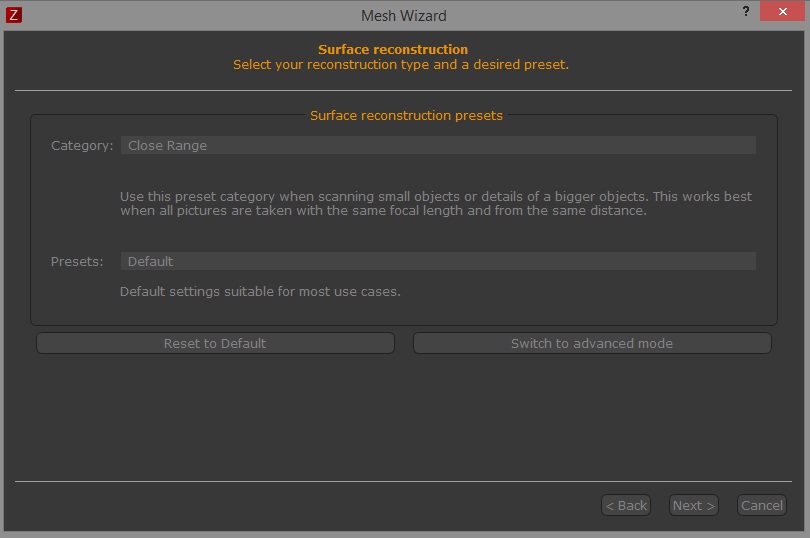
To start the mesh generation process, simply click “Workflow” (1) and then on Mesh Extraction.The “Mesh Generation Wizard” window will appear.
Since the workspace is capable of holding multiple point clouds, we have to choose which one we’ll be use for the mesh extraction. Since we just have one, we can simply click “Next” to get to the “surface reconstruction page“.
Once again, you can snoop around the advanced settings if you wish, and the select again the presets “Close Range/Default” and click “Next” in the lower right corner of the window.
To start the mesh creation, just click on the “Run” button: when the “Mesh Creation Successful” dialog appears, just click “Finish” in the lower right corner of the window.
Step 6b – Textured mesh generation
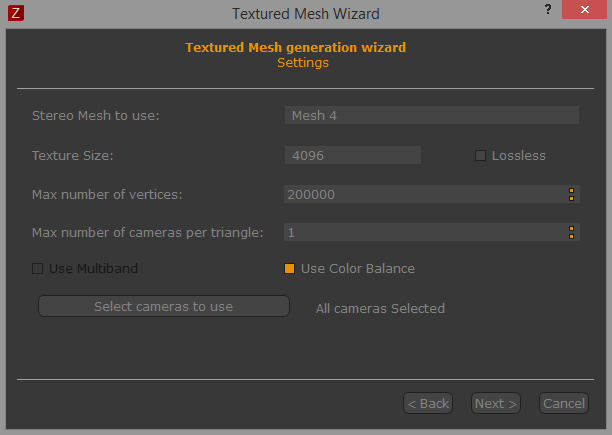
Once the mesh has been generated, the color information will be saved per-vertex. This might be fine for some applications, though usually a texture is required as well. In Zephyr, this is a separate step that takes in input the mesh generated in step 6a.To start the texture generation process, simply click “Workflow” (1) and then on “Textured mesh Generation”. The Textured Mesh generation window will appear.
Select the mesh previously generated and if you wish, tweak the settings according to your desired output. Please note how the color contribution will vary depending on the maximum number of cameras per triangle, as well as the possibilty to use the multiband setting for cleaner and sharper borders.
It’s reccomended that you leave 1 camera per triangle and Use Color Balance enabled. This feature, available since Zephyr 2.0 will automagically fix the lighting issues and pick the best possible color for each point. You can still use more than one camera per triangle and the multiband option if you wish (even paired with color balancing) however for most cases the best results can be achieved with 1 as “max number of camera per tirnagle”, multiband disabled and use color balance enabled.
Click “Next” to start the texture mesh generation.
Step 7 – Exporting to Sketchfab
You can export your generated mesh directly to Sketchfab! First, click “Export” in the top menu and select “Export Textured Mesh”.
In the “Mesh Export Window”, select “Upload to Sketchfab” in the “Export Format” dropdown. You can leave the other settings as they are. Click the Export button.
In the next dialogue, enter you Sketchfab API token and give your model a name, description and relevant tags. Hit upload to begin uploading. This will take some time depending on your the size of your file and connection speed.
Step 8 – exporting the final mesh locally
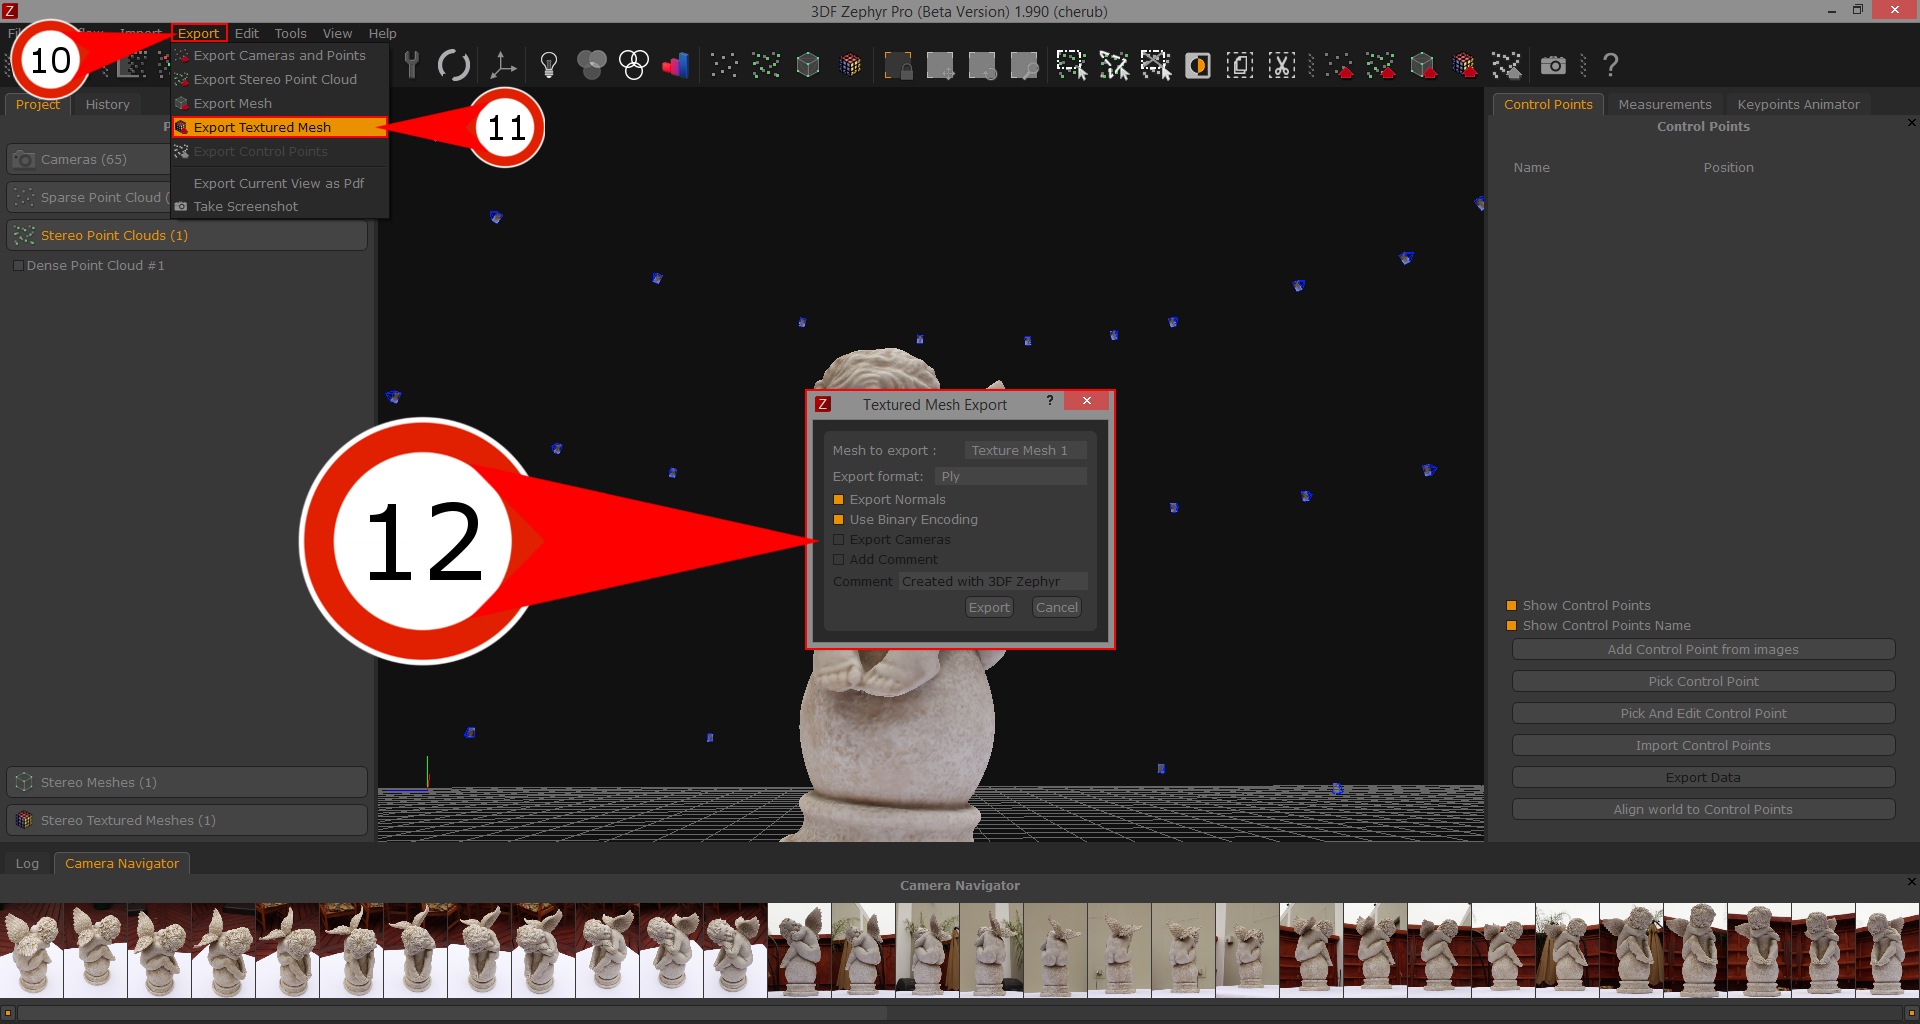
To export the generated textured mesh, simply click on the “Export Menu” (10) and then on “Export Textured Mesh” (11): the “Mesh Export Window” (12) will appear.
3DF Zephyr allows you to export in the most common and used file formats. As development goes on, new file formats might be supported, so it’s important to keep your 3DF Zephyr up to date.
Different options are available depending on the file format chosen. As a standalone 3D model viewer you can use your program of choice (for example, Meshlab).
When you are ready to export, simply click on the Export button in the lower right corner of the mesh export window. The texture generation topic will be covered thoroughly in another tutorial.
Final notes
Opening your exported mesh in your model viewer of choice, you should now see something similar to this output. Your reconstruction should also have some parts of the white table below the cherub (which the reconstruction here does not have). Continuing in this tutorial series, you will learn more than one way to polish and clean your reconstructions.
Learning the basics is easy, but understanding every aspect and the effects of every options takes a bit of time and experience: remember that we have our online documentation as well as a forum where you can ask specific questions.
If you had fun trying this tutorial, be sure t o share the results on Sketchfab and pop a link to your model in the comments below :)


