About the project
The goal of our project is to make biological museum specimens more accessible to researchers and the public through 3D macro photogrammetry. There are over a billion specimens in the world’s natural history collections, which take many forms, including whole preserved animal specimens. These specimens, scattered across the world’s museums, are a collective catalog of Earth’s biodiversity and contain answers to a limitless number of questions about how life has evolved and the increasing human impacts on the natural world. While efforts to digitize collection holdings are growing, workflows for producing realistic 3D models are still in their infancy and could be transformative for access and use of collections.
3D models hold the promise of opening the virtual coffers of museums to scientists, artists, and the public by reducing barriers to access. At the Moore Laboratory of Zoology at Occidental College, we have a collection of 65,000 bird specimens, most from Mexico collected between 1933 and 1955. It is the largest Mexican bird collection in the world and represents a snapshot in time of what bird diversity was like in Mexico before the mechanized human impacts of the mid-20th century. While the Moore Lab’s holdings are digitized, georeferenced, and available to search over an open-access database, few specimens are photo-digitized. Researchers and the public access physical specimens by visiting the collection or by receiving specimens sent through the mail to other institutions.
Certain important specimens, called type specimens, are never loaned and must be viewed and measured in person. Type specimens represent the first description of a new species, and they provide the link between a species name and its physical representation in nature. Without type specimens, it would be impossible to describe many new species because we wouldn’t know what we had already found. The Moore Lab contains 81 type specimens. As a test case, we sought to create realistic, measureable 3D type specimens that can be linked to digital records in our database.
Biography
I’m Josh Medina, a senior undergraduate student at Occidental College and technical artist who developed this procedure. I’ve been playing around with code and 3D for as long as I can remember. After getting hooked on Scratch.edu in the 3rd grade, I spent a good portion of school teaching myself various 3D packages and programming languages. My mom was a composer and my dad was a molecular biologist, so the science-art divide was always shallow at my house growing up.
Digital media is compelling for me because anyone in any field can contribute and collaborate. I got into digital art for the stories (I’m a classics major), but once I found out about the bird collection, I thought it would be a great application for digital art. On this project, I’ve worked with a studio art major, a history major, a biologist, a photographer, ornithologists, and geneticists.
The birds are incredible, but they also pose a huge challenge. Previously, I’d used photogrammetry to scan solid, matte-surfaced objects like bones or man-made objects like stone sculptures that have a predictable topology. The bird specimens are very small and delicate, with intricate, organic forms. Feathers layer and ruffle, shimmer and sheen — all qualities that make scanning them a unique sort of puzzle. It’s also why we needed 3D in the first place: the remarkable plumage patterns play with light and texture in a way that 2D photos can’t capture.
We started with a set of type specimens as well as a set of colorful tanagers, but we wanted to create a method that scaled to thousands for the future. Below, I’ll talk about our three biggest challenges and demonstrate techniques we’ve found helpful to overcoming them.
The challenges:
- The birds are small, organic, and difficult to scan;
- The specimens are part of a large collection, making automation necessary;
- Some birds have features (like iridescent feathers) that the initial scan can’t capture.
1. The birds are small: High-resolution macro photogrammetry
Organic detail has always been difficult in photogrammetry, especially with small objects. To get the kind of detailed we wanted, here is what we did.
First, we took digital photos with a 90mm macro lens. This lets us get the detail we need to recreate fine geometry and maintain the accuracy needed for precise measurements. We used a tripod with studio lighting, so we could bump up the f-stop to get the specimen in focus for every shot. For larger specimens, we also have a 15mm wide-angle lens for the alignment pass of the scan, supplemented with a detail and texture pass using the macro lens. Some software supports multiple lenses more than others. I’ve had good luck using Reality Capture.
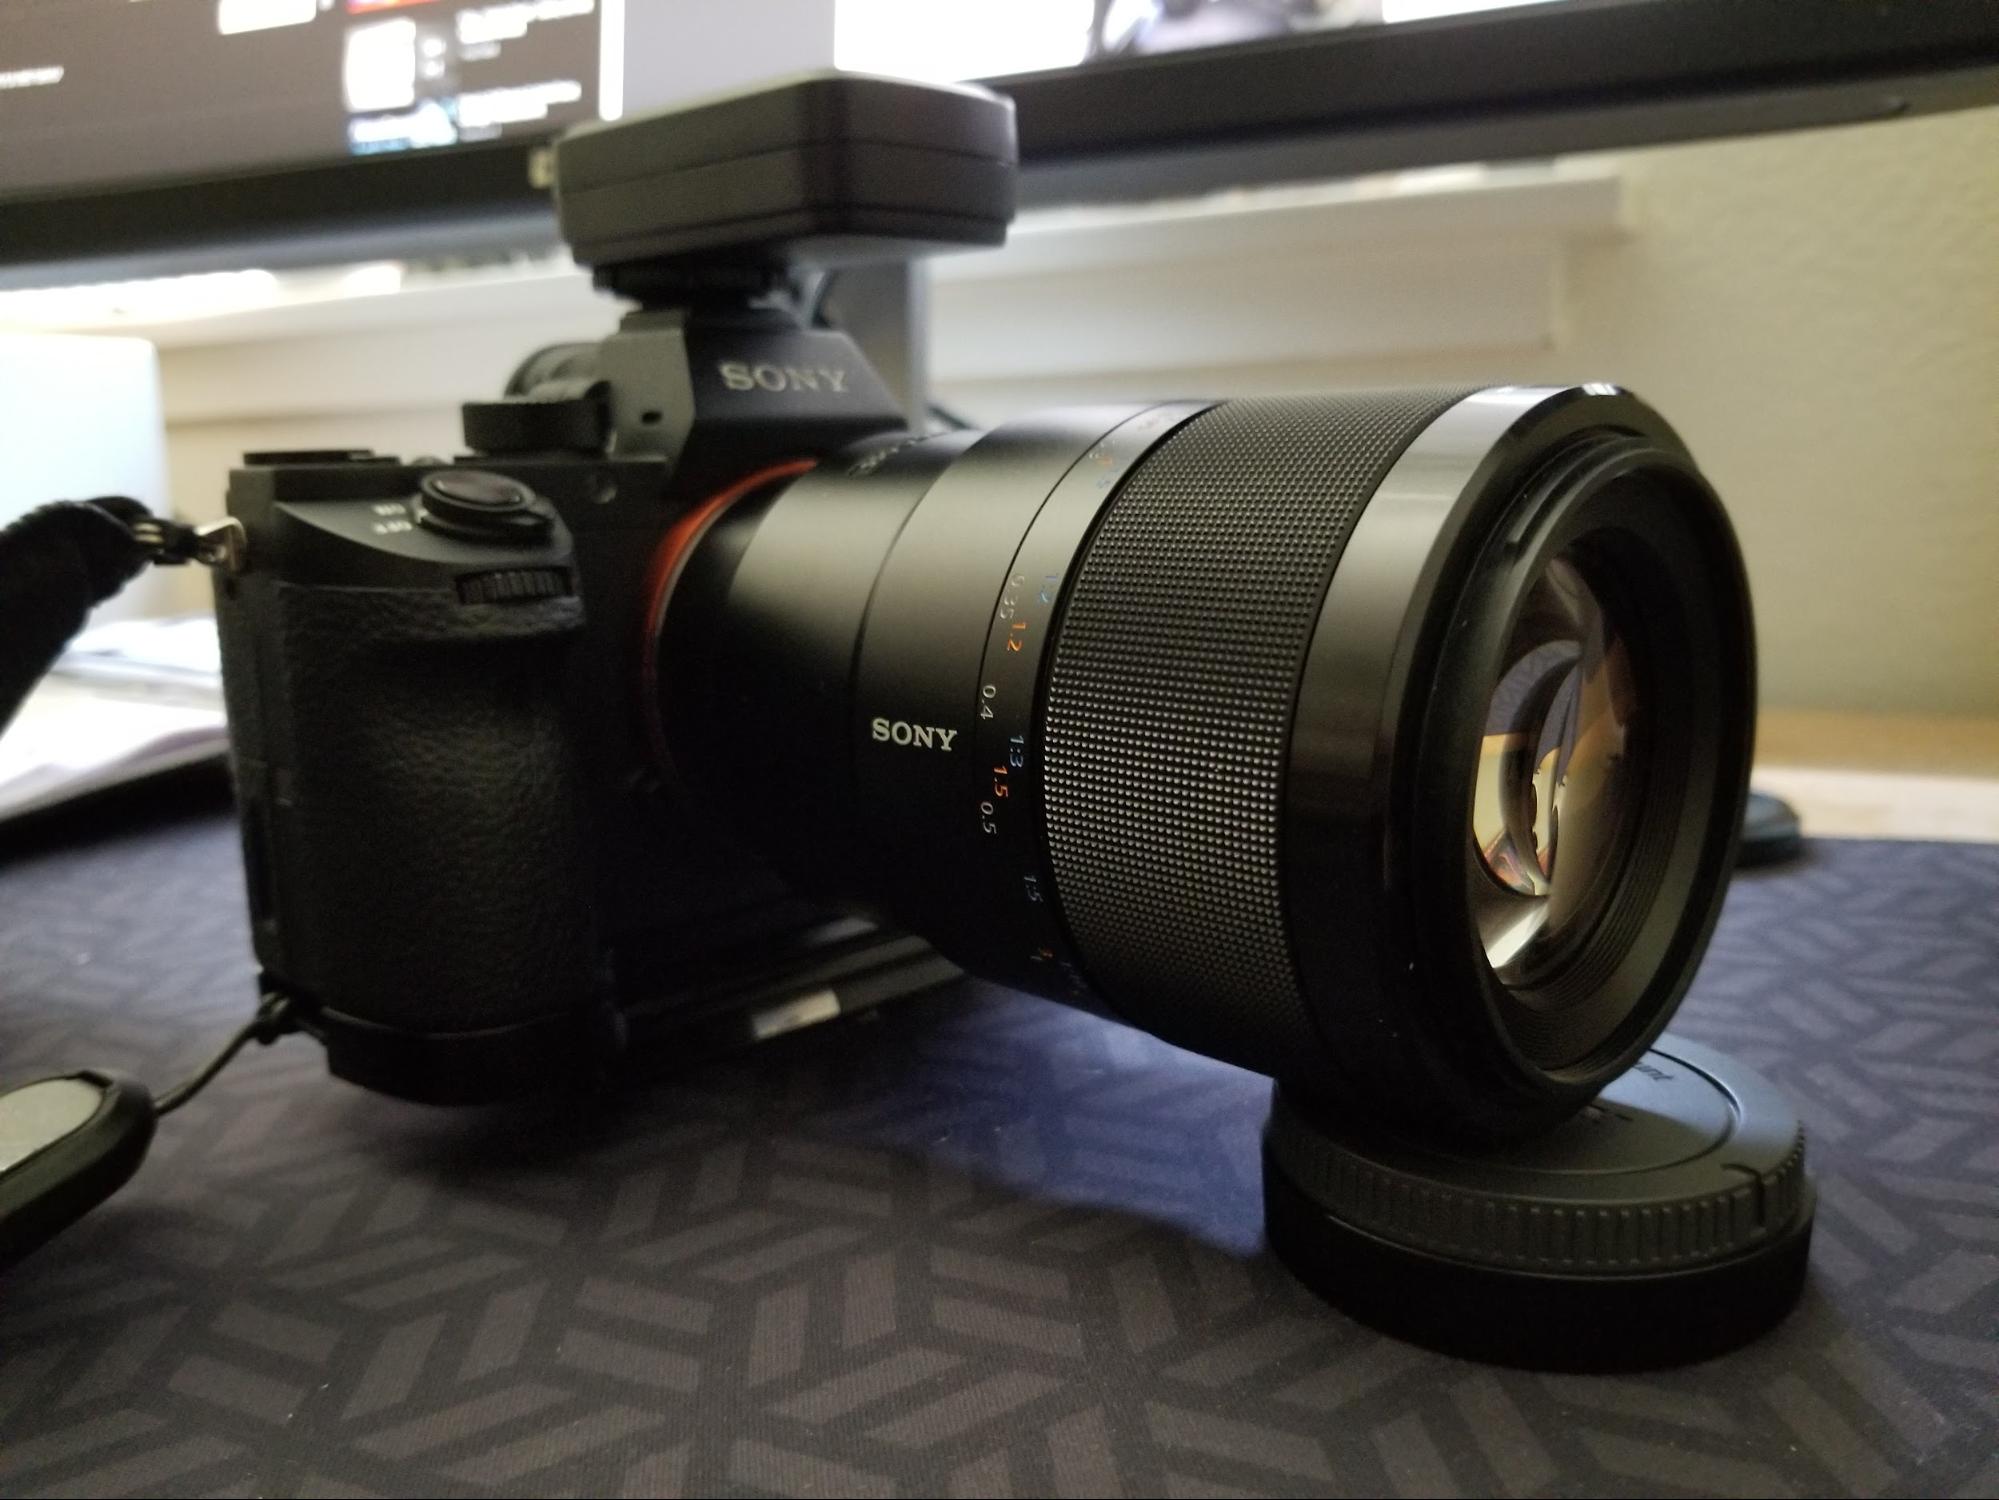
Second, we used a high-resolution sensor. We are currently using Sony’s a7rii, a mirrorless camera with a 42mp sensor. This gives us approximately 8k resolution per image, which obviates the need for secondary close-up detail passes or a zoom lens, simplifying the shooting procedure, as we eventually want to scale up the throughput to thousands of specimens. A mirrorless setup lets us troubleshoot lighting conditions and image sharpness in real time through the display.

The final step is ensuring extra coverage. Small details are easily lost between photo angles. We try to get as much coverage as possible with every grouping: 96 shots per rotation at 3 angles and 2 orientations. This would be incredibly tedious to do by hand, so we fabricated a motorized turntable that could also operate the camera.
2. The birds are many: Automating photogrammetry
If the goal is to scale up photogrammetry to capture thousands of specimens, efficiency is a must. Fortunately, nearly every stage in the process can be optimized through automated and procedural workflows. With enough practice and patience, everything from initial shooting to export into Sketchfab can be incorporated into a largely seamless workflow.
As I mentioned, for shooting photos we used a turntable. We needed one that could talk to the shutter release on our camera, which we found in an electronic ComXim turntable (MT200RUWSL) With the press of a button, it will split a rotation into x number of photos, turn after a photo is taken, then signal the shutter release for another shot after the rotation is complete. We found, too, that the delay essentially works in time with the shutter speed, which is convenient.

File management quickly becomes an issue, and the importance of a proper directory can’t be overstated in large-scale digitization. We ended up automating most import/export, file renaming, and storage operations using custom python code, along with other tasks like photo-processing batches in Lightroom and masking batches in Photoshop. I usually have these processes running in the background while filling out an entry for each scanned specimen. It is helpful to record precise file directories in the write-up for each shoot — and don’t change them!
Mesh and texture processing is especially important for objects that require full resolution for scientific study. This sort of work can be some of the most difficult in photogrammetry. Perhaps our single biggest breakthrough for speed and automation was the use of procedural workflows in Houdini and Substance. Houdini let us speed through mesh optimization, adjusting the node graph to accommodate new types of specimens, but otherwise keeps the process essentially automated. And since it’s all non-destructive, nodes and parameters can be tweaked on the fly whenever you want to expand or prioritize one part over another. Procedural work lets you simplify and optimize tasks that take multiple iterations to get right, like automatic UV or retopology. Complicated tasks such as albedo de-lighting and complex map baking for PBR are a dream thanks to Substance, and can essentially be fit right at the back-end of your mesh pipeline in Houdini.
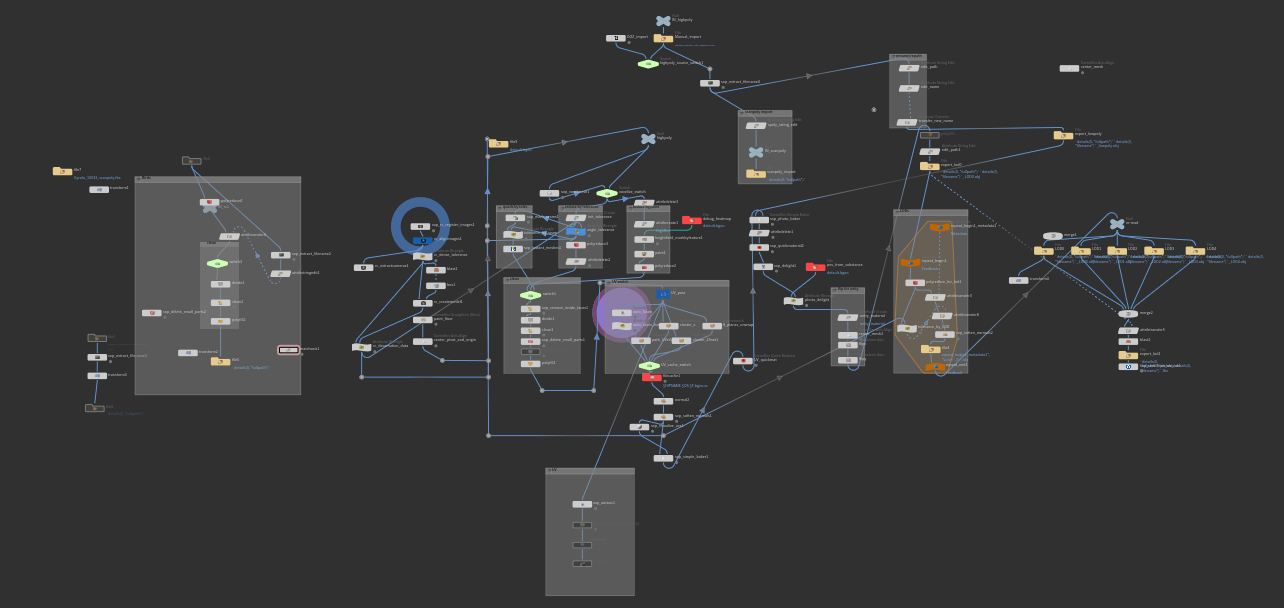
Here is a visual overview of our core pipeline in Houdini, split into a column for initial scanning, mesh processing, retopology, UV and texture baking, LOD generation, and general file management.
Below are three different retopology techniques we use, each at less than 1% the polycount of the initial mesh. The first is decimation based off an angle-tolerance decided by the minimum scale accuracy we need for a particular model. The second is decimation based on areas of interest, where certain select areas (like bill or tail) are given higher polycount than other areas. The third is part of our subdivision procedure for making models for VR with subdivided levels of detail.

Last, we tend to scrub through a few different automated UV methods that project in different ways, then choose the best result for our use case. Despite the extra calculation, we find this to be less time consuming than manually drawing seams, yet also more efficient and flexible than using the UV projection present in most scanning software. Here is an example of one scanned texture split over five different types of UV projection:

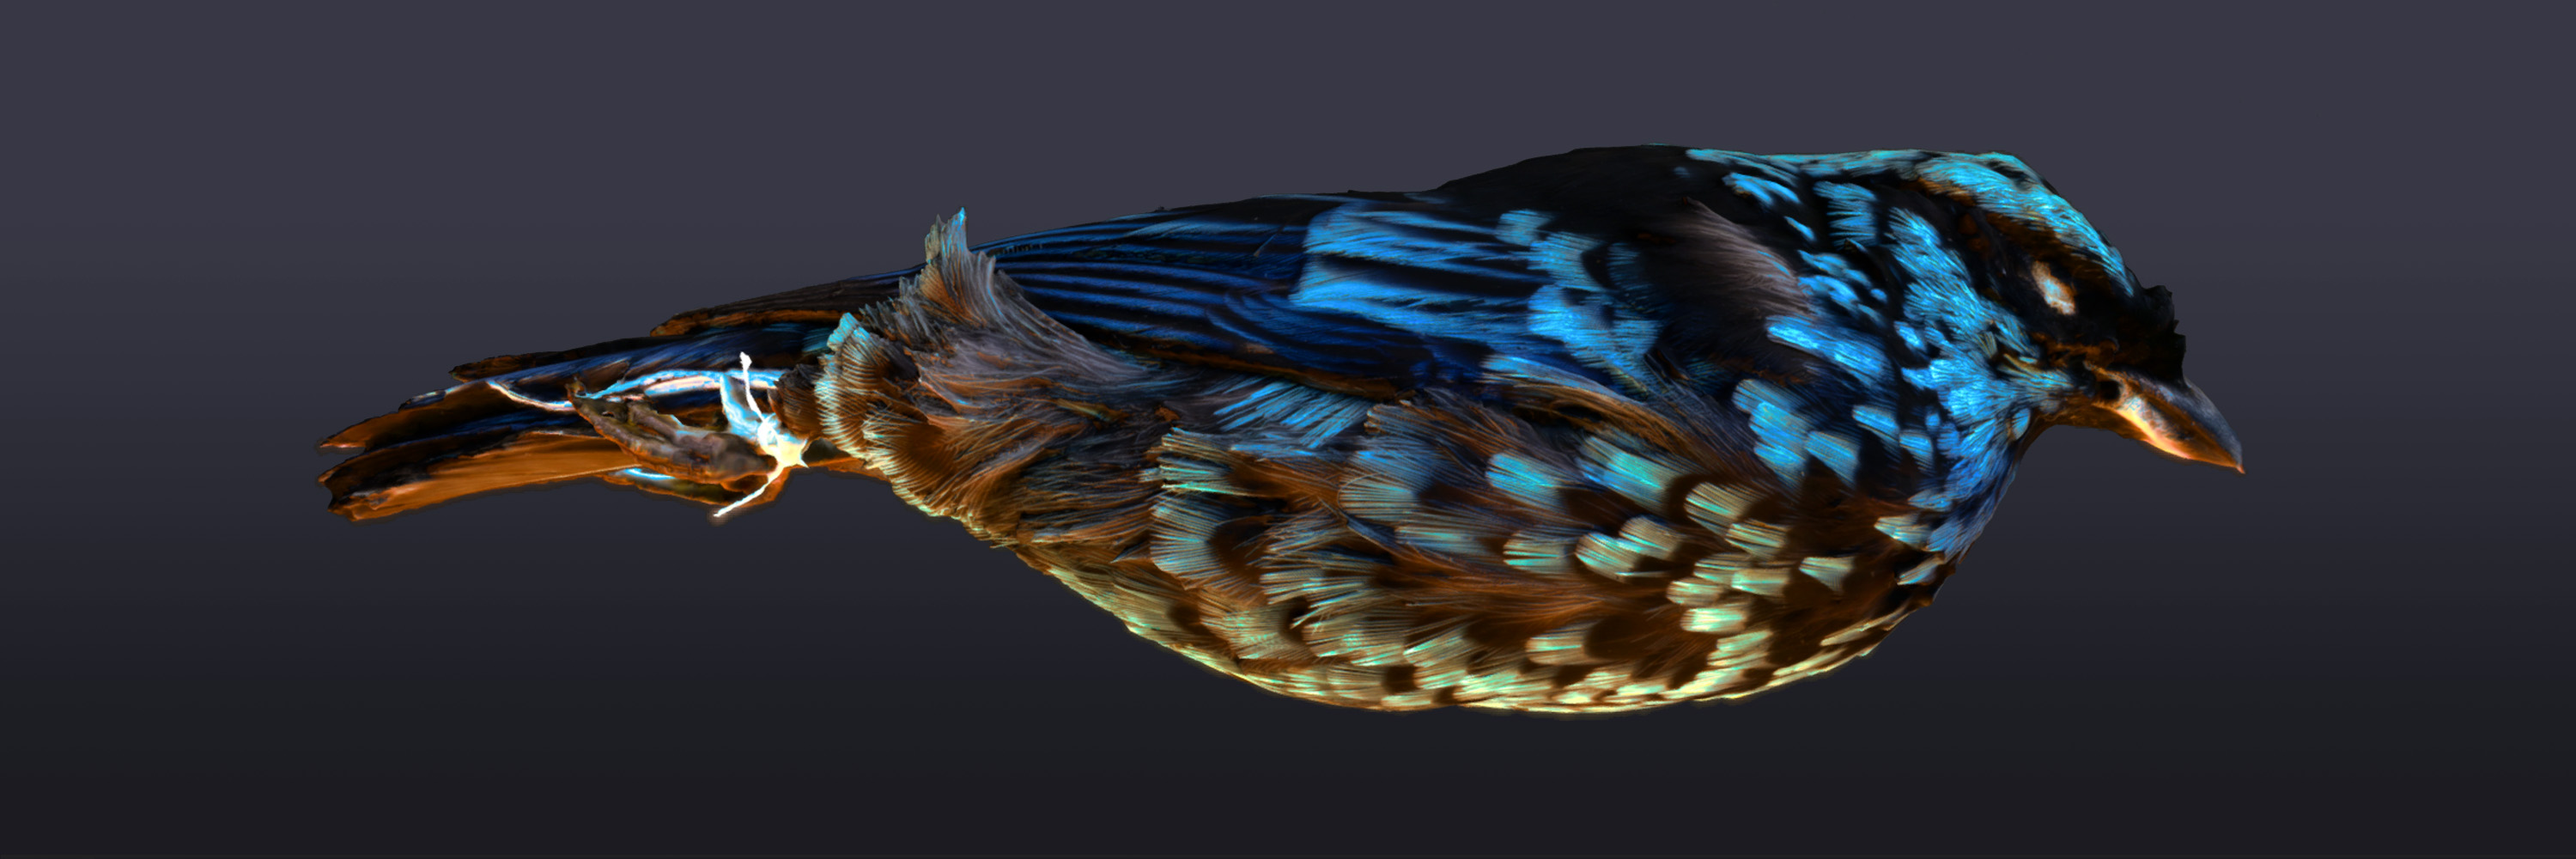
3. The birds have complex feather structure: PBR and photogrammetry
Real-time rendering and PBR is compelling for museum specimens, because simulated lighting conditions and textural detail can tell you things about a specimen that shape and surface detail alone cannot. The advantages of 3D digitization have not been fully realized until you have explored physical features that might be lost to photos (and basic scans) alone, like abnormal reflectivity and iridescence caused by refraction on the microsurfaces of bird feathers. Other techniques such as subsurface scattering might be used to approximate shell thickness in sea shell scans, for instance. Simulations like these can be especially important when public access and showcase is a priority, or when the demonstration of these visual phenomena is important to the research goals.
Here is one of our latest experiments with complex lighting and iridescence that I’ve uploaded to sketchfab:

Sketchfab remains a remarkable platform for showcasing these details, as well as hosting and sharing large 3D files. Science is all about trying new things and seeing how they fly (pun intended). Sketchfab has allowed us to demo our ideas and get feedback from the community in a way that we wouldn’t have otherwise been able to.
The future
We have been experimenting with virtual lab tools that make use of real-time rendering. We have also made a VR-accessible lab where you can manipulate and measure the lab specimens, and even scale them up to 500% their actual size for more precise (and scary-looking) measurements. We hope to add color measurement in the future. If we can catalyze research that would not have otherwise been possible, then our efforts will have been a success.
Acknowledgments
This project was funded by the Moore Lab endowment funds and Occidental College Summer Research Program.
Moore Lab’s Instagram / Moore Lab’s Website / Email Prof. McCormack / Josh’s Website / Email Josh
About the author
Josh Medina and John McCormack
Josh is a student researcher at Occidental College and freelance technical artist and John is the Director of the Moore Laboratory of Zoology at Occidental College.