Easy-peasy Touch Screen Interactive
Do you have 3D assets on Sketchfab? Would you like to show them off in a public space?
Now you can, with the open-source touch screen interactive by the National Historical Museums and RaySpace AB.
Part I: Museum Goals
Introduction
My name is Erik Lernestål. I am a photographer at the National Historical Museums in Stockholm, Sweden. We are a government agency under the Swedish Ministry of Culture and we have six individual museums as well as the country’s largest outfit of archaeologists under our wings.
- The Hallwyl Museum (Sketchfab account)
- The Swedish History Museum (Sketchfab account)
- The Royal Armoury (Sketchfab account)
- The Skokloster Castle (Sketchfab account)
- The Tumba Papermill Museum
- The Royal Coin Cabinet
- The Archaeologists (Sketchfab account)

Our mission is to promote knowledge of and interest in Sweden’s history and to preserve and develop the cultural heritage within our care.
Since we believe strongly in openness and sharing, our digital resources (collection database, 2D images, 3D models, etc.) are made available with the user in focus and are free to use and re-use under open licenses.
We understand that most people of the world will never visit any of our six museums, but digital technologies can provide us with fantastic new ways and opportunities to reach out and to promote the historical interest to a wider audience throughout Sweden and globally.
With that being said, technology is not an end in itself for us. It merely provides us with various potential tools for delivering knowledge. 3D can be such a tool and one can create a stunning 3D model of an object, but if it is used out of its context it will just be a cool thing on a screen at best. If we instead were to connect the same 3D model with information about the object’s origin, its history, its owner, and what material it is made of, etc. we have created an asset that we can utilize as a tool for storytelling and for conveying knowledge.
According to our strategy to share our digital resources freely and to meet users where they are, we, in 2016, identified Sketchfab as the platform on which to publish our 3D assets.
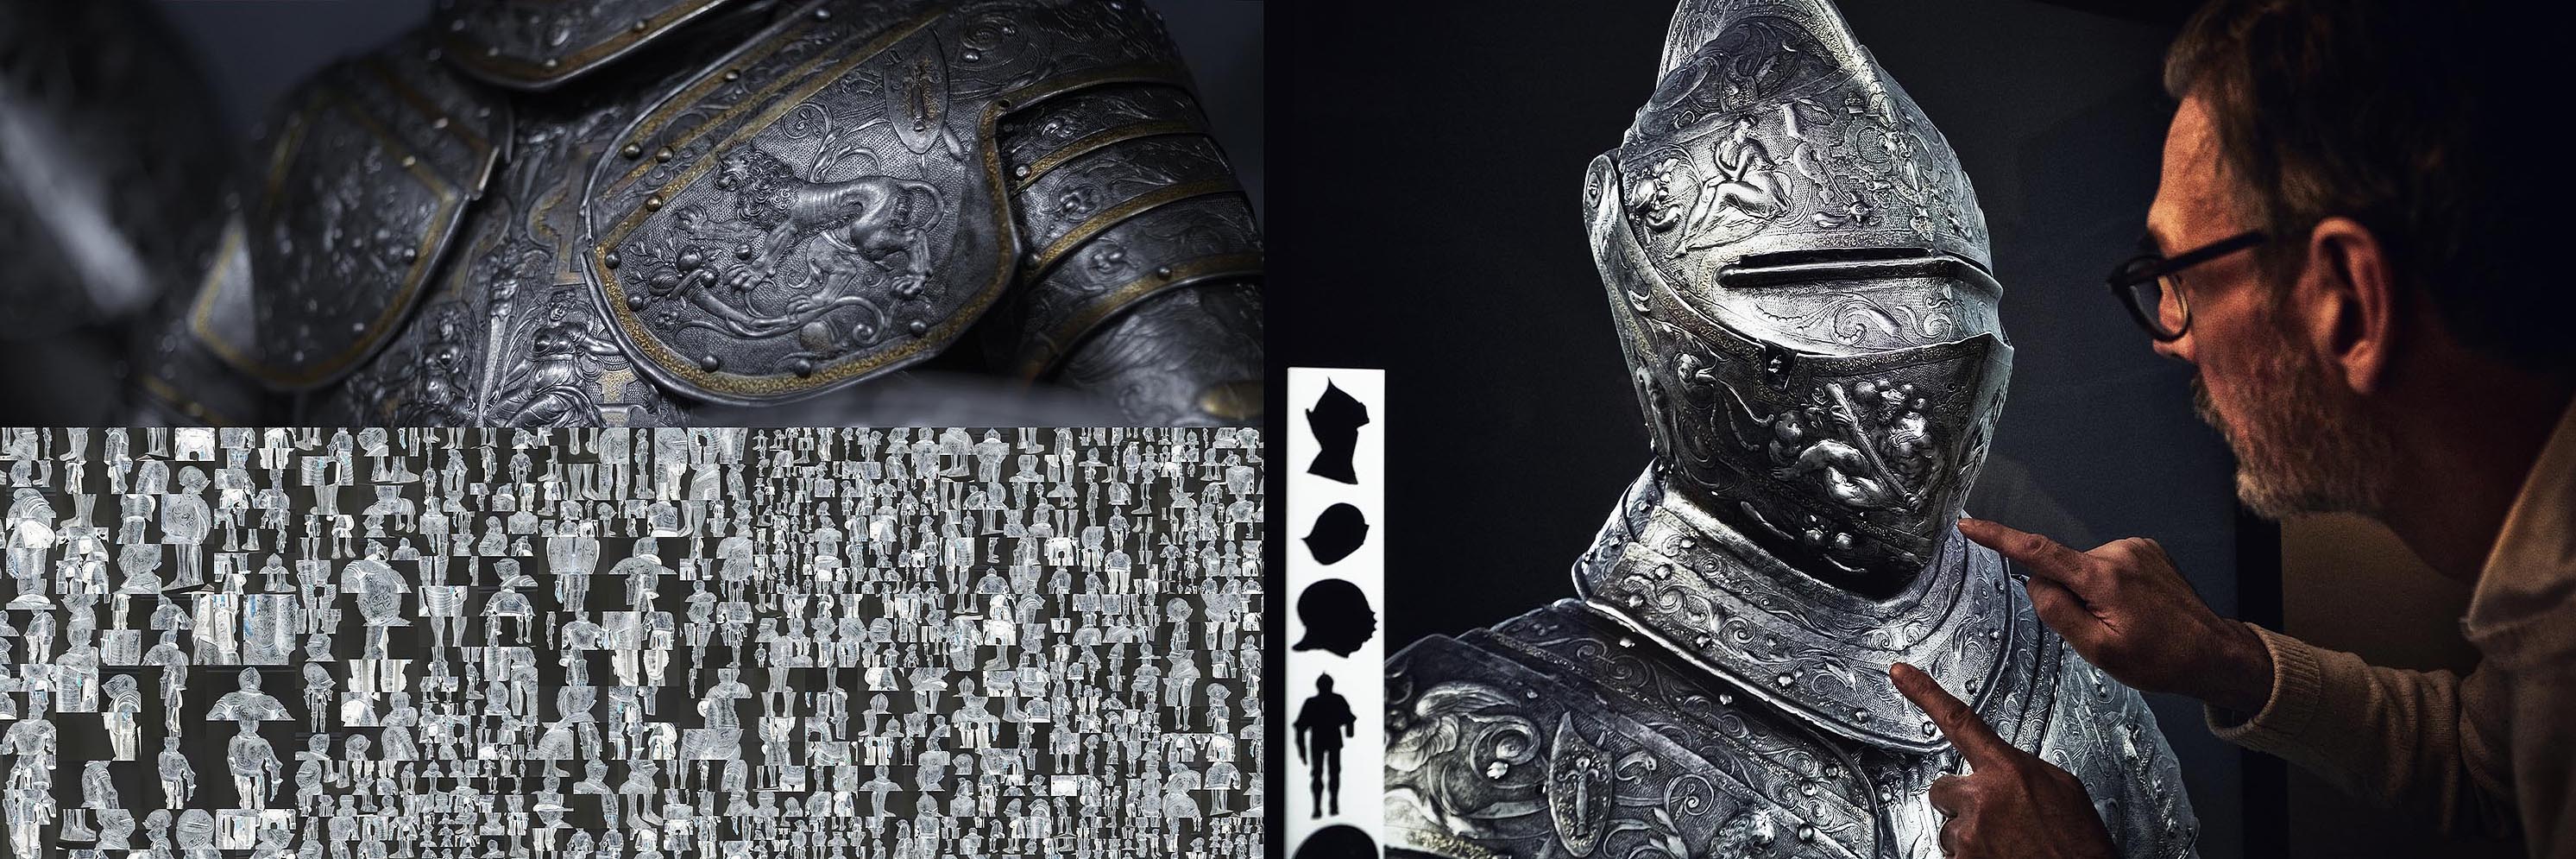
55” 4k Touch Screen Interactive
Our latest 3D project involves the Royal Armoury in Stockholm and its recently reopened and completely remade permanent exhibition. Here you can now find a 55” 4k touch screen on which you can interact with high-resolution 3D models of selected pieces of armor from the collection.
The app running on the touch screen is based on Sketchfab’s open viewer API and was developed by Erik Olsson at RaySpace AB for the museum. The app makes it possible to toggle between eight to ten high-resolution models (1M polygons and 8-16k textures) loaded from Sketchfab without the need to reload the scenes. We can also add custom annotations in two languages in order to create custom narratives.
This interactive addition to the exhibition has been very well received by visitors since the museum reopened in June of this year.
A working demo with three models is available here. Please note that it does not work on most mobile devices due to lack of memory. It takes a decent laptop to run it smoothly.
Short video demo. Erik Lernestål/SHM CC-BY
3D Noobs
We at the museums honestly do not know very much about computer graphics and 3D software and our workflow for 3D is still very simple. We create our models in RealityCapture and use the built-in feature to upload to Sketchfab. Because of that fact, or perhaps despite that fact, we wanted something that we as 3D noobs would be able to administer in-house.
What we have come to know a little about, though, is Sketchfab’s easy-to-use backend for adding lighting, materials, and post-processing filters to our models. The decision to build this thing around Sketchfab’s viewer API, therefore came naturally to us at the museum very early in the process.
Our Little App Can Now Also Be Your Little App
RaySpace AB, with their extensive knowledge and experience within computer-driven visualization, has been a great partner in this project. They also happen to share our philosophy on openness, which means that our little app can now also be your little app.
It is available as open-source and we hope that it can come in handy for others who may be thinking of presenting 3D models on a touch screen in a museum or any other public space.
Basically, if you have 3D models on Sketchfab and know your way around WordPress you are good to go!
Erik Olsson will tell you all about it further down in this article.
The app itself can be downloaded from RaySpace’s GitHub account.
Kudos
I would like to give kudos to the team at Sketchfab in general, and to Thomas Flynn in particular for being very helpful throughout the process. Thank you for answering all of our questions and for listening and deeming it meaningful to develop special features in the viewer—features that now make it possible to customize and slow down the sensitivity of orbit, zoom, and pan inputs in order to enhance the user experience on our large screen.
At the National Historical Museums we communicate our work, actively share our experiences, and we listen to learn.
Thank you for this opportunity to do so!
Erik Lernestål, Photographer, National Historical Museums, Stockholm, Sweden / Twitter
Part II: API Implementation
Implementation
Since the cultural heritage models were already uploaded on Sketchfab and because of all the useful tools they offer, Skechfab’s Viewer API was a natural choice for the implementation.
The requirements for the 3D viewer were: the user should be able to switch between 8 to 9 models, each model should have a couple of annotations with descriptive text in both Swedish and English, and there should be one info box containing user instructions. To achieve this, all the information about the models has to be stored in a database. We decided to use WordPress, mostly because it is faster to just install WordPress than to develop a content management system from scratch, and also because many internet users are already familiar with administering web pages in WordPress.
GUI
For the creation of the 3D-viewer’s GUI we developed a new WordPress theme that renders the 3D-models from Sketchfab in iframes together with one menu for selecting models and one text box to display the annotation texts. The WordPress theme was written in AngularJS as a single page application with the following structure:
- One WordPress service that retrieves the posts from WordPress
- One controller to create functionality in the GUI
- One Sketchfab service that implements the Viewer API
- One HTML view to render the data (iframes and text)
The WordPress service will retrieve the posts in JSON format via a get-request with the endpoint: /3dviewer/wp-json/wp/v2/posts. The data are then passed to the controller and the JSON data is assigned to GUI variables: screen sensitivity, animation time, menu size, etc. These variables are entered by the user in the WordPress post via a WordPress plugin that we created, called annotation-fields. This plugin consists of an HTML view with input fields where the incoming data will be stored in the WordPress database after the post has been published. If the 3D viewer needs to be customized with more data, new fields can be added in the plugin’s code.
Limitations
After all models have been published, the 3D viewer can be started in the web browser from: localhost/3dviewer. A black loading screen appears while the models are loading (one-by-one) to prevent the user from interacting with the viewer. We made this solution because if all models are loaded simultaneously, too much data will be uploaded to the GPU at the same time and some models will probably cause a “Context lost error” because the browser hit its 3D capability limit. Also, if too many models are added to the 3D viewer, you will receive an error that is related to the GPU memory limit; this is why no more than 8 or 9 models should be added. Highly detailed photogrammetry models, such as those cultural heritage objects, allocate around 300MB in the GPU memory because of their large number of vertices and high-resolution texture/normal maps that require lots of graphic memory.
To save memory, all models are initiated with their low-resolution textures and the high-resolution texture is only applied to the visible model. When the user changes models, the app simply anchor scrolls to the selected model’s iframe and the previous model’s textures change to low resolution and the selected model’s textures change the high resolution.
The following instructions describe how you add a new model to the 3D viewer after it has been installed:
Upload Model
- Navigate to your Sketchfab model library, open the model you want to upload and copy the model’s URI.
- Sign in to the WordPress panel from: localhost/3dviewer/wp-admin. Click on the “Post” tab and then “Add new”. Type in the name of the model in the “Add title” field. Click on the “More options” icon in the right corner of the post content and choose “edit as HTML”. Paste the model URI in the HTML text between “models/” and “/embed”. Click on “Publish” in the upper right corner.
- Copy the ending of the permalink. You find it by first clicking on the title field and then on the edit button. Use this ending to name your silhouette images, they must have the same name as the permalink.
- Click on the media tab to the left. Click on “Add new” button. Locate your silhouette image and drag it to the drop zone. Now you are ready to start the 3D-viewer!
-


Annotations
- Start the visualization of your model you just uploaded by opening the page localhost/3dviewer/ in your browser and waiting until the app has finished loading.
- Select the model you want to add annotations by clicking on its silhouette image to the left.
- Open your browser console (Ctrl+shift+i in chrome). Manipulate the model until you find the camera location where you want to place your annotation.
- Click anywhere in the 3D space and the camera position and camera target will appear in the console as two vectors.
- Log in to the WordPress admin page, open your model’s post and paste the camera values in the camera position/target fields down in the “Annotations” form. Type in the Swedish and English annotation titles and the annotation descriptions and click the “Update” button. Note that the camera position on the default annotation should always be set to [0,0,0].
About the author
Erik Lernestål and Erik Olsson
Photographer at the National Historical Museums, Sweden, and Developer at RaySpace AB


