Hop on board as we continue our journey Around the World in 80 Models! We began our itinerary at Sketchfab headquarters in New York and are working our way through Europe, Africa, Asia, Oceania, South America, and North America. To catch up on past destinations, check out the rest of the Around the World in 80 Models series.
This week we’re back in New York, New York, where Sketchfab’s very own Cultural Heritage Lead Thomas Flynn shows us a unique piece of ‘urban heritage’ with a surprisingly rich story…
New York, New York: New York Fire Dept. Call Post
Hey! My name’s Thomas Flynn and I’m Cultural Heritage Lead here at Sketchfab – it’s my job to help interested organizations and institutions share the story of our world through 3D. With a background in audio and visual design, I began working in the realm of 3D while at the British Museum in 2014 and since then have helped many museums produce and share 3D content through training and education programs. The emergence of accessible (and often free) 3D scanning & authoring tools plus the rich and varied physical artifacts held in collections around the world is a perfect combination and is really just an extension of photography as a means for describing objects to people who are unable to see them in person.
I also make 3D scans – a lot of 3D scans in fact! Outside of my work digitising objects for museums, 3D scanning has become a hobby of mine. Using photogrammetry, all I need to do to capture things in 3D is take a few more photos while out and about on holiday or my lunch break to the point where I am always looking out for interesting ‘scan-ables’ wherever I am.
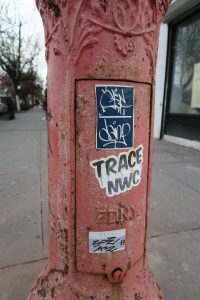
The model featured here is a New York Fire Department call box and as with many scans I make, it primarily caught my eye as an interesting and unusual object. I noticed it while walking the streets of Brooklyn in April this year while stopping in to visit the Sketchfab New York team on my way to the Museums & the Web conference in Cleveland. 15 minutes and 192 photos later and I had more than enough data to reconstruct this artifact in 3D once I got home to my laptop. (I use a Canon G7x and a Dell XPS 15 if you’re interested.)

Before I post a scan to Sketchfab, I like to do a little research so I can provide some context and description above and beyond “here is a 3D thing” – this is central to how I feel about cultural heritage and historical content in general, the story and context of an artifact are what make something relevant to people. I think there’s also something here about the act of digitising something forcing you to take a second look and think more deeply about your understanding of – in this case – an everyday object.
My ‘research’ starts with a simple web search for the object. In this case I had to use my limited understanding of what the object is as a starting point. The post has NYFD embossed on the main column, the ‘fire’ and ‘police’ button guards under the grate are clearing meant for calling those public services. So a few searches later (“emergency phone post”, “red fire police call box” etc.) and I started to get an idea of what I had scanned. And it turns out that these fire and police call boxes are a) very old and b) are surprisingly popular/controversial.
Here’s a few things I found out (I recommend clicking through to the source articles!):
- These kind of public alarm boxes are common across the United States
(source: wikipedia.com) - The design I scanned is from the late 19th / early 20th century
(source: forgotten-ny.com) - While often considered a nuisance due to misuse…
(source: untappedcities.com, forgotten-ny.com) - …they are also considered essential for some members of the public who are unable to use regular phones
(source: nydailynews.com) - Although Mayors Rudy Giuliani and Mike Bloomberg considered them useless, some people are trying to fix up any call posts that are in disrepair (like the one I scanned) to keep them working and celebrate a piece of urban history
(source: nypost.com) - As far as I can tell the NYC Fire Musuem has a record of more recently added electronic mechanism in the post, but not a record for the cast iron(?) posts themselves
(source: nycfiremuseum.pastperfectonline.com)
I was amazed to find so much information about these posts with only minimal effort. I also love the idea that cities and physical places are themselves ‘living musuems’ with plenty of modern history in plain sight. 3D scanning helps create a digital archive that documents physical objects that will, most likely, end up on the scrap heap. Along with the stories attached to these objects the geometric and surface colour data can help tell the story of municipal practice, social interactions, urban design and street art.
How I Digitised the Call Post
As mentioned above, to begin with I took 192 photos of the call post. I was lucky that the day I chose to scan was bright with some cloud cover that prevented harsh shadows. I leave my camera on full ‘auto’ mode when shooting, just making sure the camera auto-focuses properly before firing the shutter.

The GIF earlier in this post shows the first round of images I will normally take, making sure to get the whole subject in the frame as I side-step around it. Capturing the whole helps put all the closer range shots in context when processing into 3D.
Once I’ve got that initial round of images, I move in closer to capture the details like the call panel, fine mouldings, graffiti, and stickers:


Back at my laptop, I fire up RealityCapture and import all the images. I use the default settings for alignment, set the Reconstruction Region (the oblong region around the post in the image below), process in Normal Detail, simplify the model to around 500k (probably overkill) and then texture and export as an .obj with 8k texture.

Next, I jump over to Blender 3D and import my .obj – my first move is to remove any excess geometry by:
- selecting my model and tabbing into Edit Mode
- selecting a single vertex on my model and hitting Ctrl-L to select all linked vertices
- hitting ctrl-I to invert my selection so now I have everything that isn’t the main model selected
- hit X and select ‘Delete Vertices’
- tab back into Object Mode

Next, I want to crop some of the base to make things look a bit nicer:
- Insert a cylinder primitive: Shift-A > Mesh > Cylinder
- Scale up the cylinder (Hit ‘S’ key for the scale tool) and position it over my scan (use the arrow/axes widgets or Grab Tool, ‘G’ key)
- Tab into Edit Mode with the the cylinder selected and extend the top face above the top most point of the scan and extend the bottom face *inside* the ground.
- Switch to Orthographic mode (‘5’ on num pad) and choose a front or side view (‘1’ or ‘3’ on num pad). Hit ‘Z’ to change to wireframe view to check all that I want to crop is contained inside the cylinder volume.
- Still in Edit Mode, select the bottom face of the cylinder and hit Ctrl-B to bevel the edge a tiny bit. Not essential but I like the way it looks 🙂
- Tab back into Object Mode, select the scan model.
- Navigate to the Modifiers tab (the one with the wrench/spanner) in the right panel. Click ‘Add Modifier’ and select ‘Boolean’. Operation = Intersect, Object = Cylinder. If all looks good, hit Apply; if not adjust the cylinder position or switch the Solver from BMesh to Carve and Apply when ready.
- Select and hit ‘X’ to delete the cylinder.
- Tab into edit mode on the scan model and select all the new faces created with the boolean modifier using the Select Brush, ‘C’.
Hit Ctrl-T to triangulate all the faces. - We now have a nice circular crop to our scan.
Click thumbnail images below for an idea of what you should be seeing at each step.
-

- 1.
-

- 2.
-

- 3.
-

- 4.
-

- 5.
-

- 6.
-

- 7.
-

- 8.
-

- 9.
-

- 10.
-

- 11.
Styling on Sketchfab
I figured the easiest way to describe the simple adjustments I made in 3D Settings for the call post after uploading the model to Sketchfab was to record the video above, admittedly I forgot to record the mouse cursor but you still get the idea.
- Under the general tab I set the model upright using the 90° axis rotation buttons.
- In the same area, I switched the rendering mode to “Shadeless”
- Slightly lower down under this tab I adjusted the Background settings by simply turning the brightness all the way down. (I could also have switched to a colour background and selected pure black)
- Moving on to the Materials Tab, I select the material for the geometry that was added by the boolean operation in Blender (often this will be the same name as the main material but with ‘NONE’ added to the end.)
- I turn the base colour for this all the way down, pure black to match the background.
- I did also add some annotations to give a small tour of the model but you can find out all about Annotations in the Help Center article here.
And there you go – a piece of New York carved right out of the sidewalk and dished up on screens around the world! I hope you’ve enjoyed this post and are perhaps inspired to go out and scan some local history in your own town or city 🙂
To see more of Tom’s models here on Sketchfab, check out his profile!
About the author
Abby & Néstor
Abby and Néstor are Sketchfab Masters.
Abby Crawford, Ph.D. is trained in and passionate about Roman Archaeology and works as a freelance artifact illustrator and 3D scanner in California.
Néstor F. Marqués is a virtual Heritage & cultural diffusion researcher, and an enthusiast of ancient Rome’s culture.