Hello everybody! I’m Perrine Lozinguez, a French 3D artist freshly graduated from my school in Paris, Isart Digital.
I am currently looking for a job so I spend all of my free time sculpting, modeling, and painting in order to improve myself and building my portfolio.
I spent the past two years working on student projects: Lily, colors of Santa Luz as an environment artist and Naraa, the living book as a character artist.
I also had the opportunity to create characters skins for the game Hacktag.
The Concept
A few weeks ago I heard about the new Disney/Pixar movie, Coco.
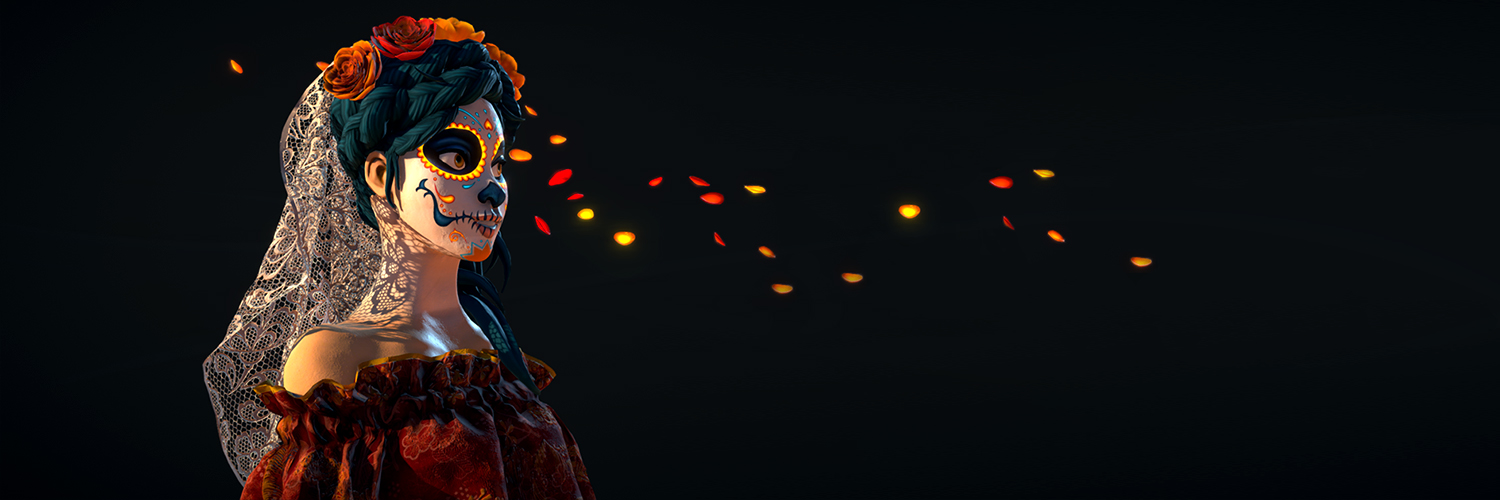
While watching the trailer I fell in love with the dià de los muertos universe and the beautiful glowing flower petals.
The technical artist inside me woke up and said “Emissive maps, girl. You have to do something with that!”
And I was like, “Okay”, so let’s begin!
 My main inspiration was Maria Dimova’s beautiful illustration, mostly for the makeup and the colors. In the meantime, I also looked for art style references somewhere between cartoon proportions and a bit more realistic texturing.
Even if I like drawing, I rarely do my own concepts art but I use a lot of references (other artist work, anatomy books, photography…).
While starting working on Catrina, I already knew that this project had to teach me something but also had to be fun. Naraa, the last game I was part of, is an AR mobile application so I could not play with as many polygons as I wanted.
My goals were simple:
- Found something to do with the emissive maps.
- No polygon restriction, this one is for fun!
- Start learning Marvelous Designer.
- It will be on Sketchfab!
Step 1: Sculpting and Modeling
My process was pretty standard: I started sculpting from a basic sphere in ZBrush and adapted the shapes as much as I could to fit to my idea.
I restarted this step several times (and used a lot of anatomy references) in order to get the good base. For the braids here is a simple tip: load the cylinder primitive, subdivide it 3 or 4 times and add some hair details. Then in deformation, twist it only on the Y axis and use inflate balloon. Finally you just have to mirror the mesh and move/rotate it to get the braid. Easy!
After the hair I started learning some basics on Marvelous Designer to create the veil and the shirt. It was very funny to see how the elastics affect the fabric (but can be tricky at first).
 While simple, these standard patterns allowed me to save a lot of time on the folds sculpting and UVing.
After adding extra details and definition, I started on the retopology and UVs.
As usual I made the first one with my good old friend Maya and the second with 3Ds Max, the unwrap tool is so much more natural to use for me.

Step 2: Texturing
This step is always the hardest for me. More so this time sicne I wanted to play with the emissive maps to add an extra layer of fun and give a modern touch to my Catrina.
After baking the normals and AO maps with topogun (I both use it and Xnormal), I started working on Substance Painter.
I really wanted to emphasize on the glowing painted skin texture so I worked a lot and took extra attention to details on my smart material‘s normal, emissive, and roughness maps.
Even if I worked on a Calavera Garbancera inspired character, I did not want her to be scary. So I chose to balance the creepiness of her skull makeup with warm colors, her dreamy look and sweet smile. Finally, I had to choose fabrics and patterns for her clothes. I started with something blue but it didn’t render the soft effect that I imagined for the whole piece.
Looking for ideas, I was browsing through Pinterest and google images when I found the delicate accessory that would not weighing down the silhouette: a bride veil. I could immediately picture the shadows on her skin and some cool things to do with opacity.
The process wasn’t really difficult; I used a simple seamless lace texture as opacity/height map and added details manually on the roughness/albedo maps.
I wanted to add a lace detail on her shirt but it made the global look much more complex and did not highlight the character properly. Lastly, I chose a soft gold pattern as a reminder of the flowers ornament on her veil.
Some color corrections and polishing later, it was done!
Step 3: Sketchfab
Since the beginning of my 3D art studies I used Sketchfab to display my models.
I simply couldn’t imagine adding a model on my portfolio without it.
I loved using the 3D settings mode: it really helped me to bring Catrina to life.
This time I especially played with the lights settings in order to get the famous laces shadows on her skin.
The petals were the original idea that launched the creation of this character.
They had to be an important part of the set so I played with the depth of field and the bloom to give them the attention they deserved.
I would like to thank Sketchfab for this amazing opportunity to share my work.
It was a real pleasure to talk about my project and there’s also a lot of things to discover on my Artstation and my Sketchfab.
That’s all for me! Hope you enjoyed this!
If you want to ask me anything, write me an email! You can also find me on Linkedin.


