In Art Spotlight, we invite Sketchfab artists to talk about one of their designs.
Hey guys! My name is Ingrid Barrios and I’m 3D Artist from Bogotá, Colombia! I’ve started working three years ago for video games. My specialization is 3D modeling and texturing for characters and environments.
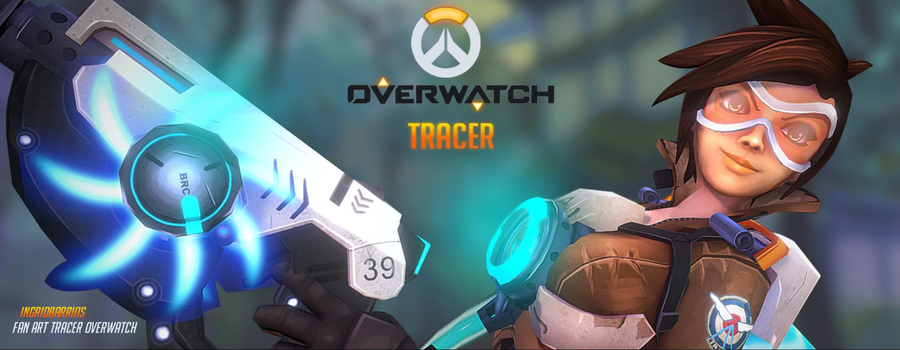
A few months before the Overwatch global launch, a few friends and I were so inspired that we wanted to create fanart of our favorite characters. In the end, it was an easy choice for me to pick Tracer because I loved her attire, weapons, and personality. I immediately started working on her 3D model.
Before jumping in, I looked online for references for inspiration and also thought about alterations I could make. I decided I wanted to give her more comfortable shoes. And what could be better for that than some Velcro High Top Sneakers?

Modeling
The software I used for modeling her was Autodesk’s 3D Studio Max. When I began modeling the 3D mesh, I tried to stay as faithful as possible to the original concept but I wanted to put a little bit of my style.
First, I began with a really simple shape of the body, and by using the references I collected before, I managed to achieve the desired proportions for me to work with. When I was sure the base mesh was ready, it was time to give Tracer her outfit, so I extracted the jacket, the straps and armor from the same body mesh.
After I was happy with Tracer’s body, it was time to polish her face a little bit more, so I switched to ZBrush. There, I worked on the mouth, eyes, and general proportions of the face. It’s so much easier to manage vertices in ZBrush.

After that, I modeled her hair and glasses, extruding the parts from the head mesh as I did with the body props.
For the weapons I used the reference kits that Blizzard provides on the Overwatch website (check them out, there’s a bunch of useful work).
So I started to extrude planes to create all the little pieces that make up her weapon.


Ambient Occlusion
Now that the modeling steps are over, it’s time to prepare Tracer for texturing by creating UV maps for the body, face, armor parts, weapon, and pedestal.
After I carefully place every little part of the 3D model so it wouldn’t lose detail in the UV maps, I made the Ambient Occlusion for all the model.
So, the First step is to Press F10 to open the Render setup window, and on the Assign Renderer section choose Mental Ray in the Production field.

Second step is selecting the mesh and press the number zero, this will open a window called Render to Texture. Then, in the Selected Object Settings you need to Change the Padding Value, this will help the the edges to overlap. In this way there will be not visible seams in the textures.

Third step is to click the Add… button to open up the Add Texture Elements window and select Ambient Occlusion (MR) from the list.
In the field “File Name and Type” enter the filename of the rendered texture and then specify the texture dimensions.
You can set the “samples” and “Spread” values as you like, but you can just use the values that I show you in the screenshot below instead.

Textures
I began to organize the psd file in photoshop, importing the ambient occlusion map and UV Maps. To not get lost with all the different parts on the texture, I write numbers on a separate layer on top of the other layers, to help me identify the parts easily.
So, I usually set the layer style of the “ambient occlusion” map to multiply or overlay, and place that layer, above the others.
The process of texturing that I always use is as follows: I paint the base colors of every part, proceeding to add light and shadow values, starting from the big picture and, working my way down to the little details. Remember, you must never use black color for shadows nor white for lighting, the color of those values will be determined by a lot of factors, from the object’s color to the light affecting it.
I love the hand painting texturing technique; it’s a procedure that requires a lot of craftsmanship :)

Character’s Pose
After all that hard but fun work, is time to give life to Tracer. So, the first step is to make the rigging and skinning. Using the vast amount of Cosplay references that flooded the social networks, I set up a couple of poses, and I choose the pose that is currently in Sketchfab :)


My Thoughts on Sketchfab
I love Sketchfab! It gives me a lot of freedom to achieve marvelous rendering, illumination and model presentation.
In the Sketchfab model settings, I used a dark background, because I think that makes the character stand out a more. I also added grain, sharpness, and bloom with the post processing filters.
I used three blue point lights and an orange one, and finally, I set up the corresponding transparency and emission on textures that I wanted it to glow.
I started using Sketchfab several years ago, it has been a great help to showcase my 3D models in real time, instead of only pictures. It also helps the art community to get a better sense of understanding how a 3D model and textures are made.
I want to thank Bart, Seori, and all the Sketchfab team for inviting me to share my Tracer creation process.
Here is the finished model in case you haven’t seen it :)
Finally, I want to show you where you can find more of my work, this really motivates me a lot to keep on working on new 3D models that I can share with you guys :D Find me on Sketchfab, Behance, and ArtStation!
Thank you so much!
Thank you, Ingrid!


