About me
Hi Sketchfab! I’m Pat Klisiewicz, I am a self-taught 3D Artist with a background in Graphic Design.
I have always loved drawing and painting. The last few years I have spent time learning 3D and in late 2019 I decided to combine my love for digital painting and 3D into stylized hand-painted art!
I love hand-painted and stylized games like World of Warcraft and Sea of Thieves, and these were the gateway for my path to 3D art.
Quick breakdown
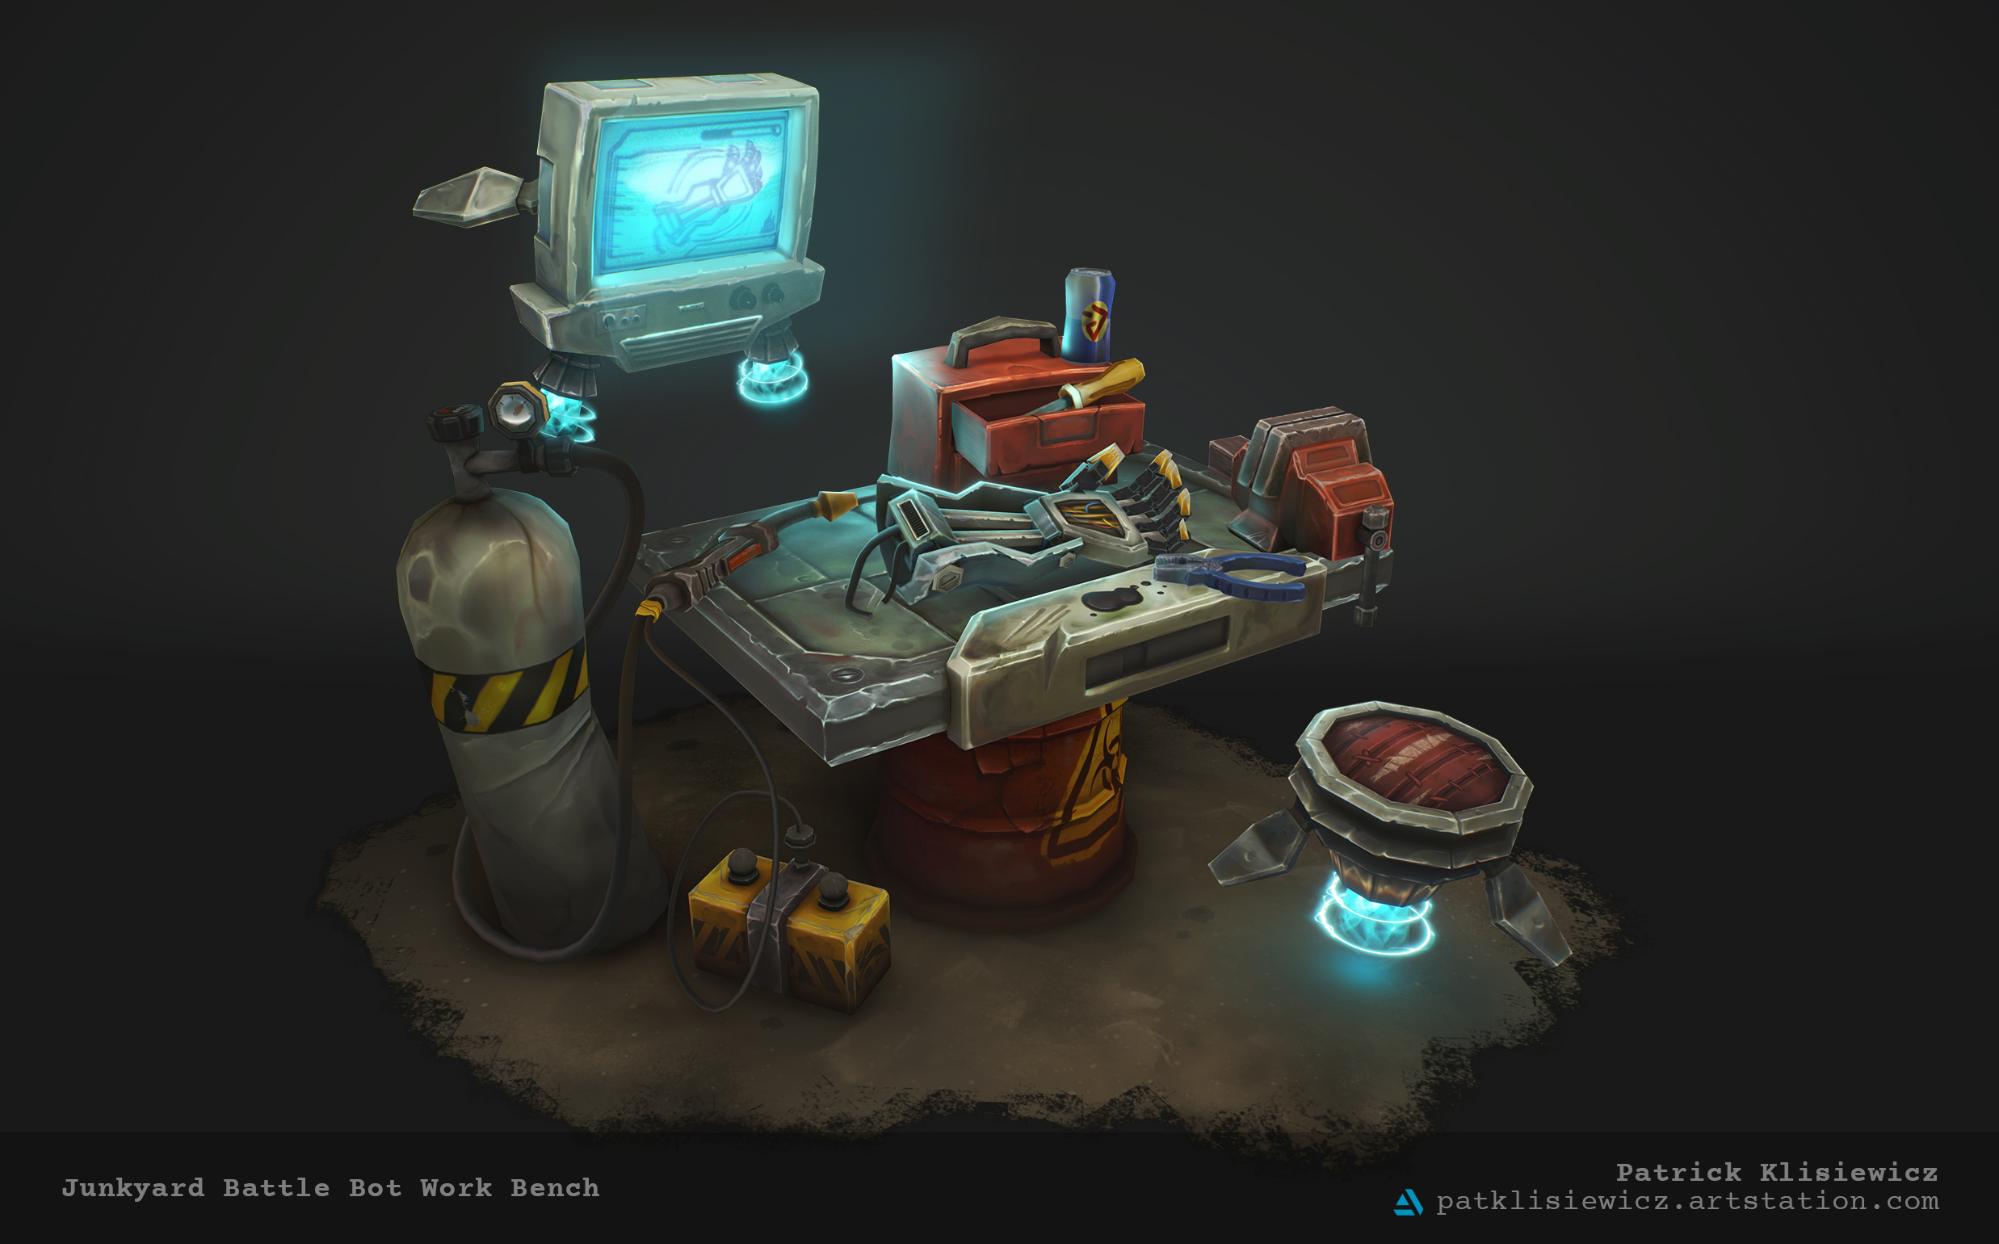
My Junkyard Battle Bot Work Bench was one of the tasks for the CGMA Stylized Assets for Games course taught by Ashleigh Warner. The assignment for weeks 3 & 4 was to concept and produce a hand-painted sci-fi prop. Taking a part in the course was a great experience. I met a lot of great people with the same passion who helped me to stay motivated and keep pushing myself to become a better artist. I can highly recommend this class for anybody thinking about it.
The whole piece was made in 2 phases, “in-class” and “post class polish”. I will get into this a bit later on!
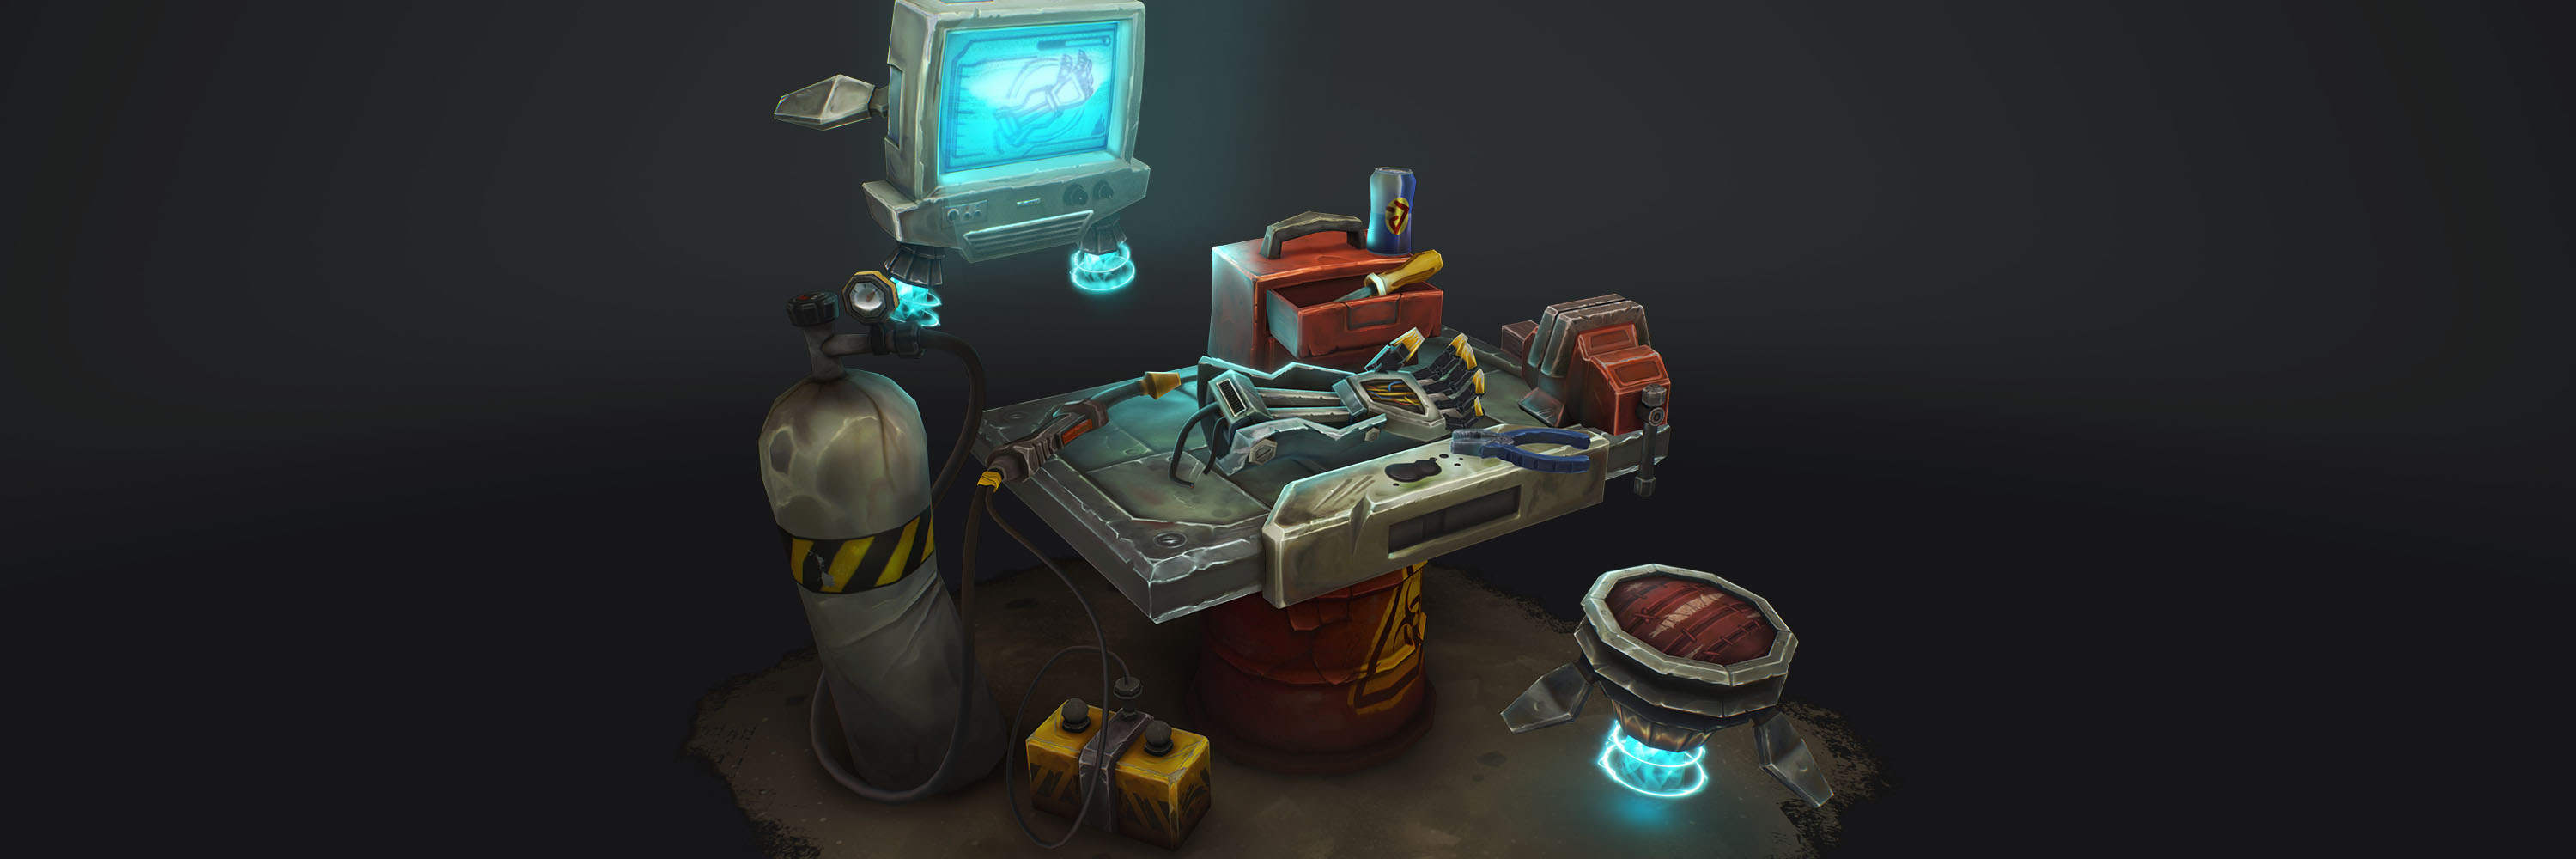
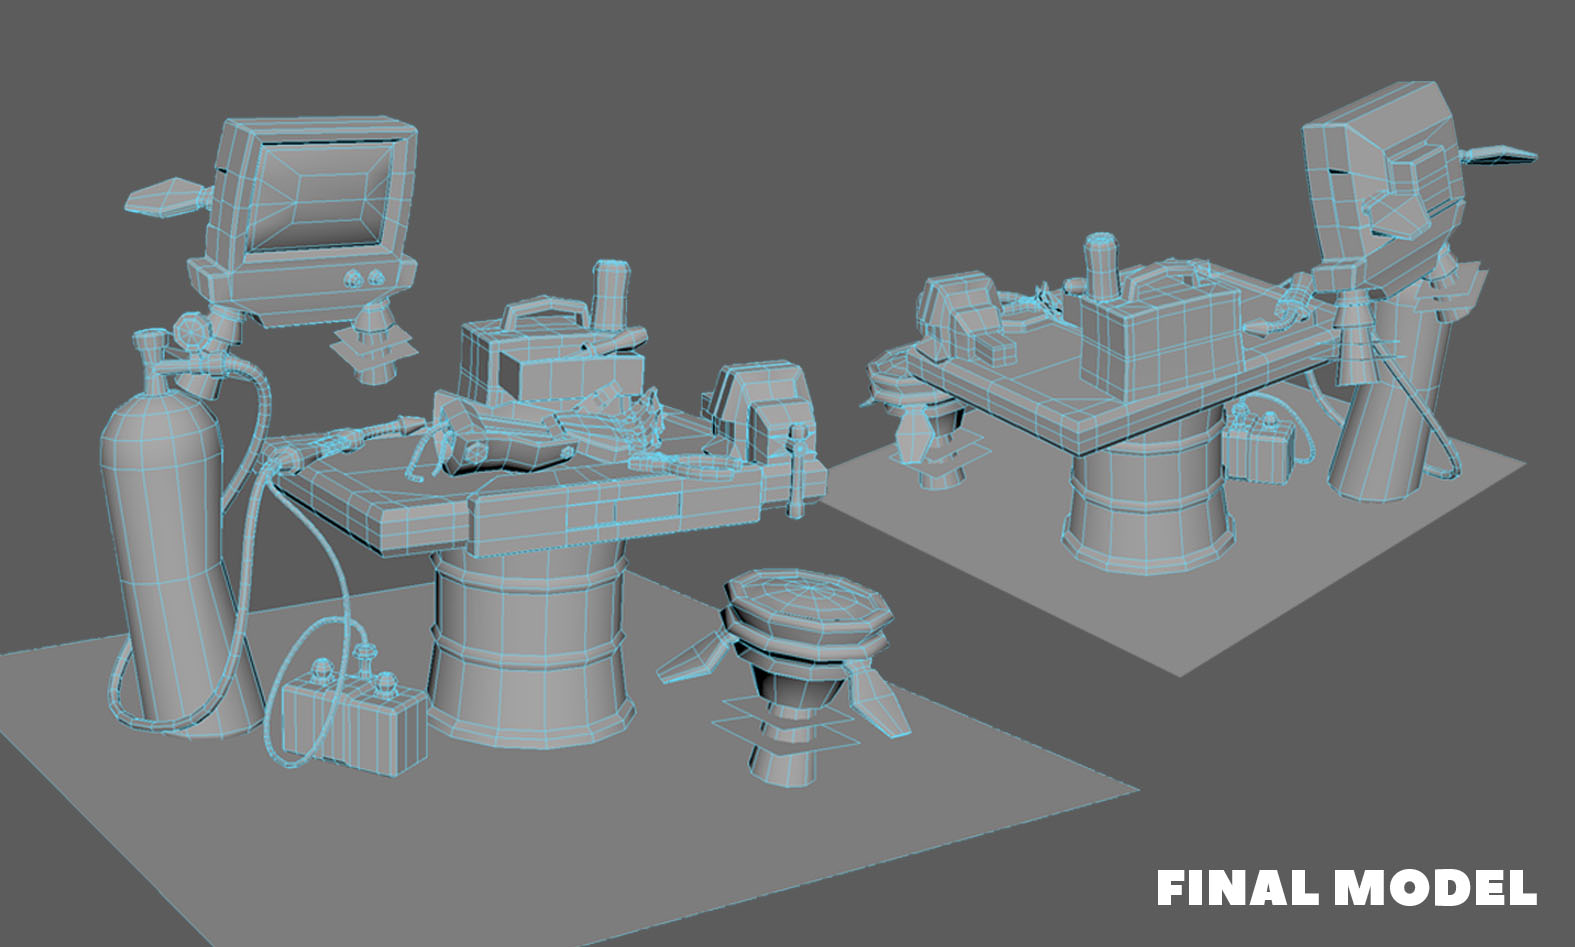
Here is the final piece that I will be breaking down!!
Reference
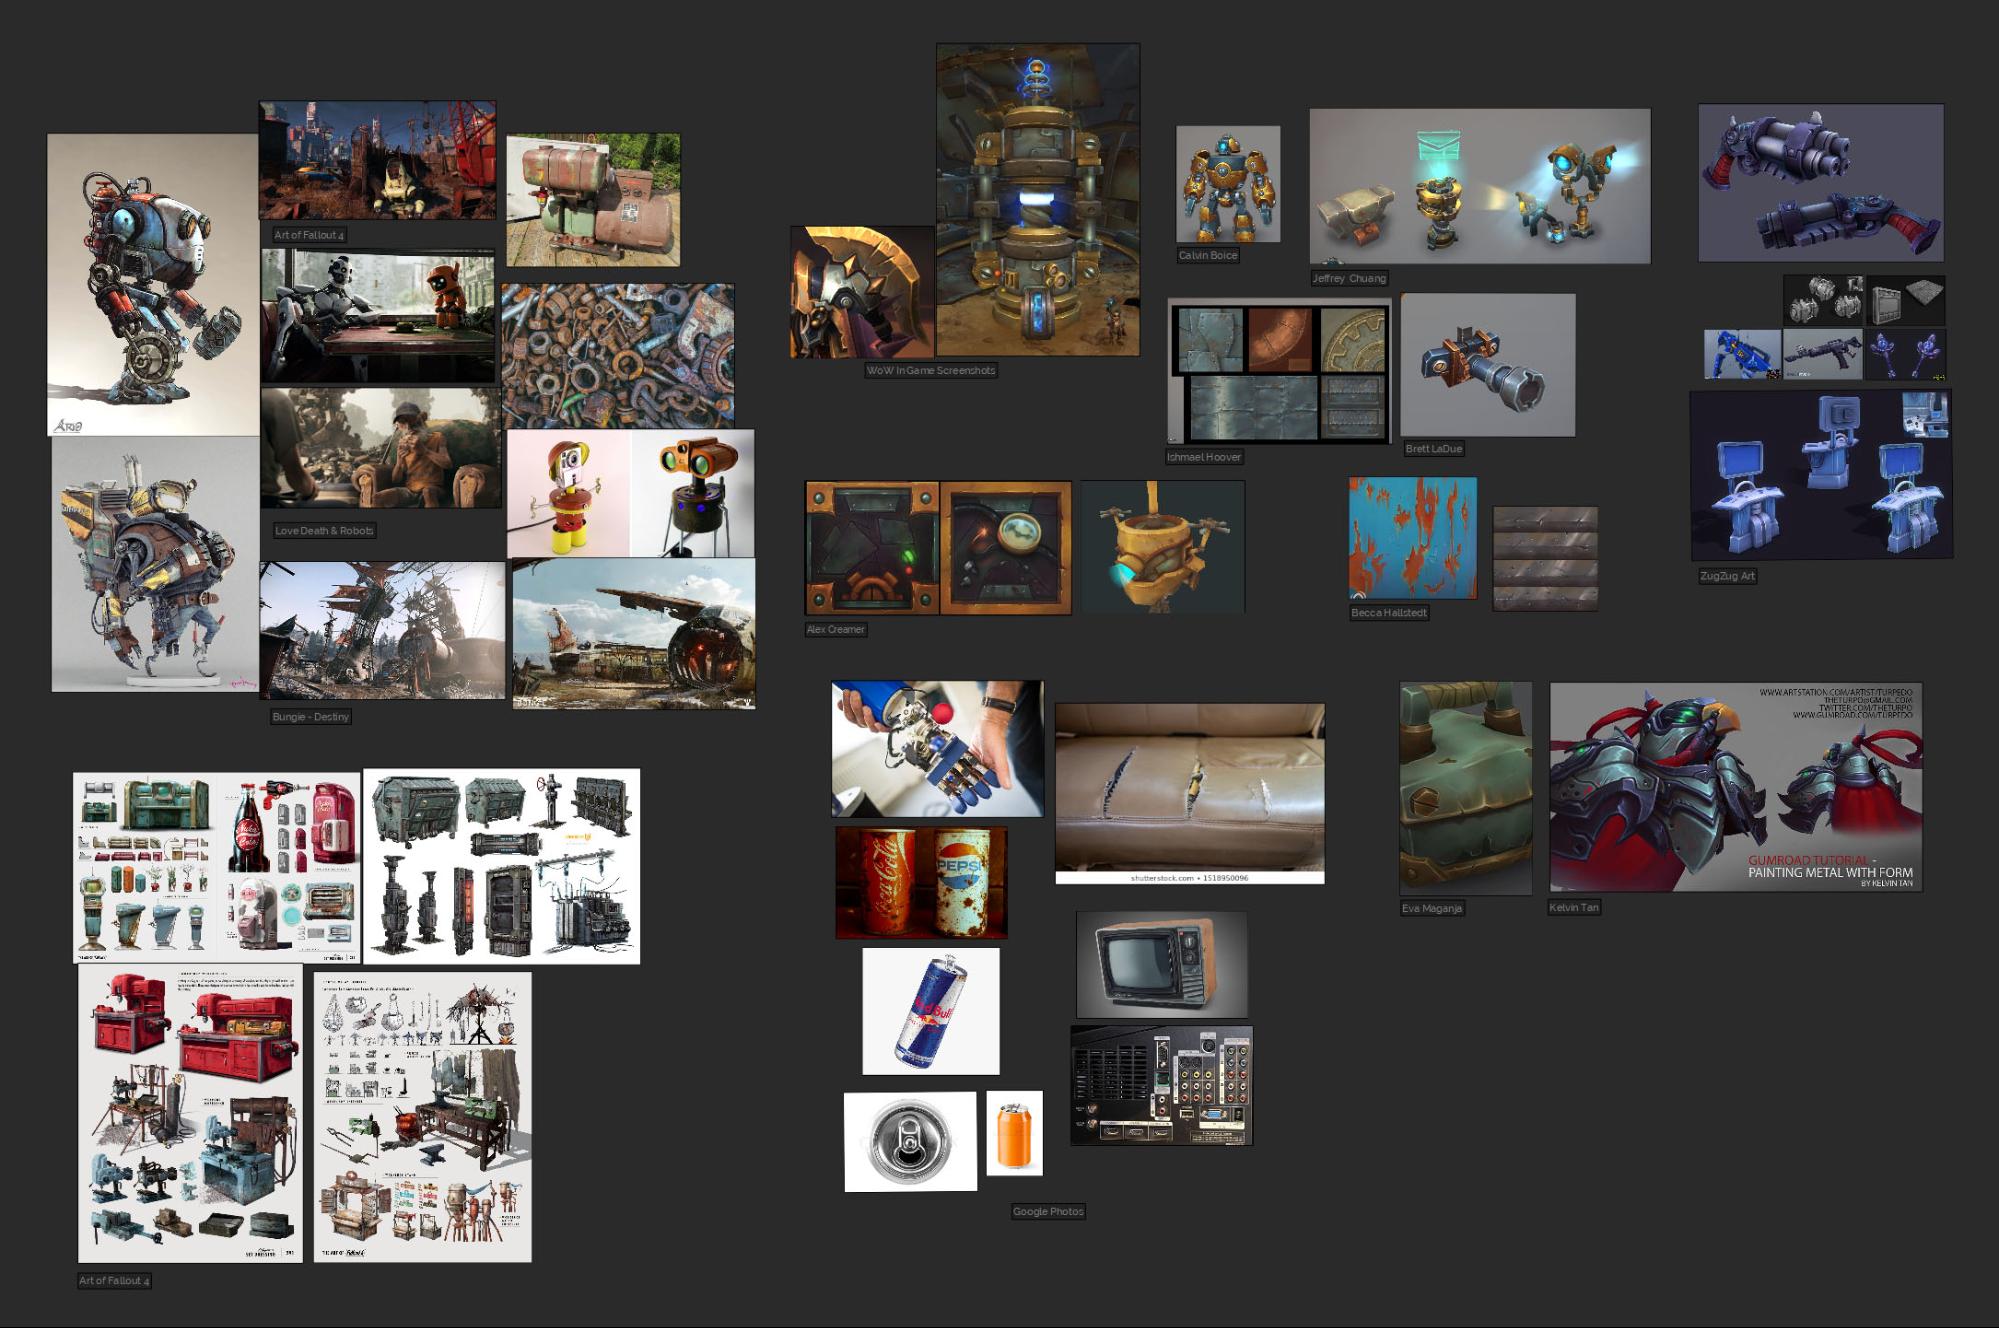
Coming into this project, I had recently watched Love Death + Robots; I also love the aesthetics of games like Destiny and Fallout. The pops of pastel colour tones and the earthy browns of the grunge and rust are some of my favourites. I set up my references in PureRef, which is a great resource for gathering reference for your projects; it is super flexible and can be maneuvered around your screen while you work. I use a combination of real-life references as well as hand-painted art—every bit helps, even if it is not the exact style I am aiming for.
Concept
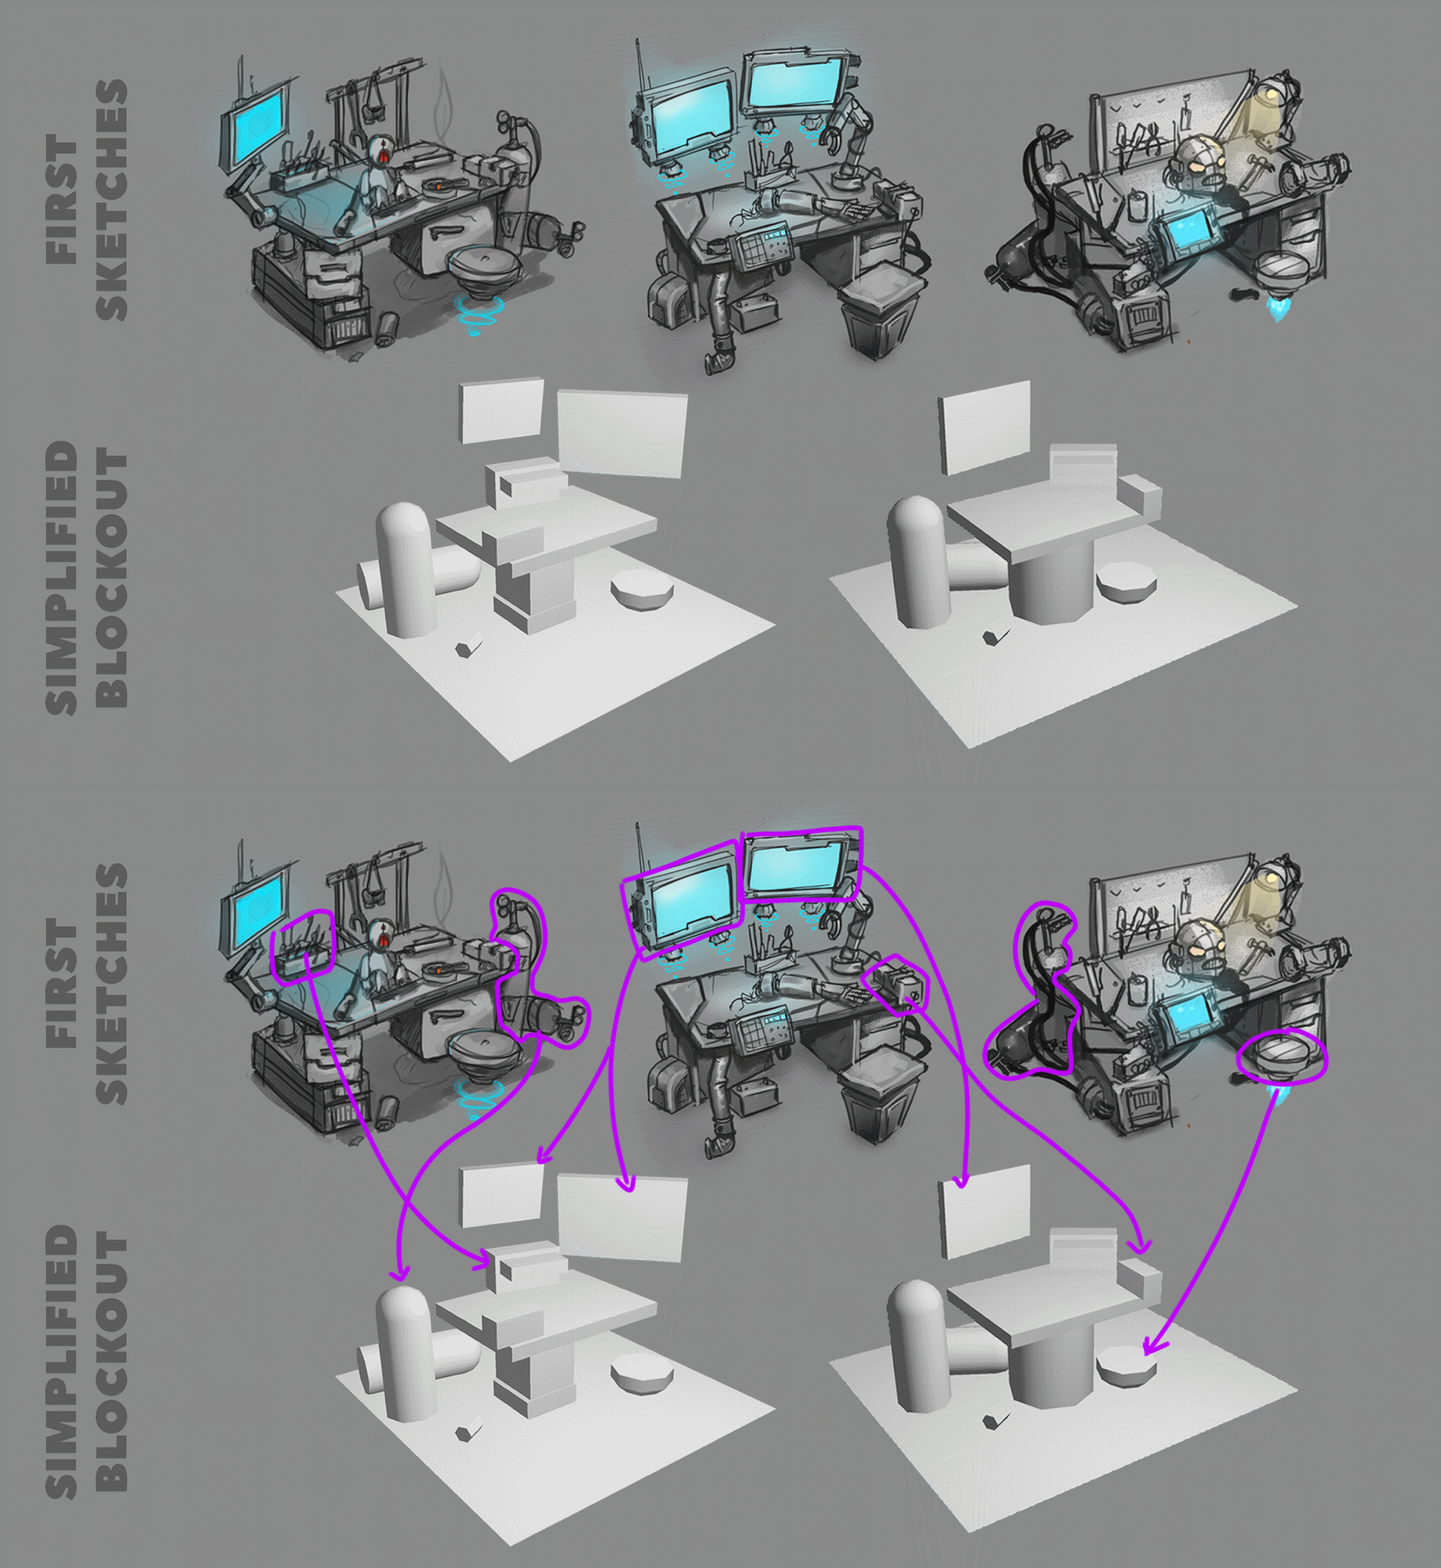
My Initial concepts were quick and dirty sketches to get a rough idea of shape. I quickly realised I would only have a week to produce all these assets, and there was no way—this being my first full scene—that I would be able to do it in time. But this step was still valuable as I could take the props and items I liked and work them into a simpler scene. I am big on using my imagination and imagining myself in the scene, thinking about the space of the area, how far apart things would be and what items I would need if I was fixing a robot, for example. I made a quick greybox blockout that I could make a cleaner sketch and concept over.
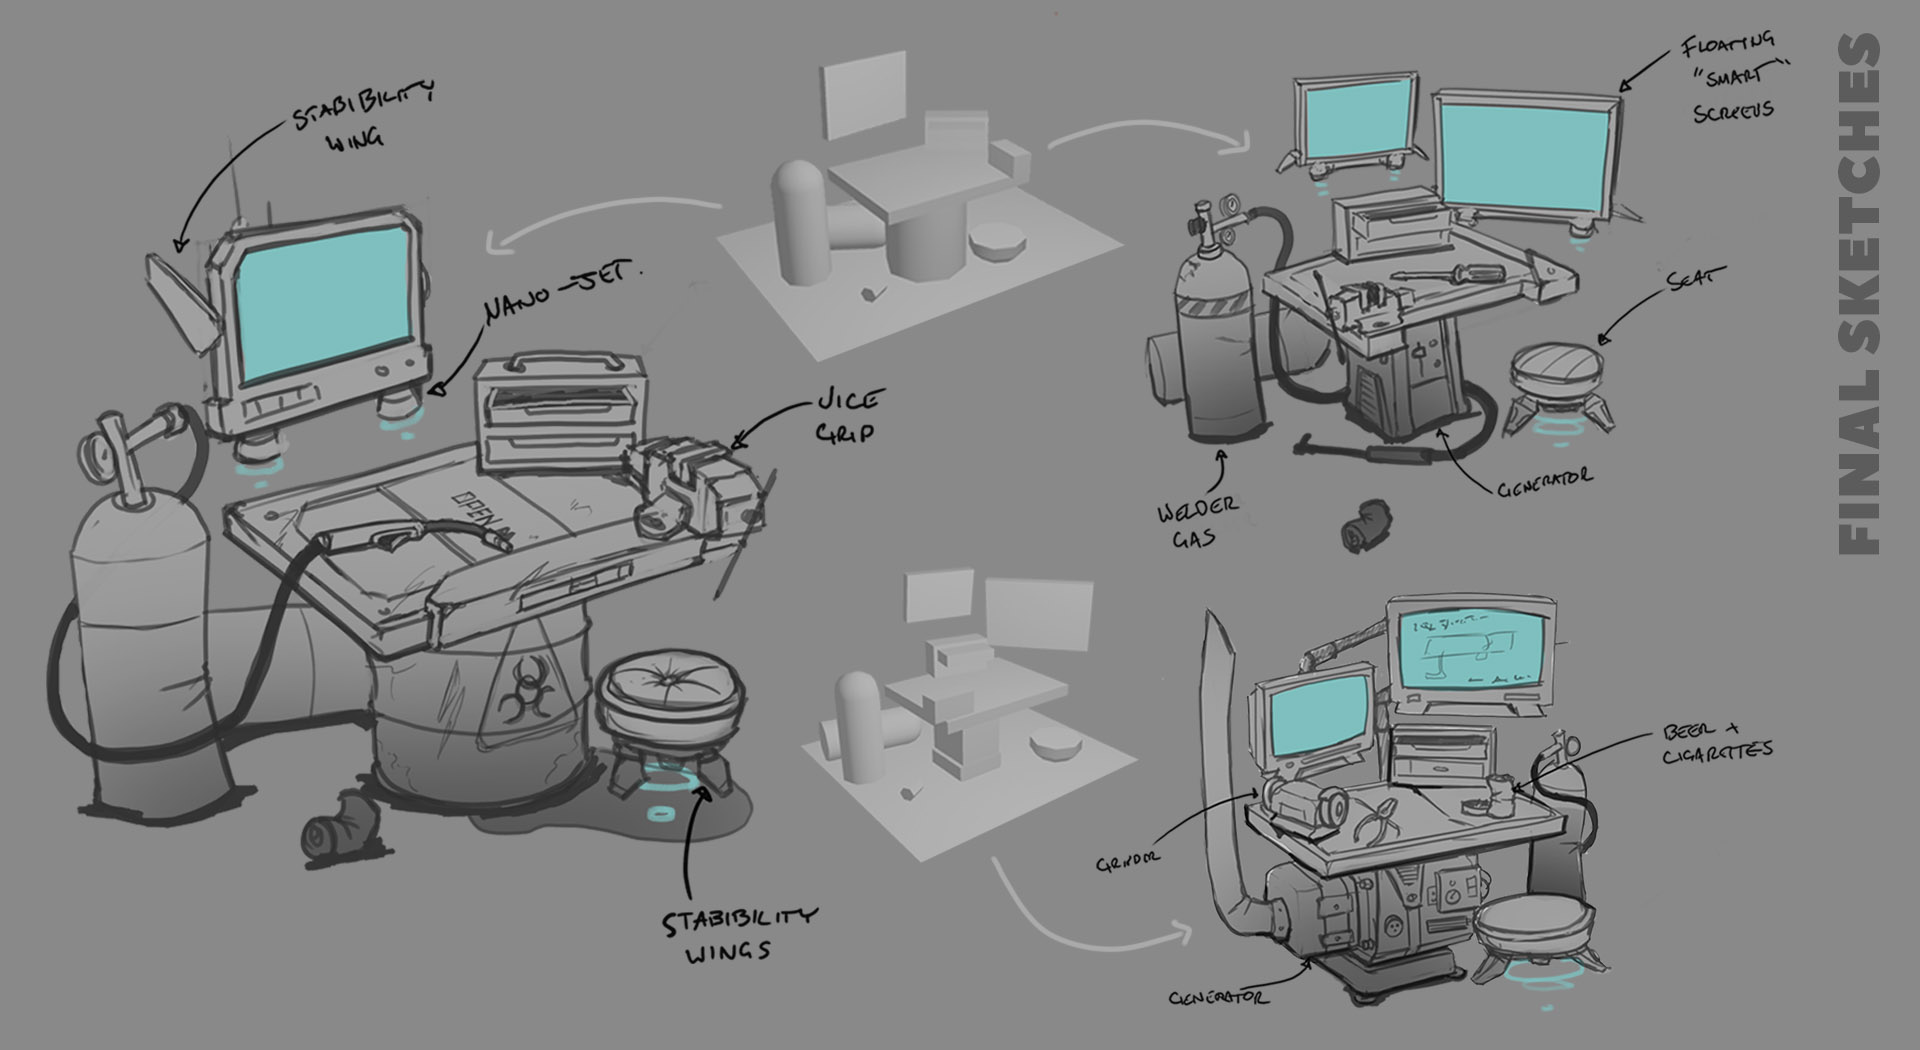
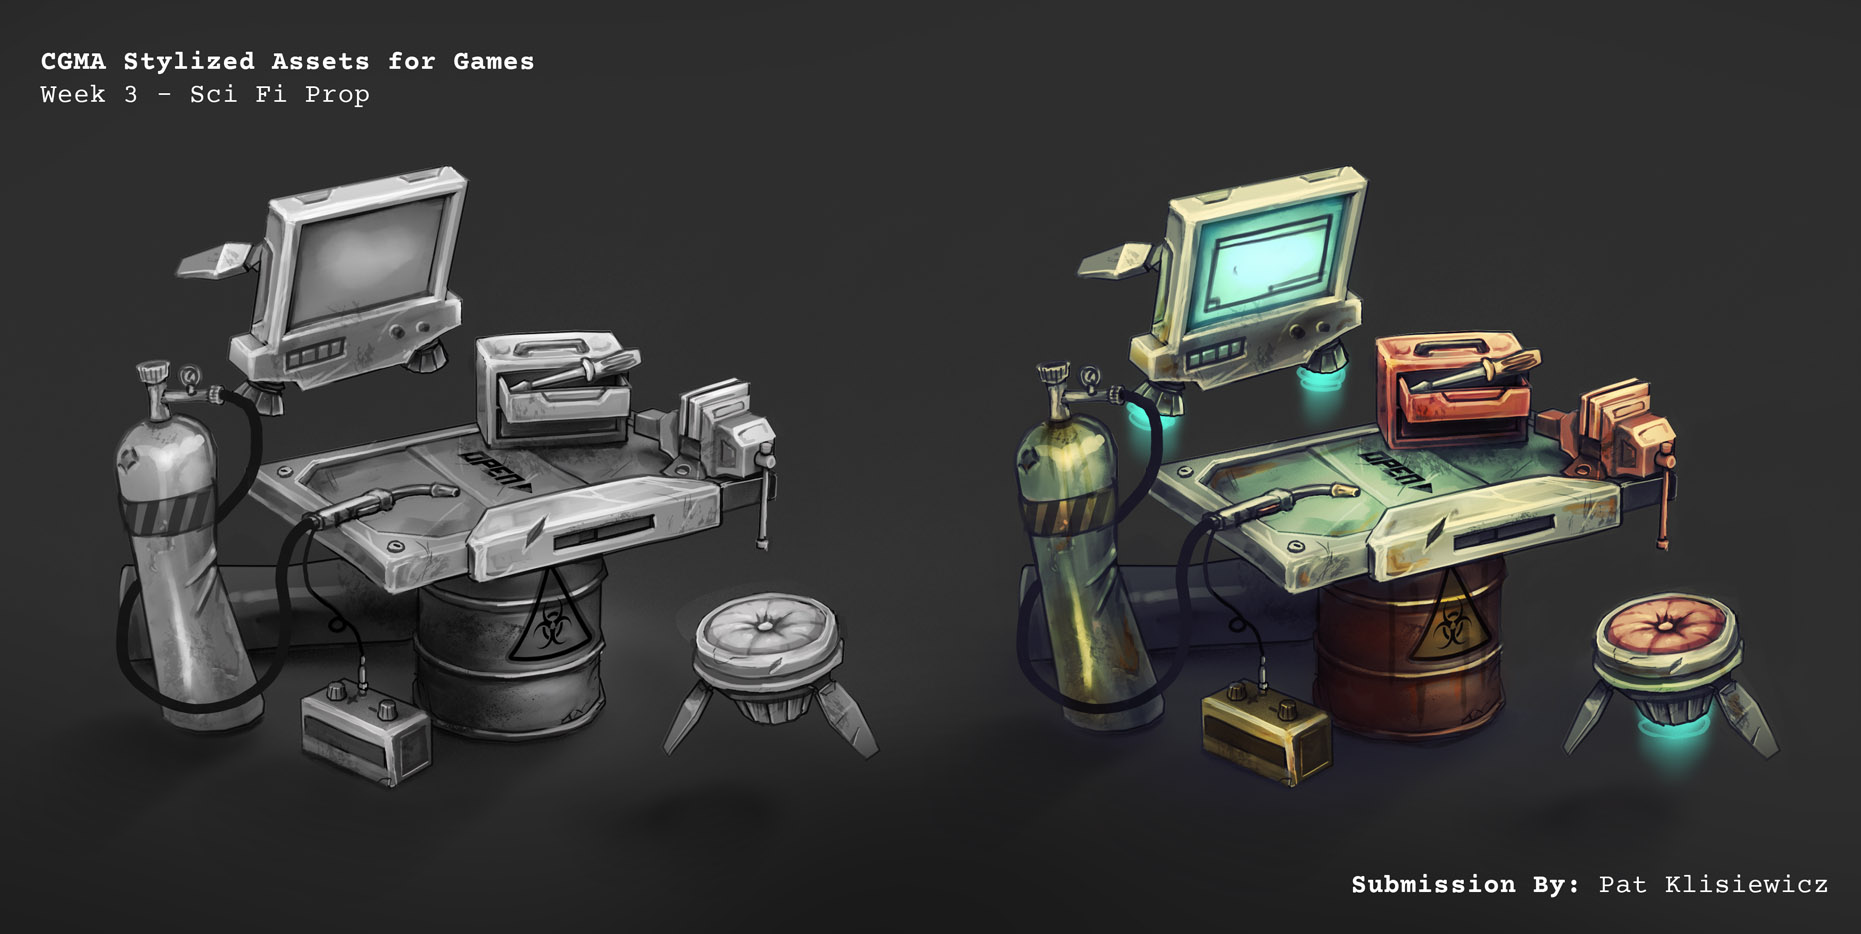
From here I went on to develop my simple grey block model into a more refined model that I would end up creating my final geometry from. The refined model doubled as a base to create a paint over.
I created the paintover to give me a better idea of what the model needed to look like, and also to set a colour theme and develop designs. I started in greyscale and then colorized it with gradient maps and painting onto layers with different blending options while referring back to my reference to see if I was hitting the “vibe” I wanted.
Modelling in Maya
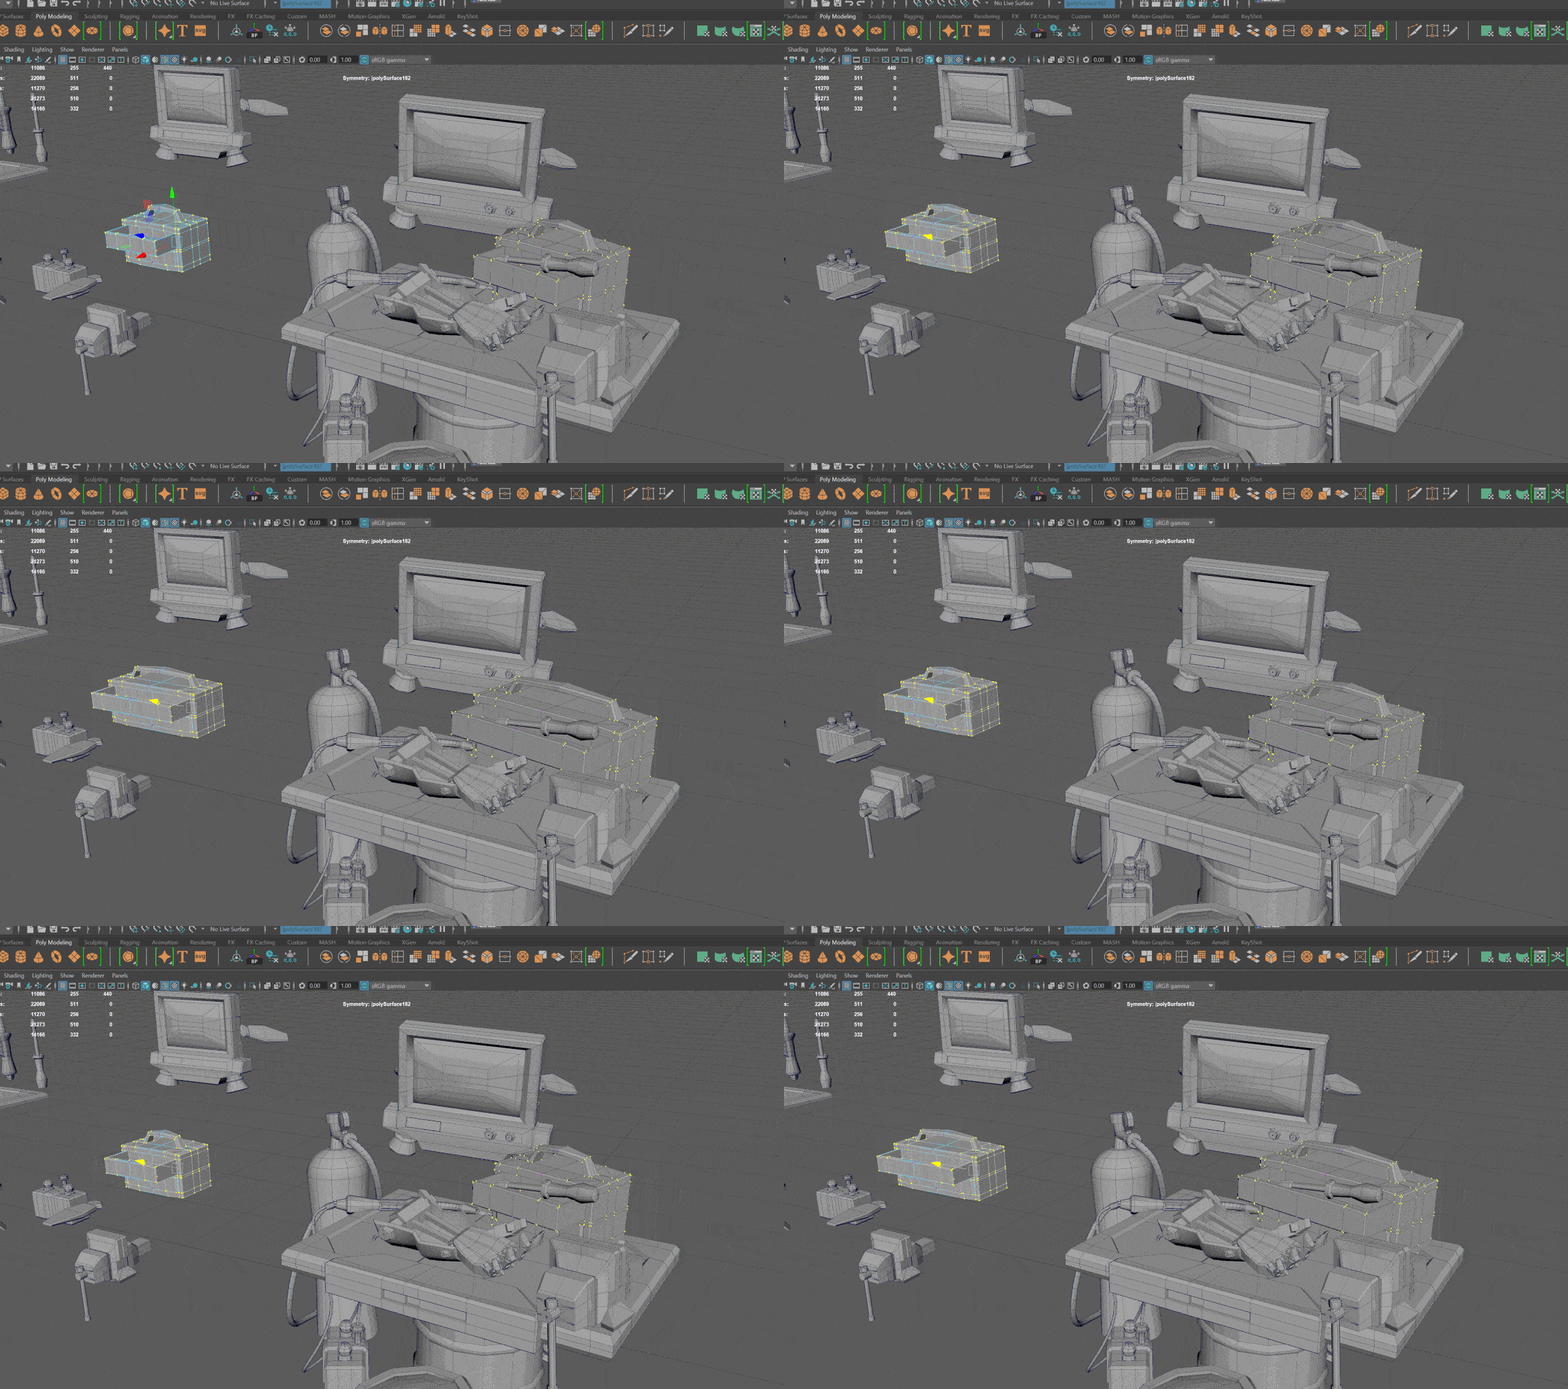
I used the model I created for the paintover to continue the modelling process. A big thing I really love about Maya is the ability to Instance Models. I worked in an exploded view, taking my base model and separating everything into its own space and using “instanced” objects in the final scene composition while I worked.
Instancing is a form of duplication that allows any alterations I make on one copy of the object to be automatically applied to the “instanced” versions. This technique lets me work on models that are aligned straight with my X, Y, and Z axis without having to worry about moving around pivot points and aligning edges. To do this, I use Duplicate Special and make sure the “Instance” box is ticked. (Instancing also works when using the mirror function in Maya, just tick the “instance” box.)
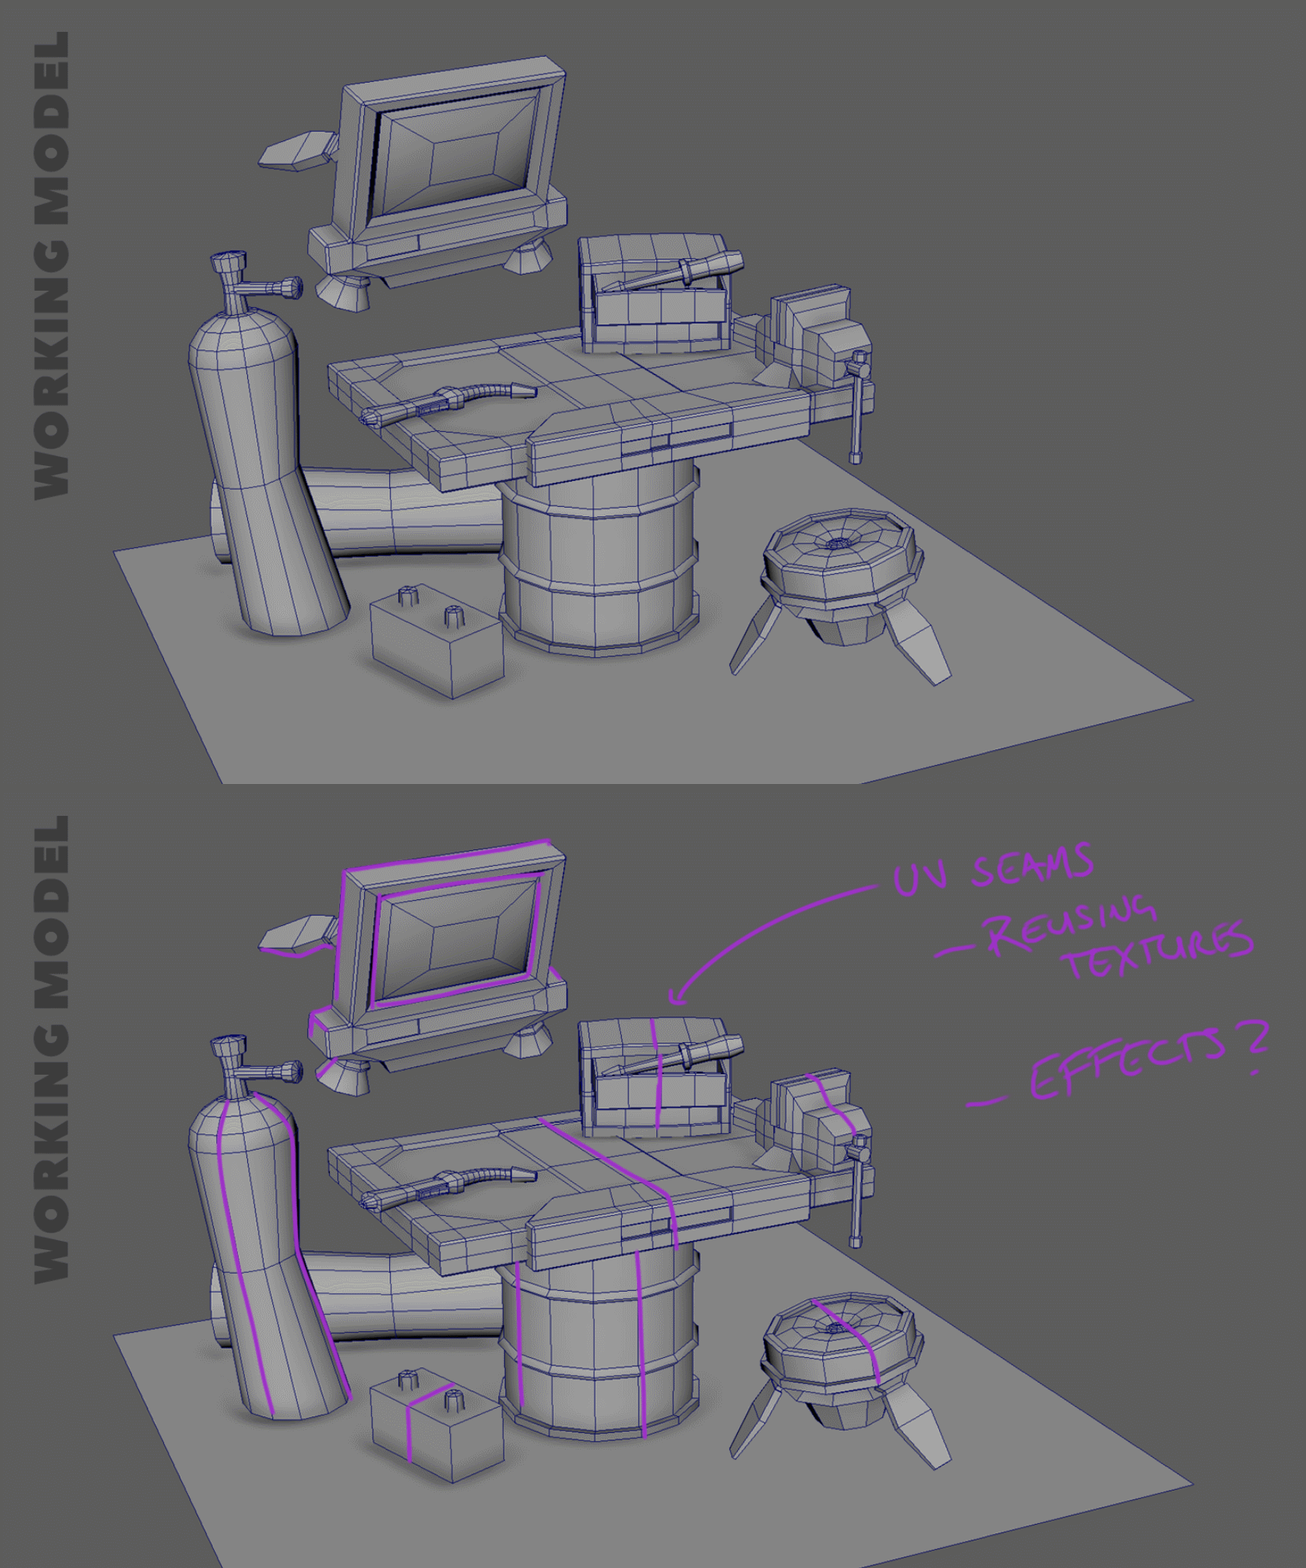
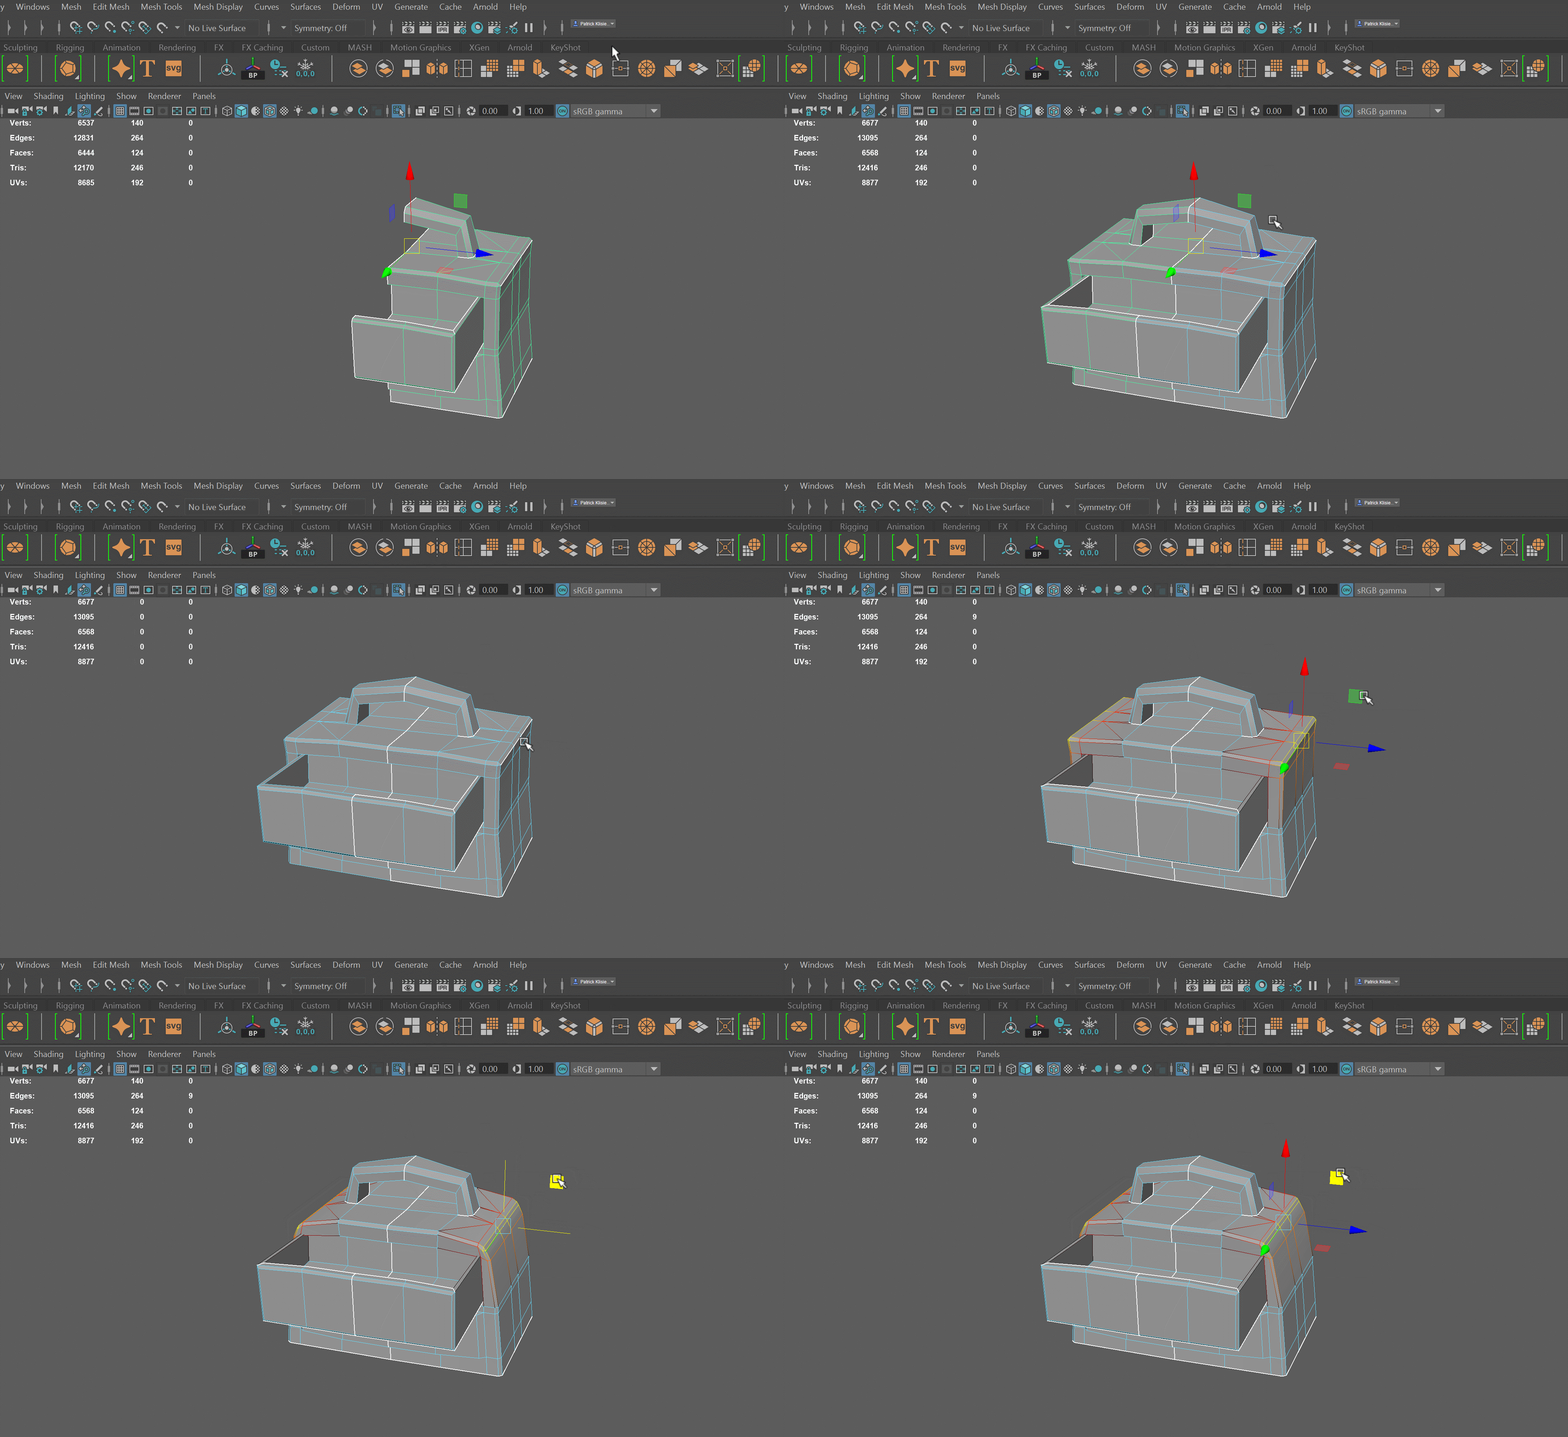
As I went, I tried to optimize my topology as much as possible. I also started to think about how I would texture this, because when I make my UV’s I wanted to have a pretty good idea of what areas I could reuse and stack to save time.
Once I was happy with the final model, I sorted my objects and used Mesh>Combine to organise my model in the Maya outliner. I also applied my hard and soft edges to the final geometry. I usually also keep an uncombined version if I need to go back and make quick alterations.
UVs
When working on my UV’s, I tried to straighten as many of the shells as I could by using the built-in Straighten UV’s and Straighten Shell tools in Maya. Frequently, I also just selected UV nodes and scaled them straight. Straightening things makes texturing later on much easier.
(Instancing also applied to UV’s. I could work on one half of the model, and have UV’s on all other instanced versions of this geometry applied automatically.)
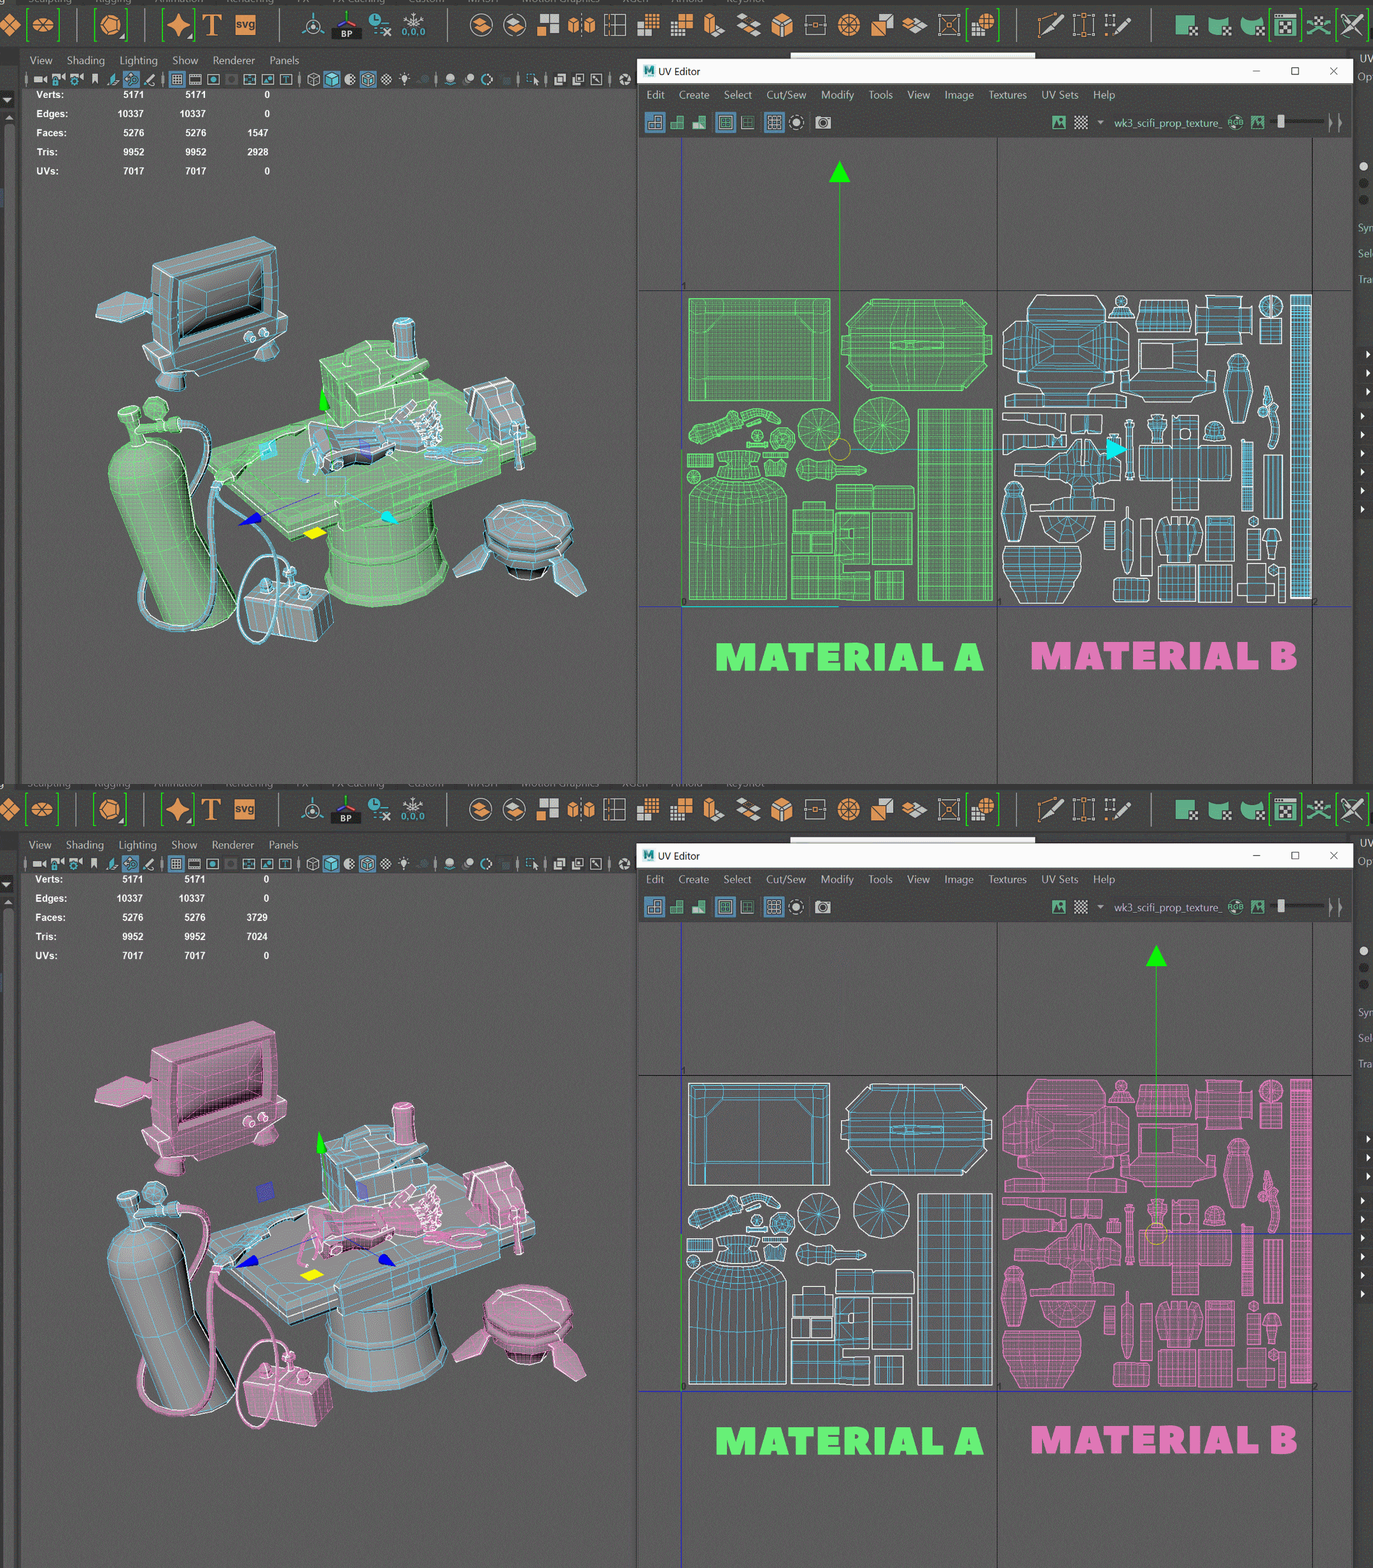
I tried to find a good texel density overall. For this piece, I ended up using two 2048px maps for the main geometry, a single map for the effects, and 1 map for the ground plane. This might be a bit overkill for an in-game asset, but I wanted the extra resolution as it was going to be a portfolio piece
To make things easier and less confusing for myself, I worked on the 0,1 and 0,2 UV Spaces while packing UV’s so I can see where everything sat. I created 2 materials, one for each texture sheet, and applied that material to the corresponding objects. (This was important for my steps later in 3D-Coat.)
Before exporting to start painting I made sure to combine, name, and organise all my objects in the outliner in case I had to move things around or duplicate items. And I moved all my UV’s to the single 0,1 UV space, which was important to get the bakes to work in 3D-Coat.
Texture setup & baking maps
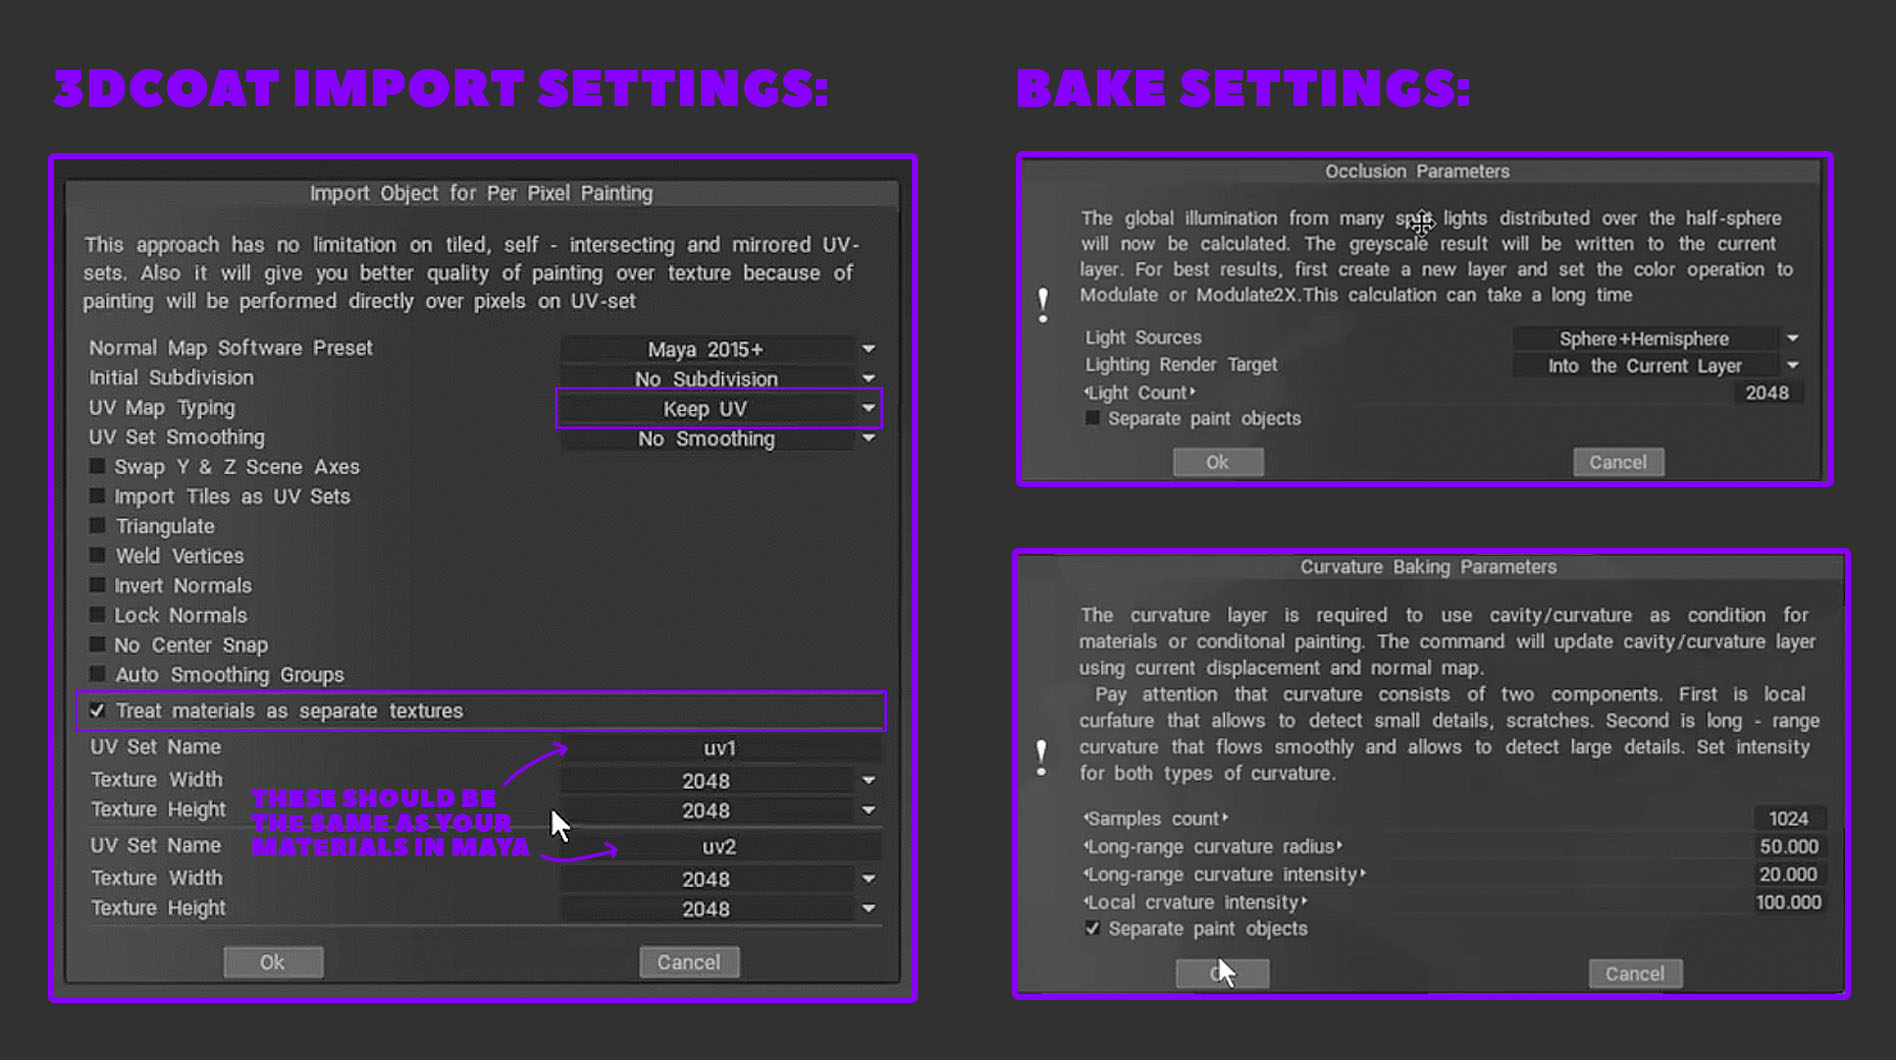
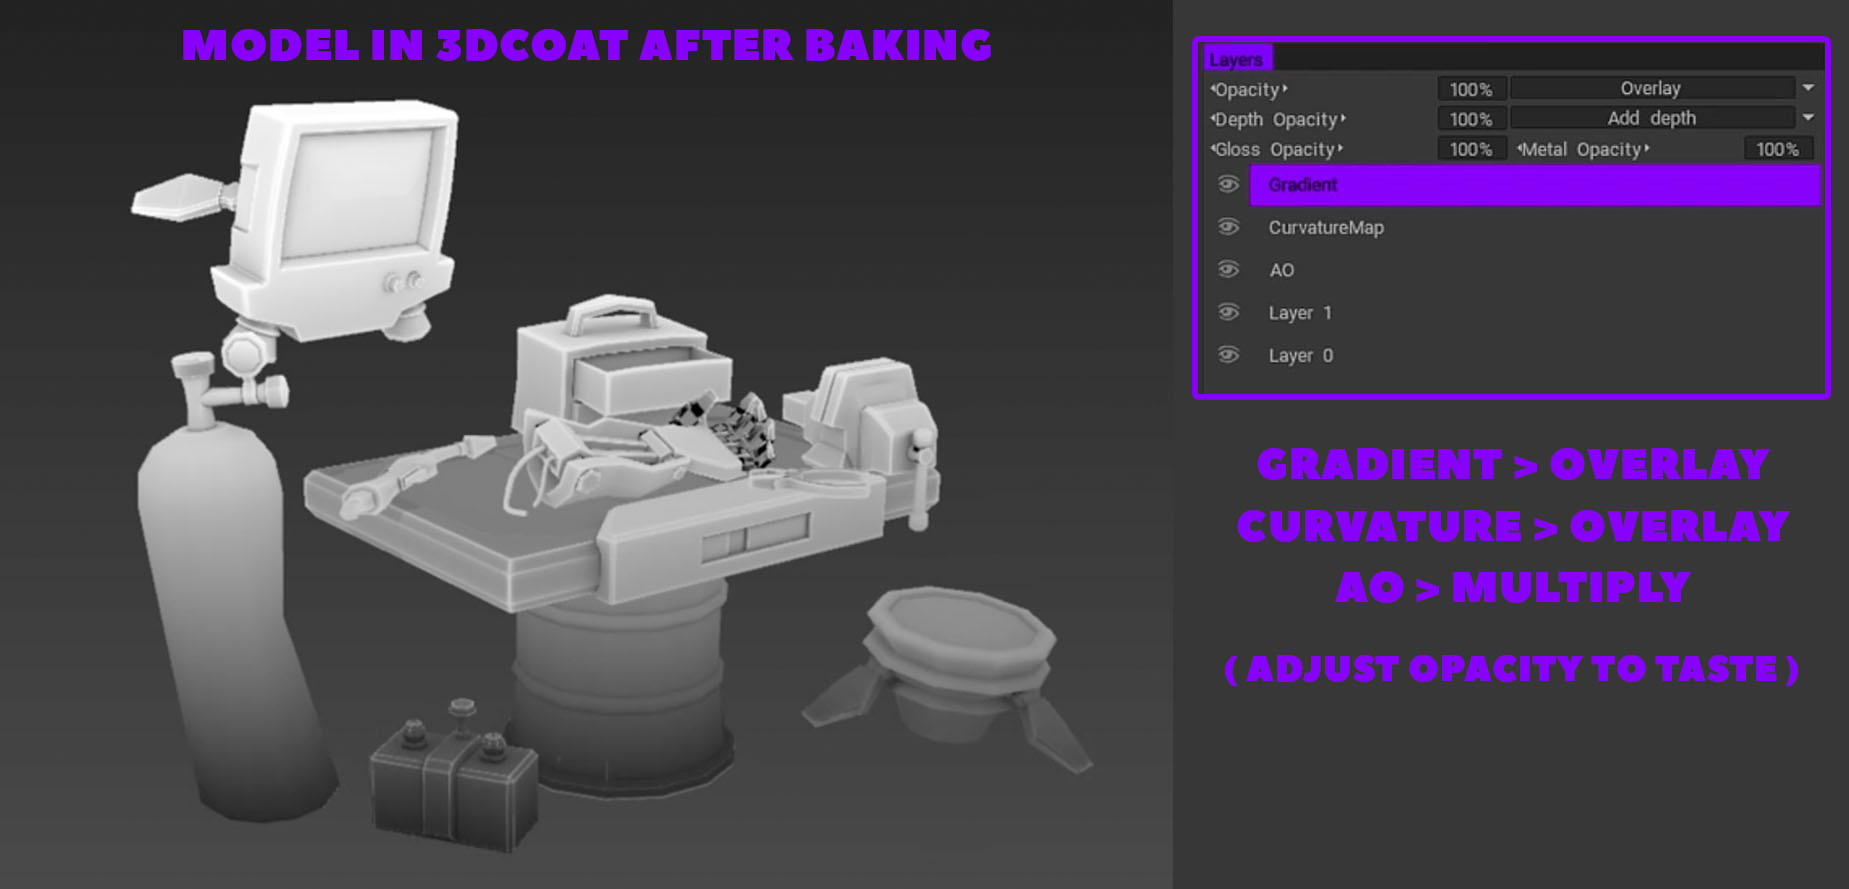
Once in 3D-Coat, I imported the model for painting. I ticked the “Treat Materials as separate objects” box. This is why I applied materials per UV Texture sheet in Maya. This treats the 2 materials as 2 separate textures. Once imported, I went through and baked my maps for each object. You can isolate objects by ALT+LMB, and clicking the visibility icon in the Object Display panel. (I could have used the separate paint objects option in the ambient occlusion bake settings, but I find I can have more control on what items are baked together by just isolating the objects.)
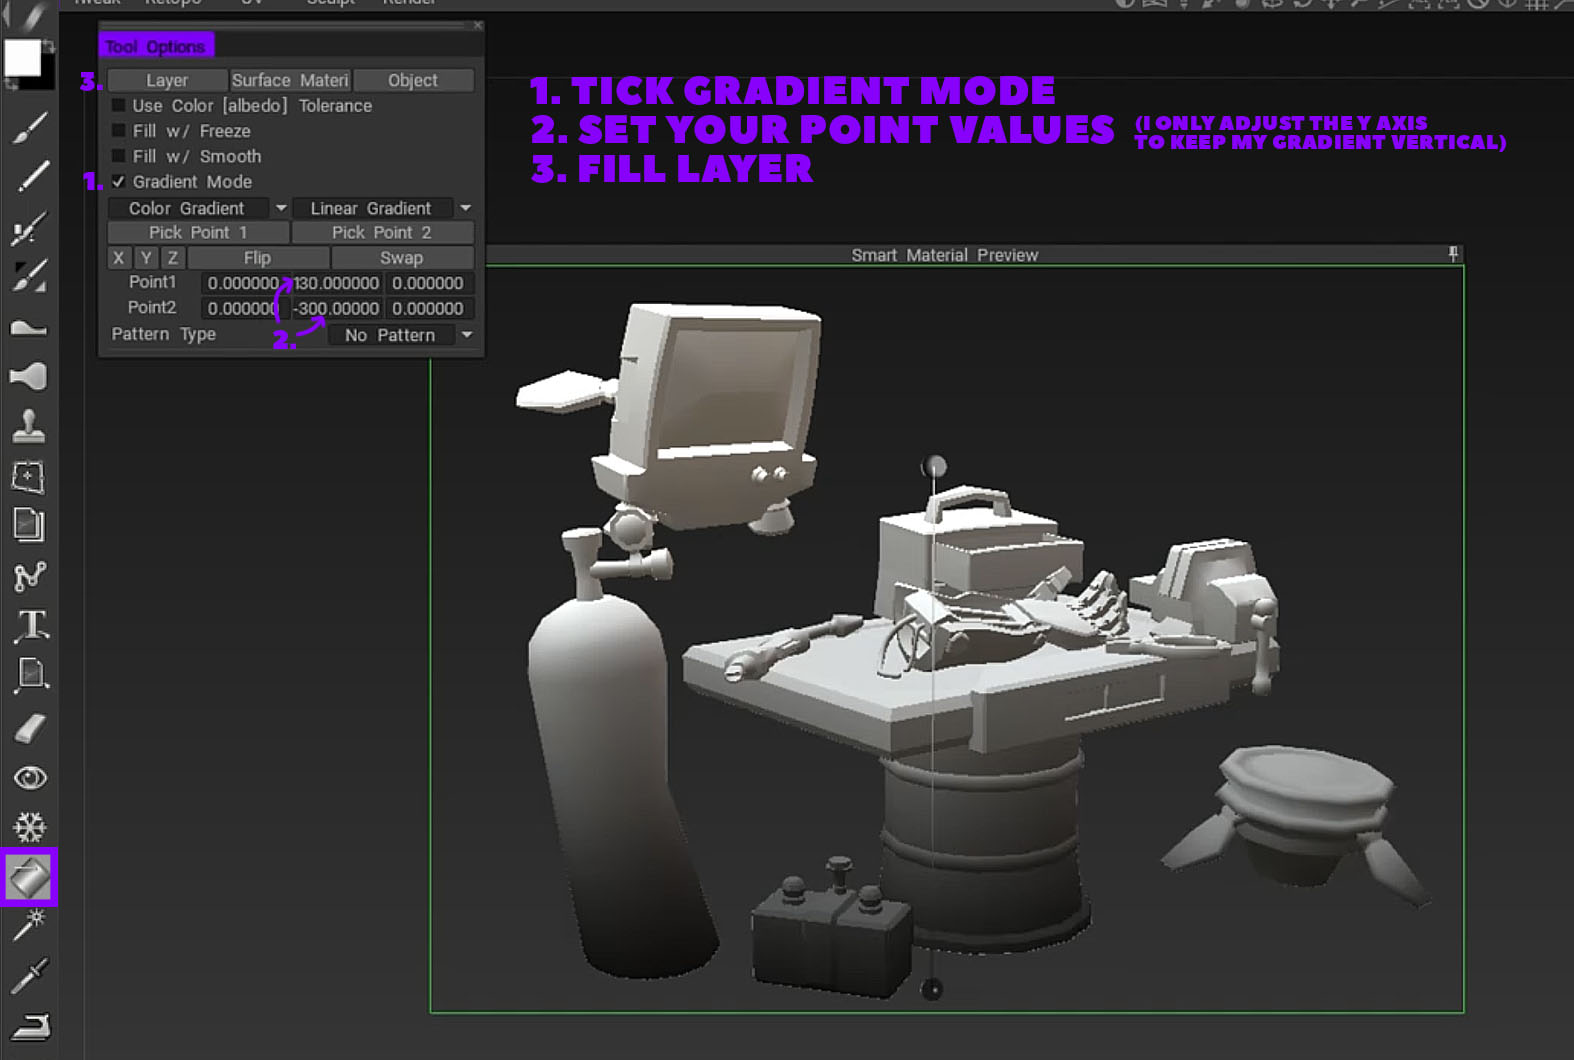
I set the mode to Sphere+Hemisphere and baked a curvature map without worrying too much about artifacts in the bakes from stacked UV’s; I would paint these out later, anyway. Finally, I used the gradient fill tool to fill my object with a top down gradient: white to black. I would colorize this later when I took my textures into Photoshop and set up my texture files.
I made sure to use Unlit Mode in 3D-Coat by pressing 2 on the keyboard.
Note: I hid the hoses/cables when baking as I did not need any baking information for these.
Last step here was to hit Ctrl+P and export each texture sheet to Photoshop, then re-save the files as my working textures.
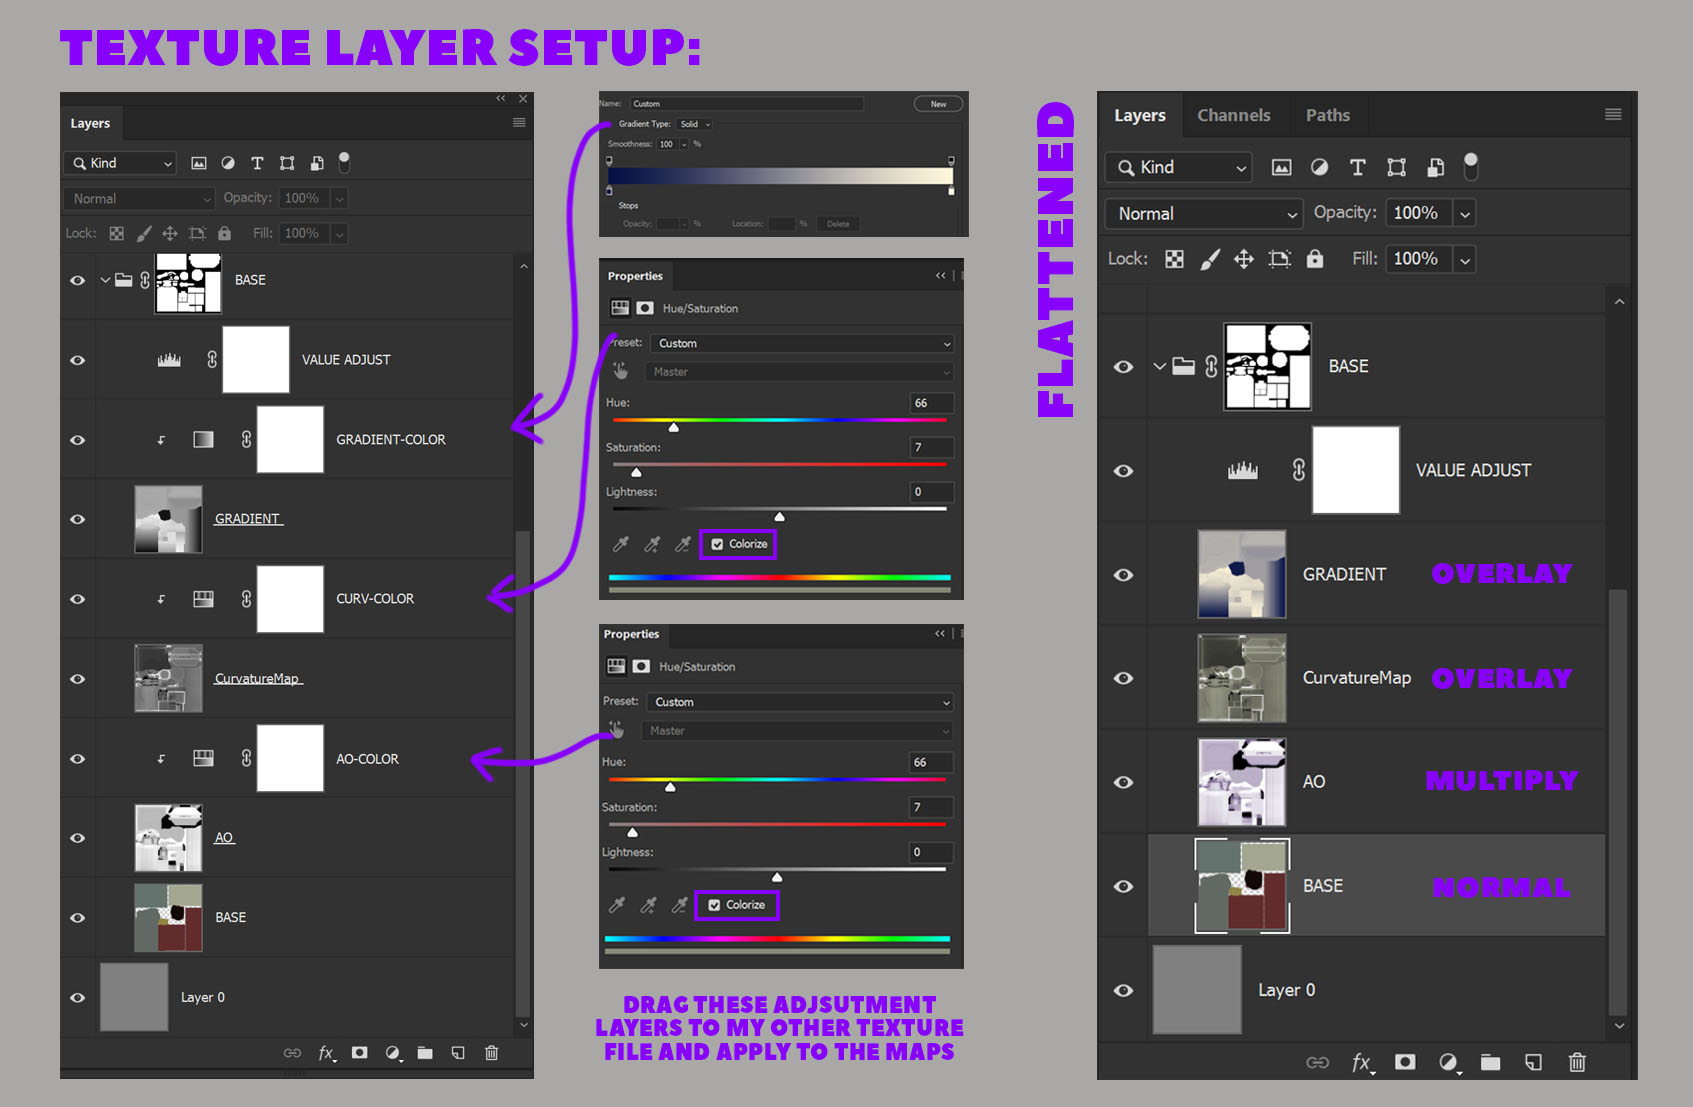
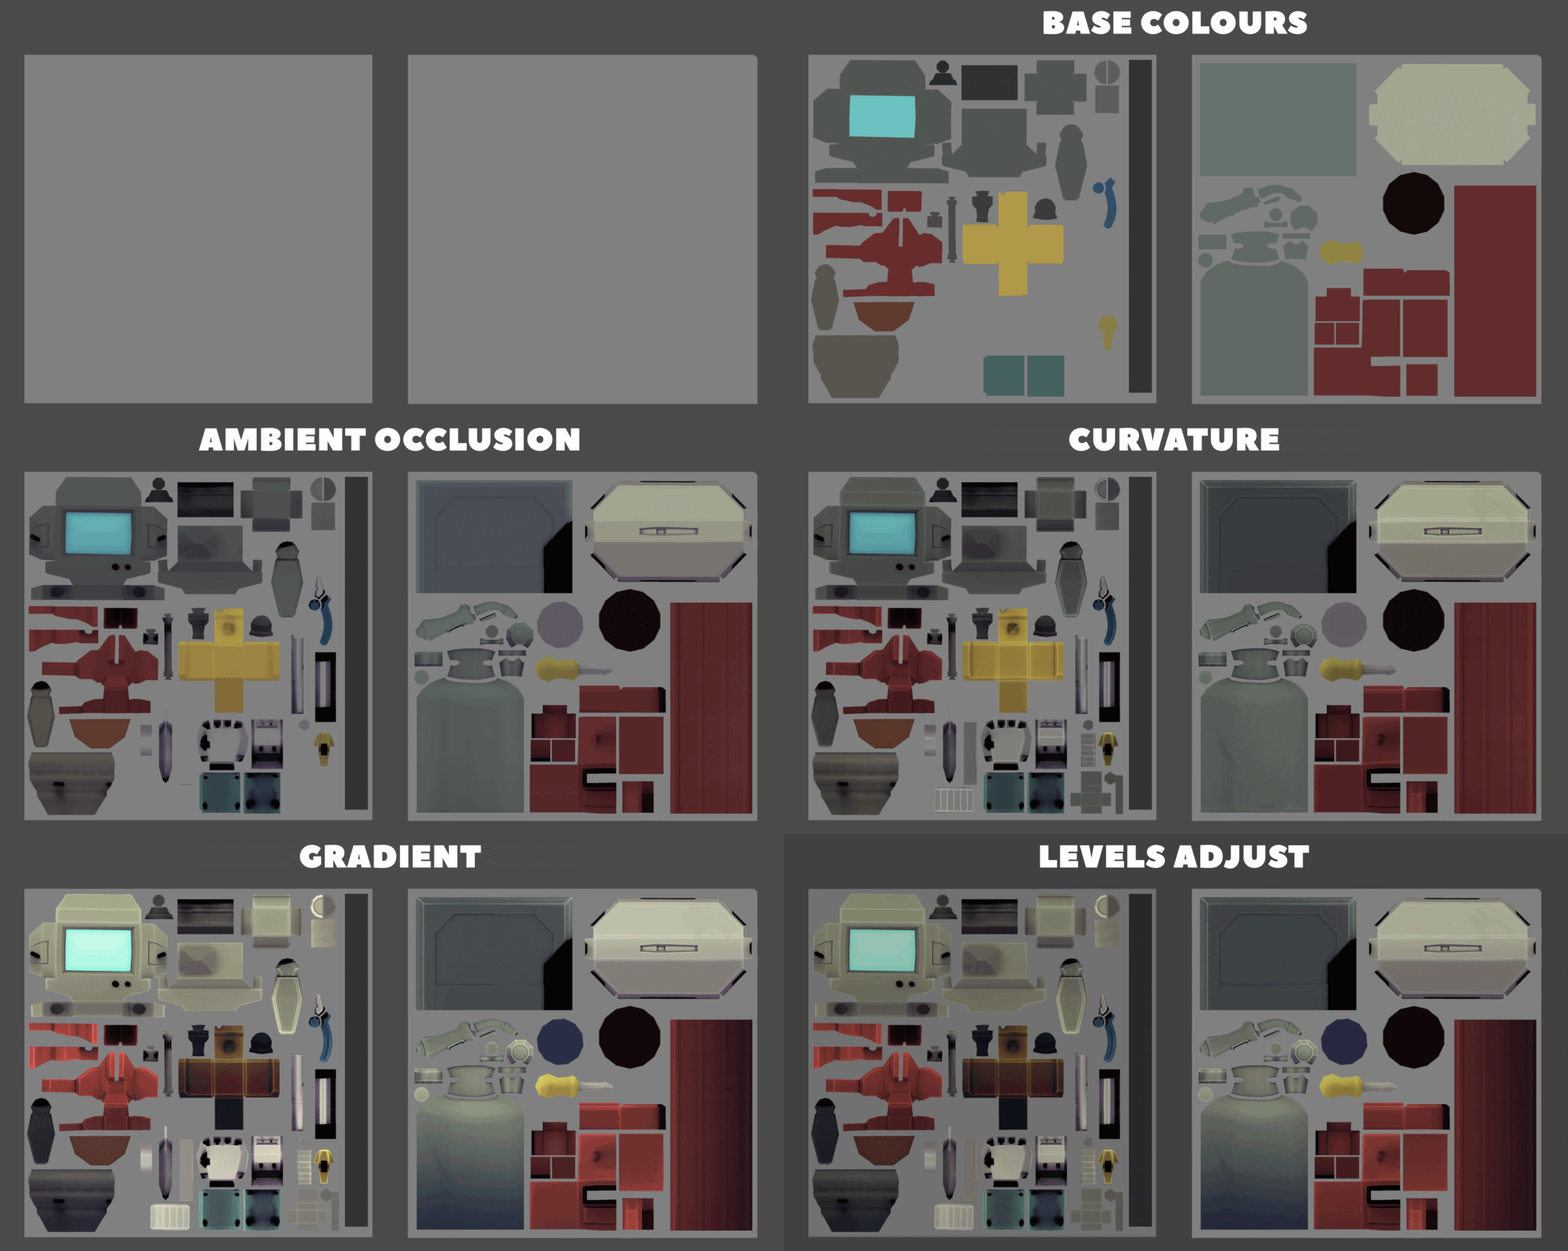
I went in and painted out any map baking errors or areas where I didn’t want any shadow information. Then I filled in my base colours on a layer at the bottom of the stack and used a Hue+Saturation Adjustment layer set to “Colorize ” to give my maps a coloured tone. My rule of thumb is purple/blueish for Ambient Occlusion and Yellowish/Orange for the Curvature map.
Lastly, for the top-down gradient, I applied a Gradient Map adjustment layer using the same colour rules as before: cool shadows and warm highlights. This approach gave the lighting a nice bit of colour variation without looking flat.
To get a uniform colour across my maps I copied the adjustment layers into my second texture file and applied them to the corresponding map. After this I tried to tidy up my layers, flatten, and add my own padding using the Unity Padding Actions for Photoshop. (These can be found here.)
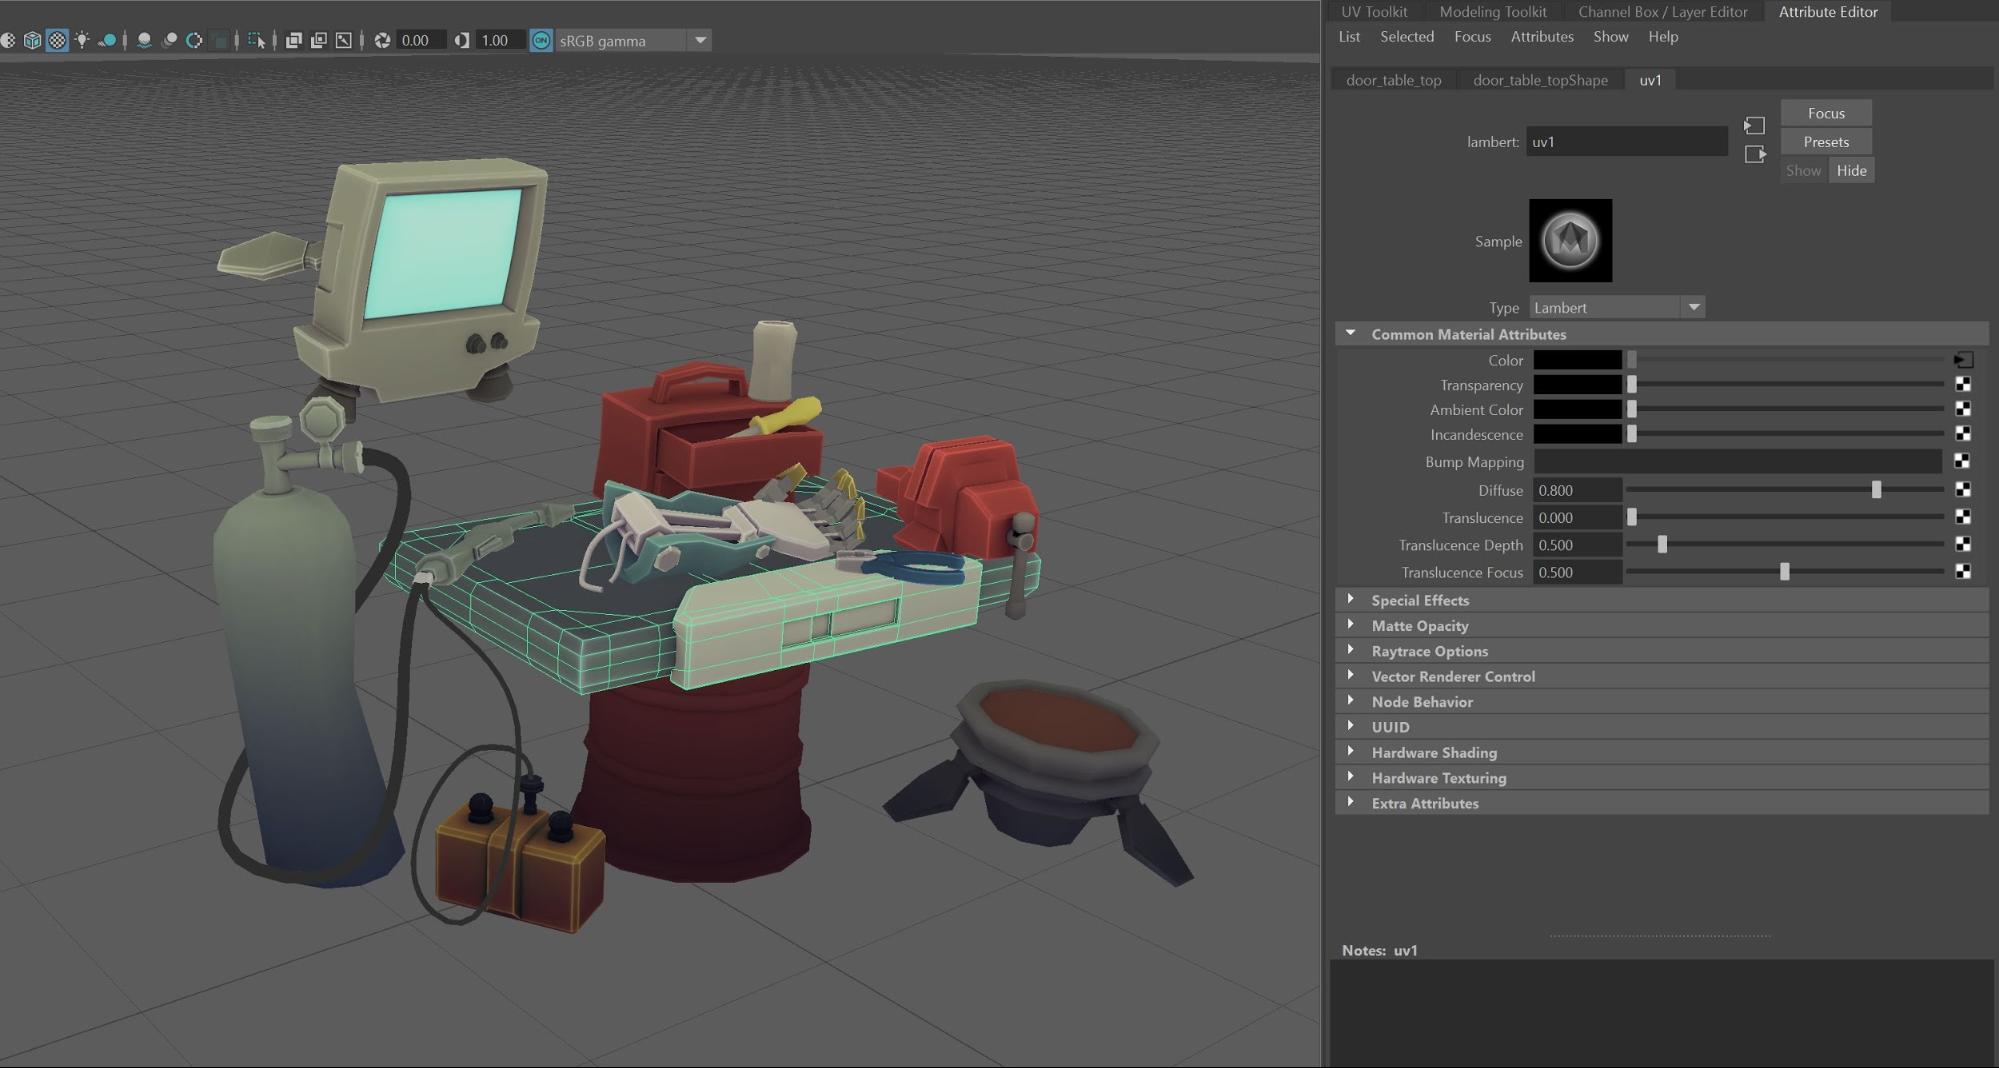
I now jumped into Maya and connected my Photoshop documents to the materials to see how they were looking. From here I adjusted levels and colours to a point that I was happy to go in and start painting down on my base. (I also saved the maps into a separate group in the Photoshop document—they usually come in handy later.)
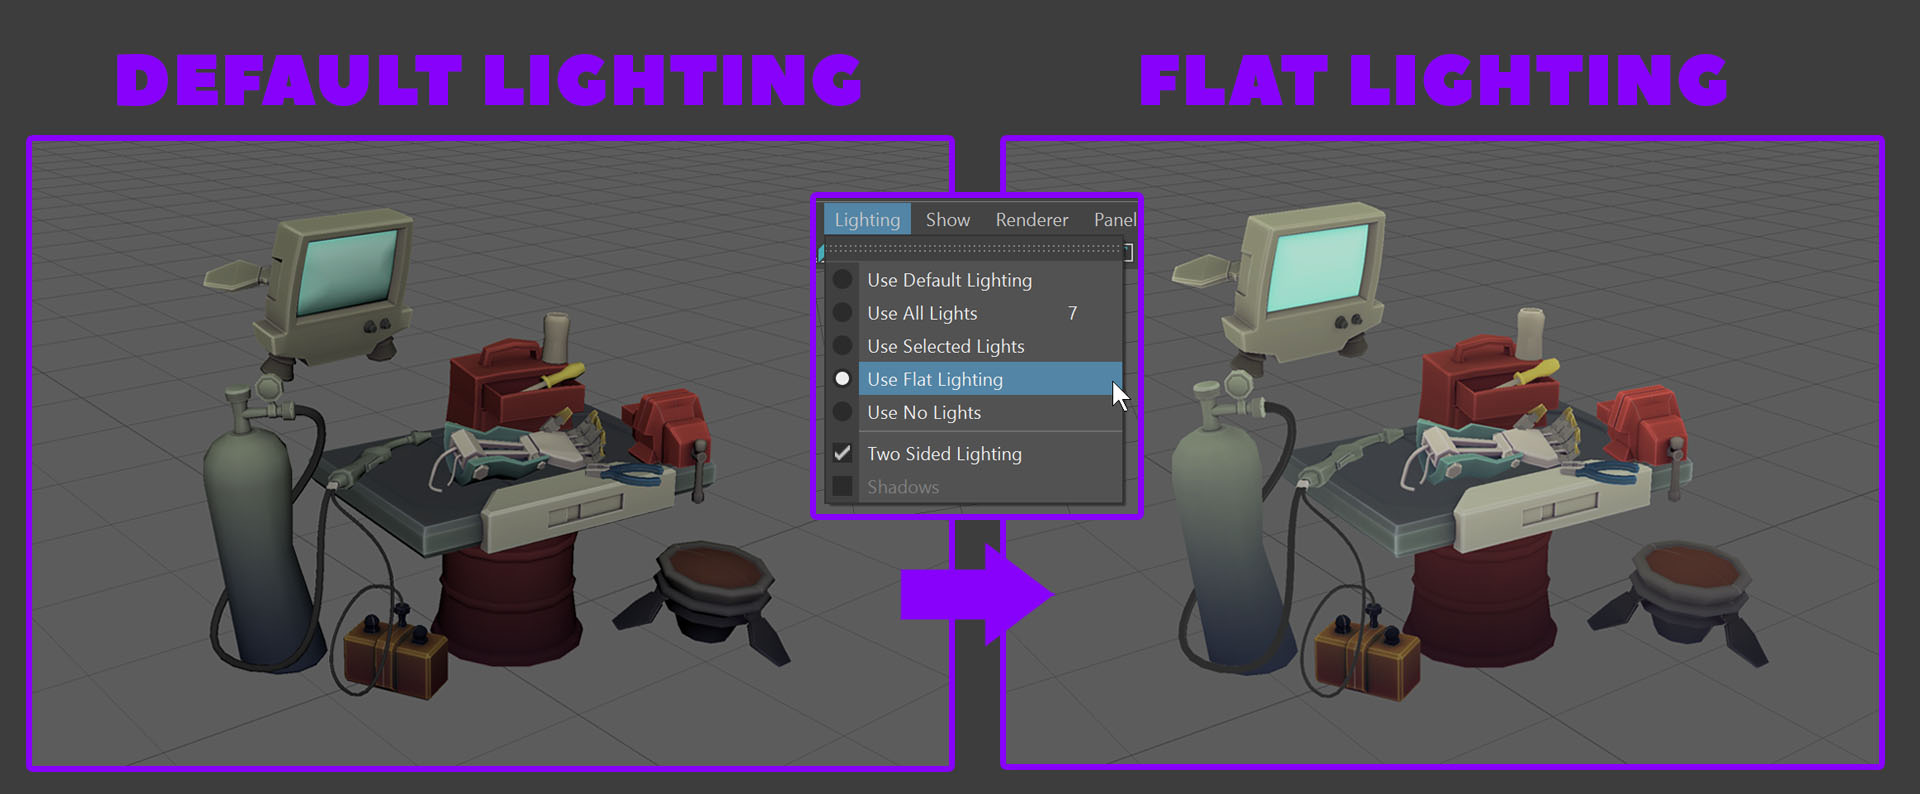
Setting up the Maya viewport with the correct settings is important. I turned on Flat Shading, 2 Sided lighting, and adjusted the Viewport Transparency to Depth peeling.
I always work in flat shading mode. This setting is important when creating hand-painted art, which relies less on world lighting and more on painted lighting information. It can also be hard to judge values between Photoshop and Maya when default lighting is casting shadows and tones.
Texture painting
Rome wasn’t built in a day, and neither are polished textures.
Spending the TIME on your textures—I feel—is the magic sauce. Don’t rush. Work big to small so your textures can develop properly. Studying your references, analyzing, and getting feedback will take your textures that much farther. Periodically throughout the process I went into 3D-Coat, applied my textures and painted out the seams.
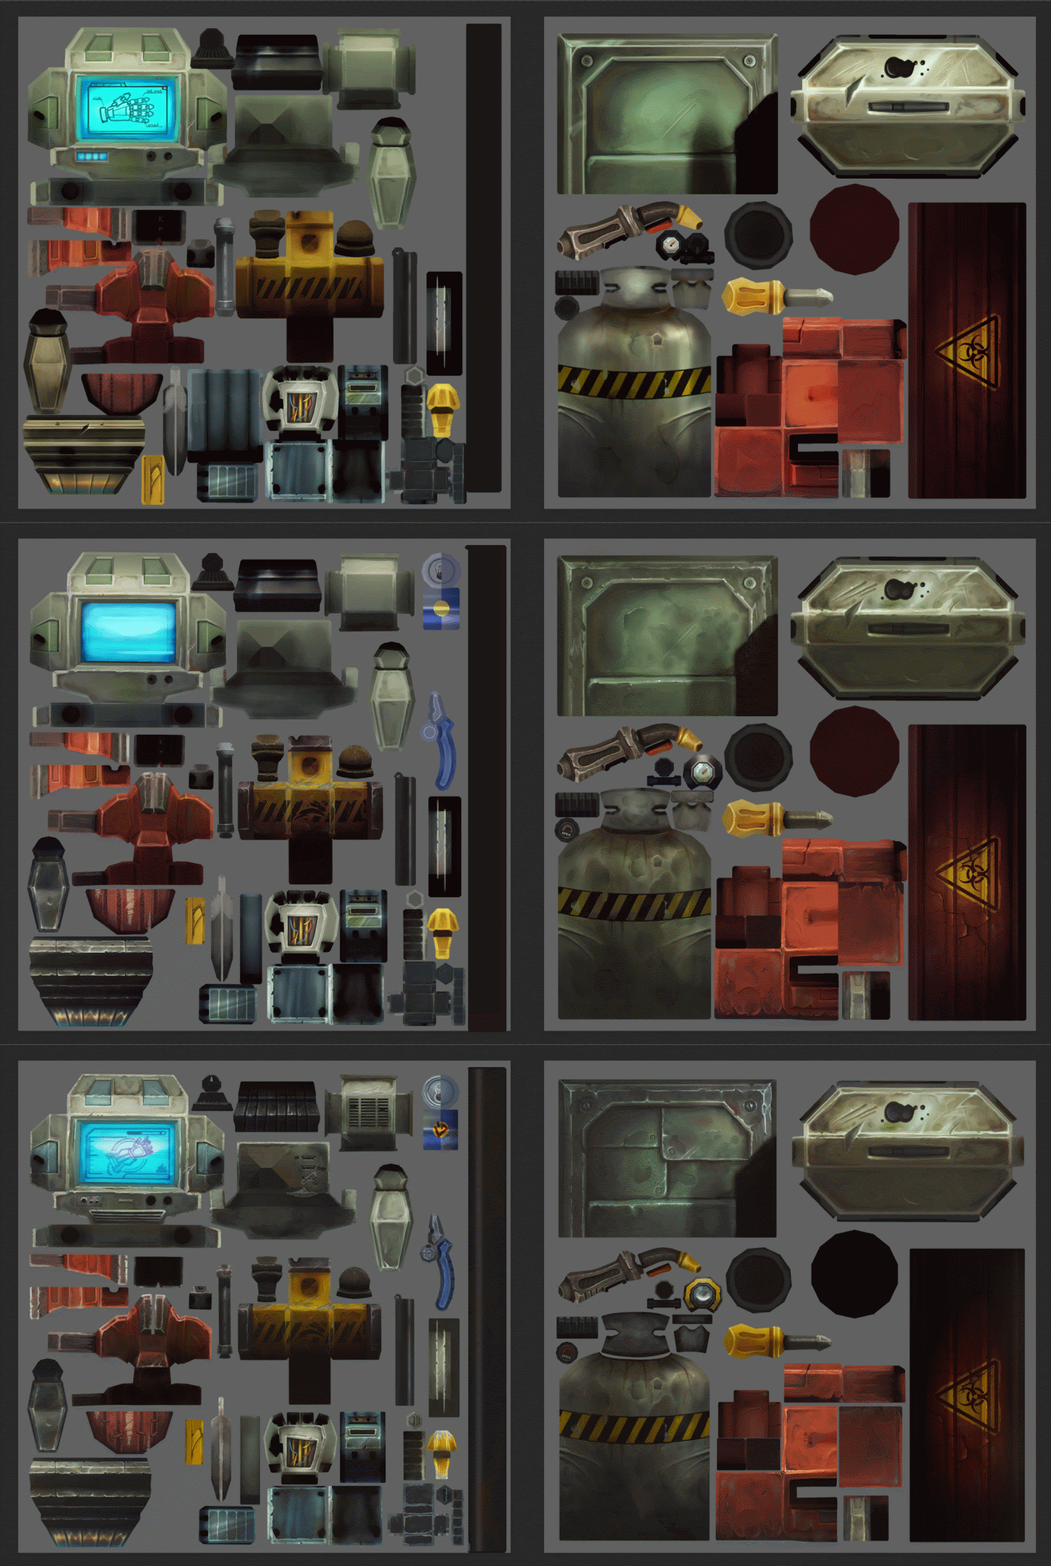
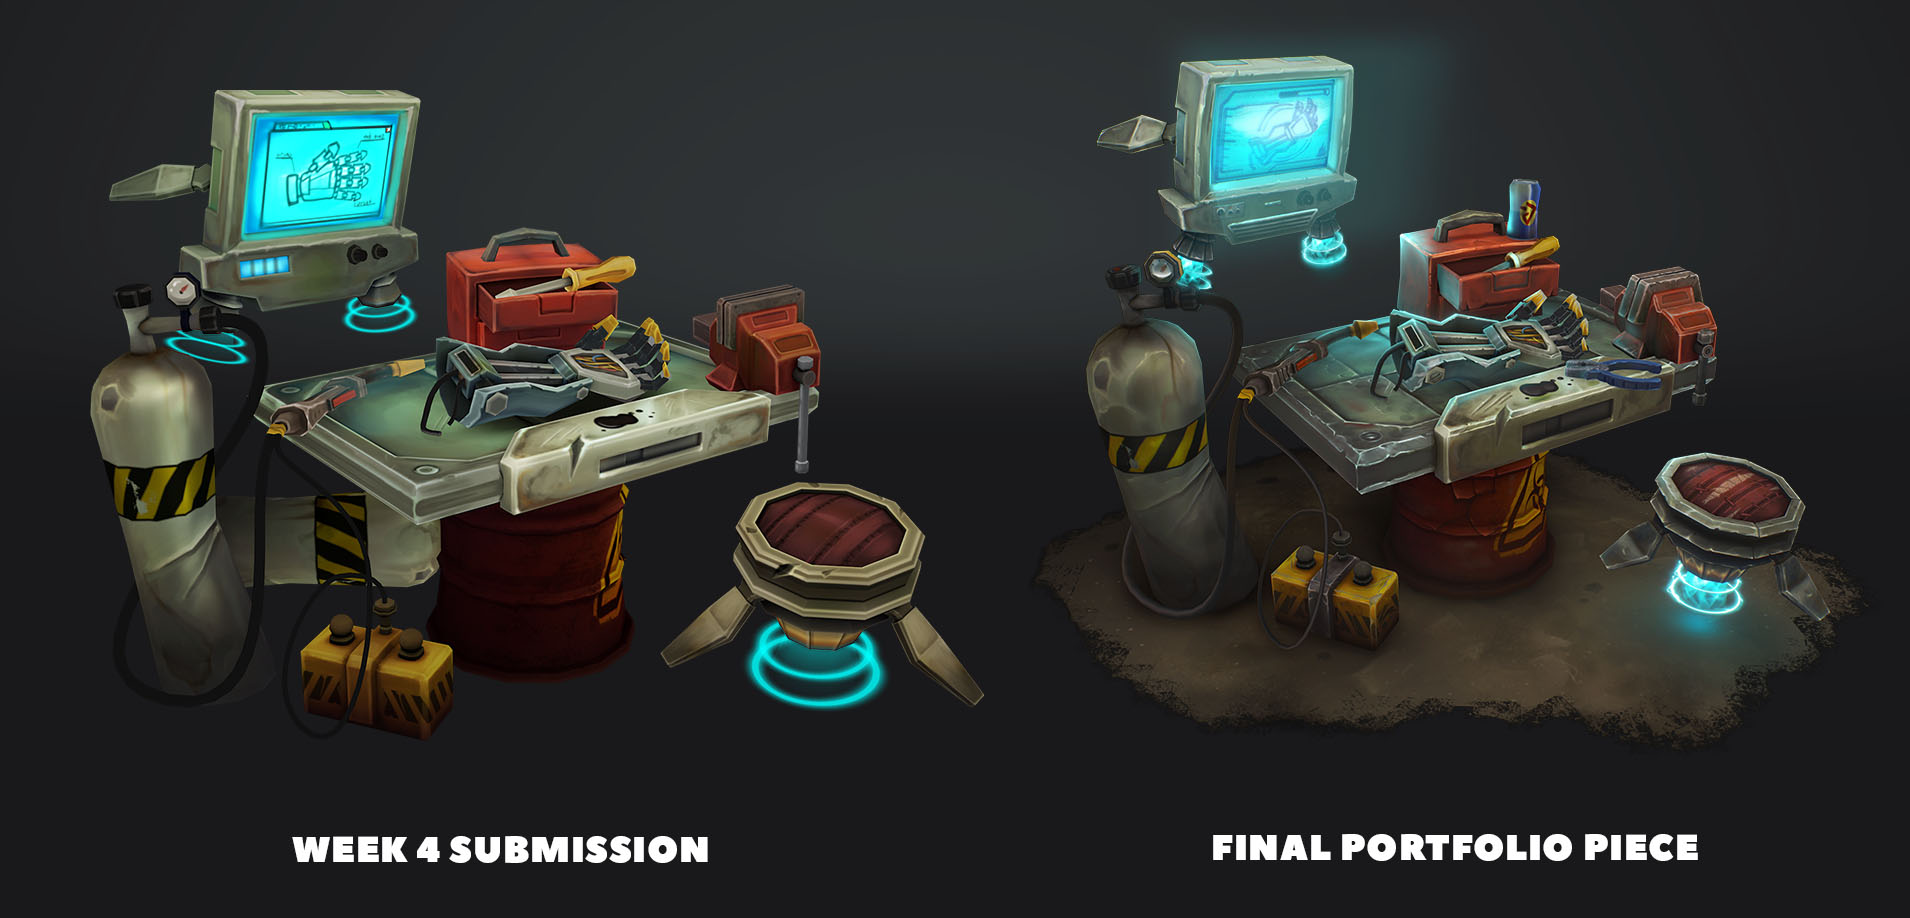
Here you can see how my textures looked when I submitted them at the end of Week 4 compared to the more developed textures I produced after the course had finished and I had spent the extra time to polish things in my own time for my portfolio!
Note: I made UV changes late in the process. I was not happy with the stretching and UV layout on a few items so I went back and tidied it up. You will notice changes throughout the process because I fiddled with the entire model constantly during texturing. If something didn’t look or feel right, I would change or adjust it.
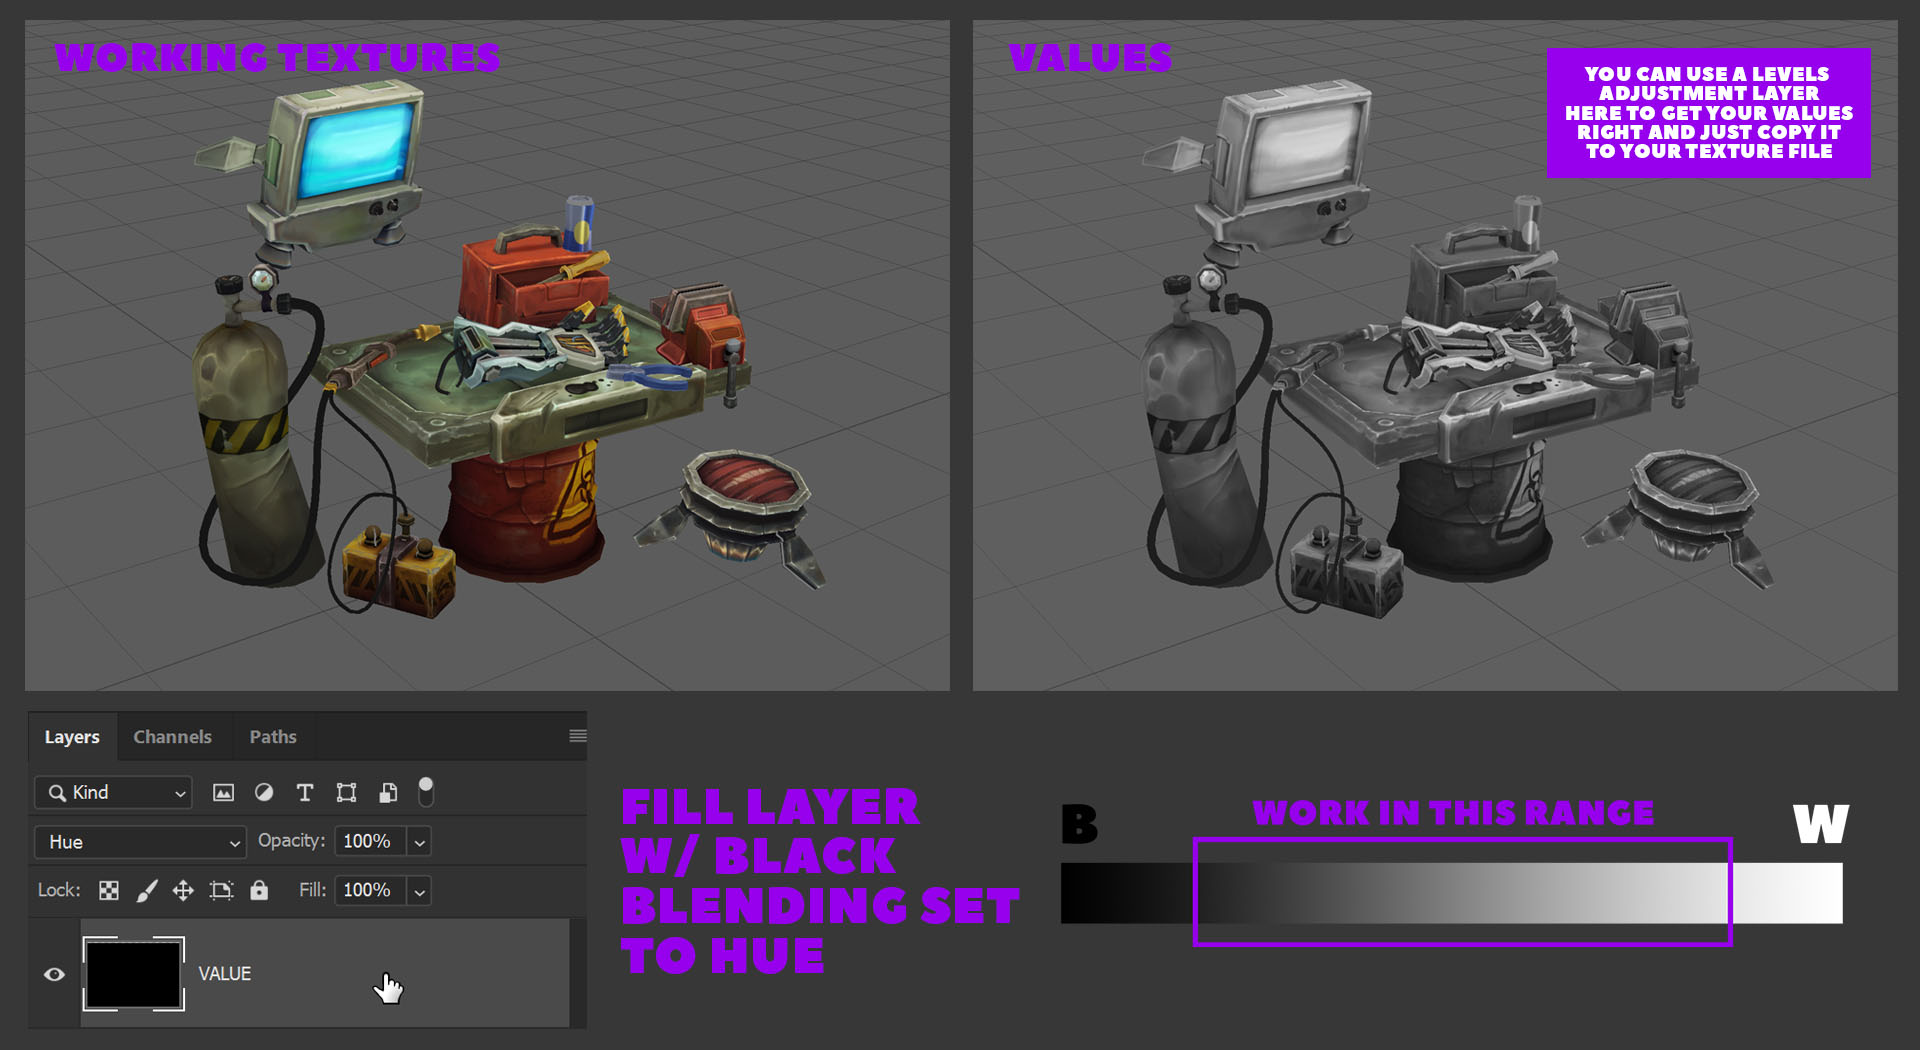
Checking values as you work is simple: just take a screenshot, drop it into Photoshop and apply a layer on the top set to Hue; this will show you how your base values look. And it is easy to spot things that are too bright or too dark. Fixing things in Photoshop is easy by just using curves or levels. I try not to work with too much contrast and keep the values clamped.
An important thing to remember for “rich” textures is colour Variation and moving colour around the piece. Adding splotches of extra colour here and there can really make a muddy or flat texture look more alive.
Effects
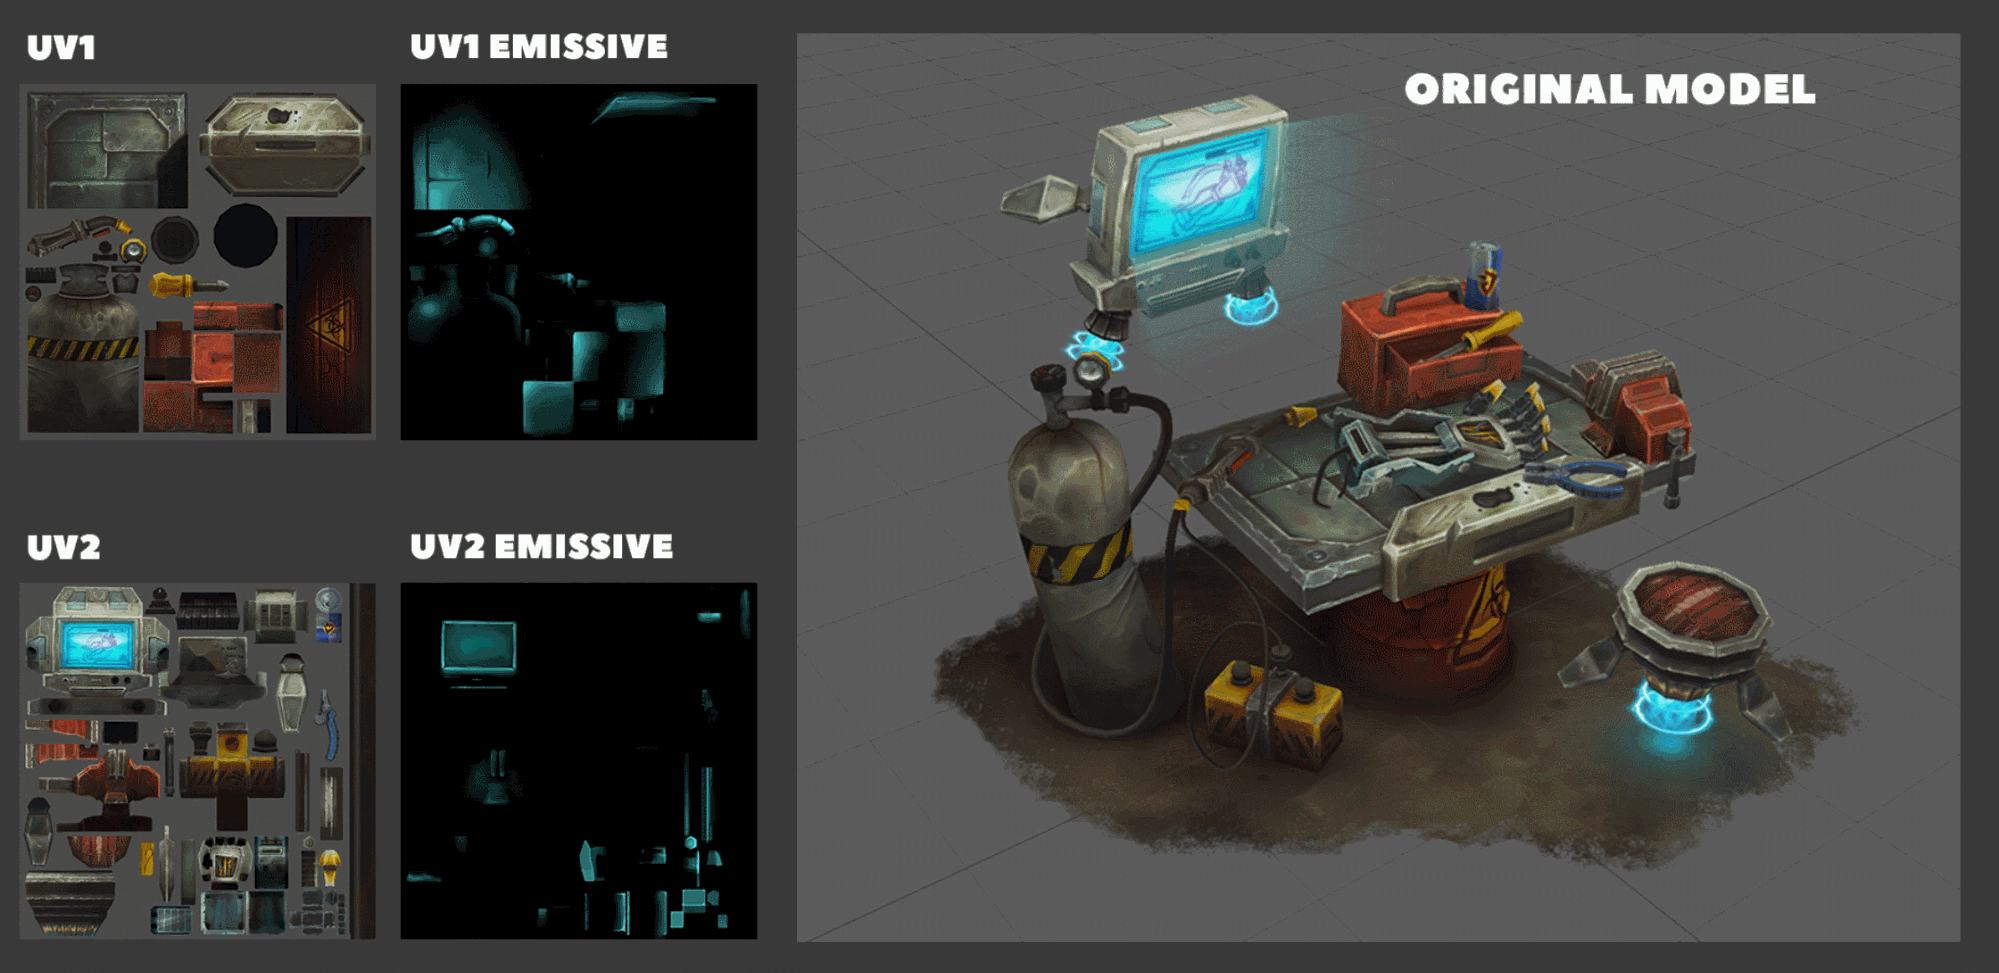
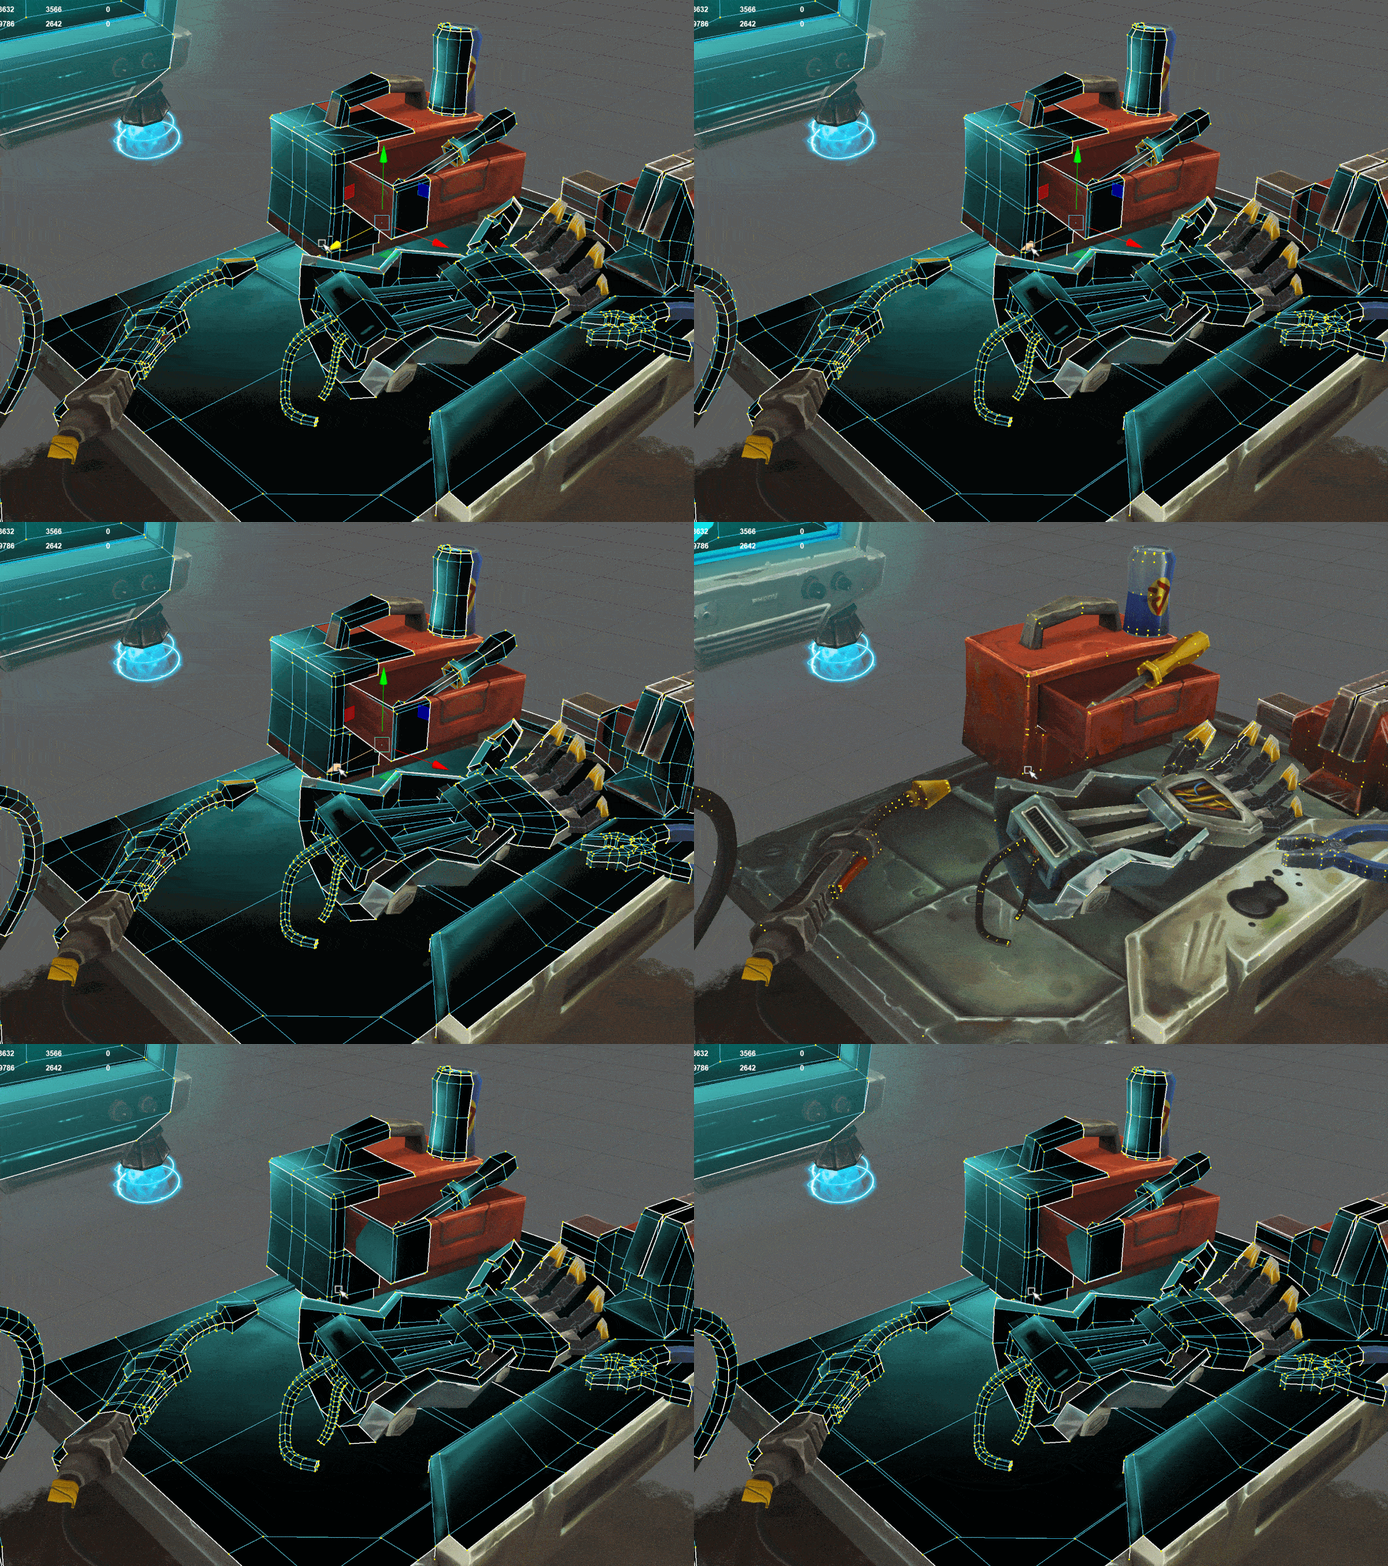
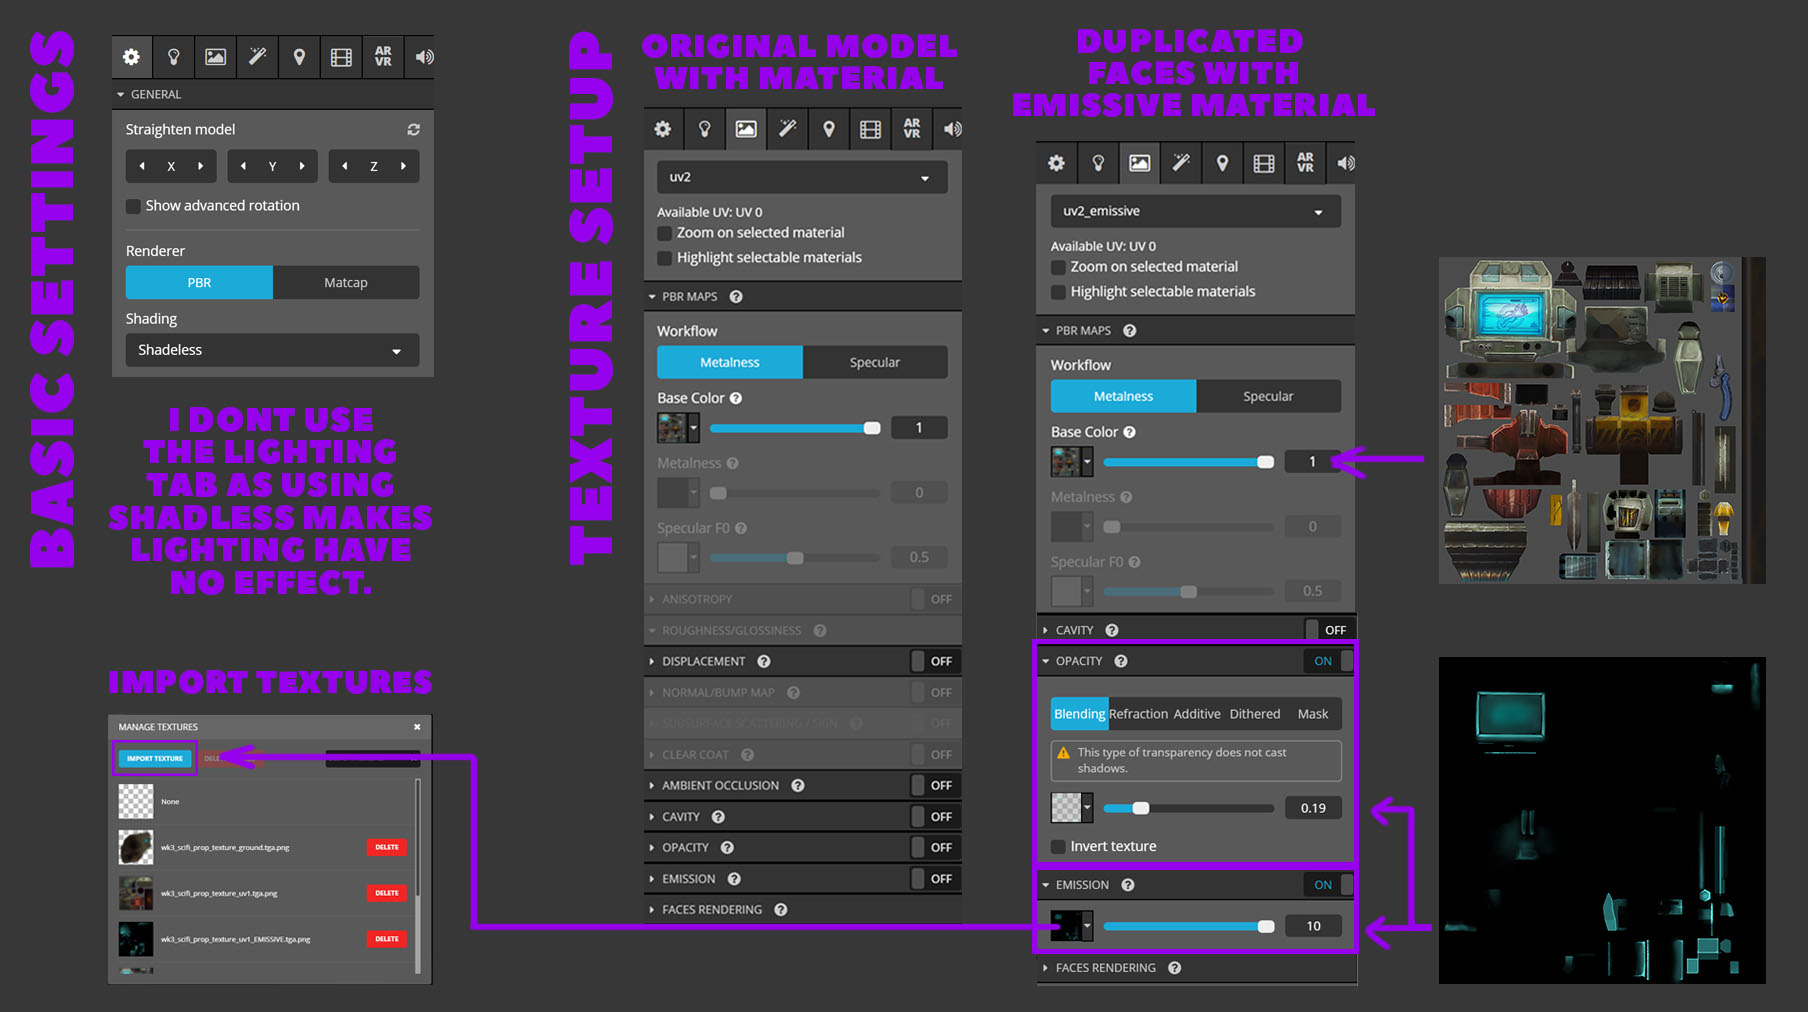
I realised later in the process that I wanted to add a glow effect from the screen onto the benchtop. Having mirrored UVs meant that I was getting a glow where I didn’t want it. An example of this is the farside of the tool box and the fingers and bolts of the robot hand where I had stacked UVs to save time texturing. The way I worked around this was to duplicate the models I wanted to have the glow on, and import them into 3D-Coat. I painted in the emissive light on a new layer here, keeping in mind where my UV mirrored seams were. After exporting a texture from 3D-Coat, I applied it to my duplicated objects in Maya and deleted the faces I didn’t need (the faces that wouldn’t show the emissive glow.)
An issue here was clipping of the geometry sitting on top of itself 1:1. To fix this I selected all the vertices, and, holding CTRL+ MMB, nudged the move arrow to inflate the geometry slightly. This technique solves any clipping issues you might have and is not visible to the viewer.
It wouldn’t be done like this in-game. And this is where really planning things out early can save you a lot of time and pain.
Final hand-in for CGMA class vs. Extra polish
Earlier I mentioned how this project was done in 2 phases. Here I just wanted to show the model after my original submission at Week 4. And the piece after alterations and polish when CGMA wrapped up after 10 weeks. I think this goes back to my comment during texturing, which is TIME. I spent a lot of time just polishing the textures and experimenting, asking other artists for feedback and advice. It isn’t magic. It’s a bit of hard work.
Presentation & renders
This is where the hard work pays off. I exported my model and saved my maps as .TGA Files. I saved anything using transparency as 32-bit, which preserves the alpha channel. I knew from the beginning that I didn’t want to rely on any scene lighting and I wanted to just let my textures do the work, so I set this up in Unlit mode using only a base color, opacity, and emissive channel. I also loaded all my textures straight into the Sketchfab texture manager.
The post-processing is where you can really experiment with different looks. I love how Chromatic Aberration looked on this piece. I also love the SSAO and Bloom that Sketchfab has.
A light sharpen and some colour & contrast tweaks, and I was off to the races! You can really set a mood using basic lighting and post-processing here.
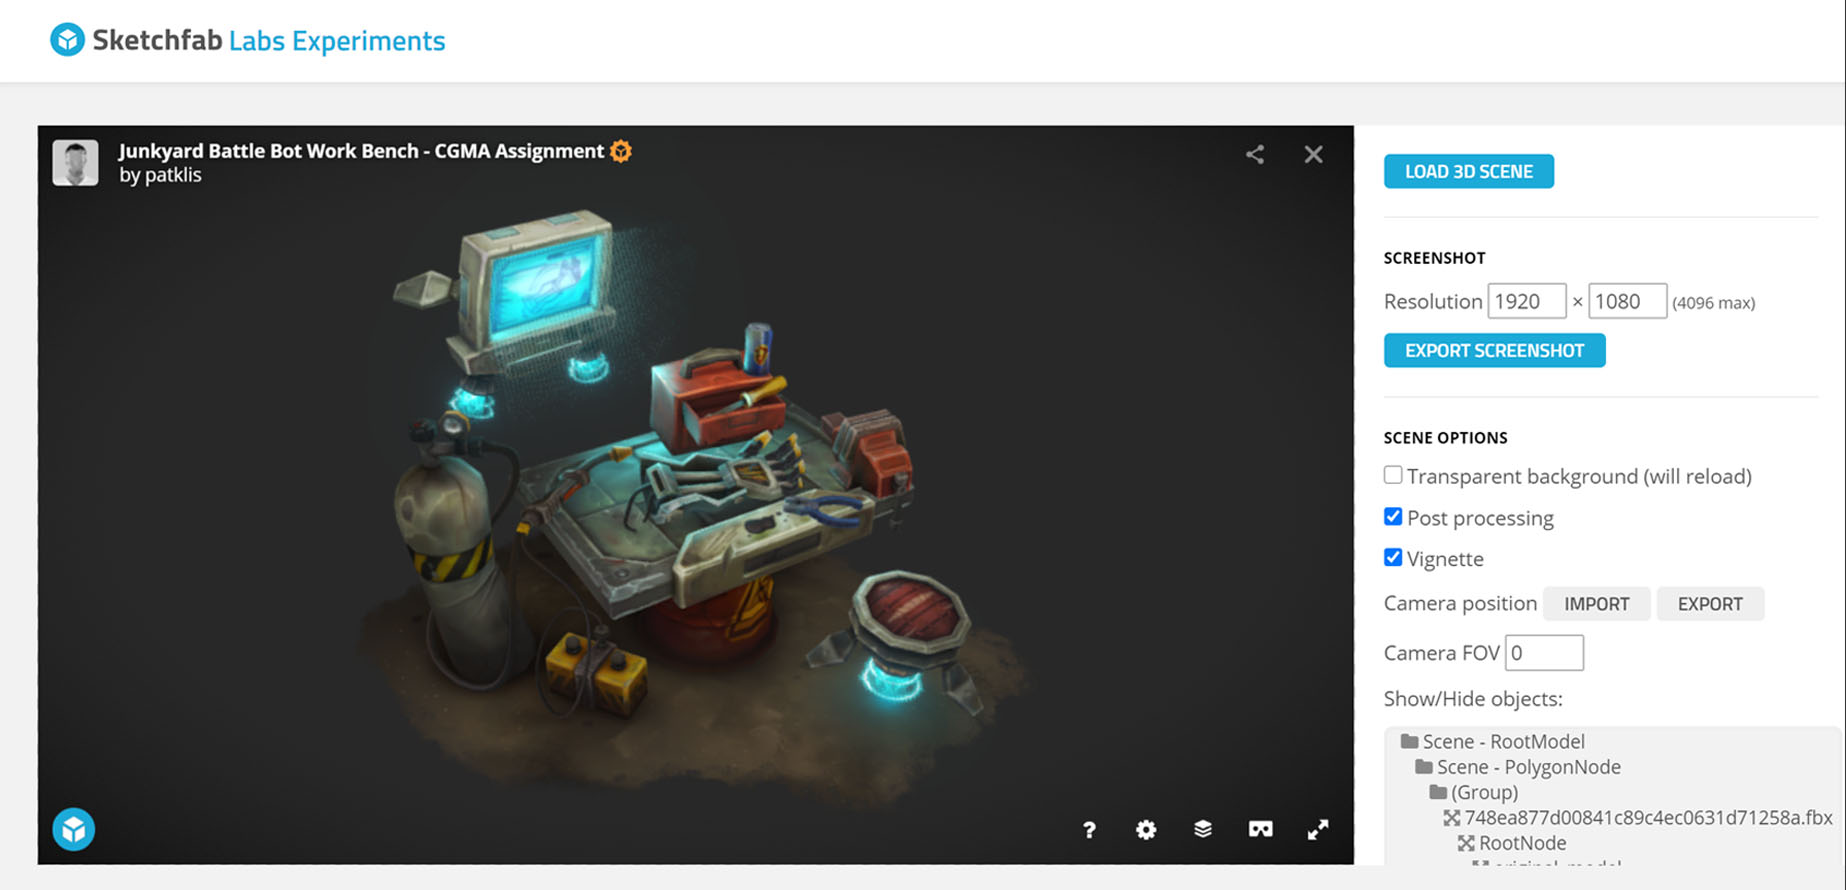
For final renders, I used the Sketchfab screenshot tool for the first time. This was super simple and gave excellent results that I could take straight into Photoshop for my final presentation images!
It’s super simple to use! Input your final size. Tick which effects you would like or if you want a transparent background. Hit Export and all that’s left is slapping it in Photoshop with some other shots for your portfolio!
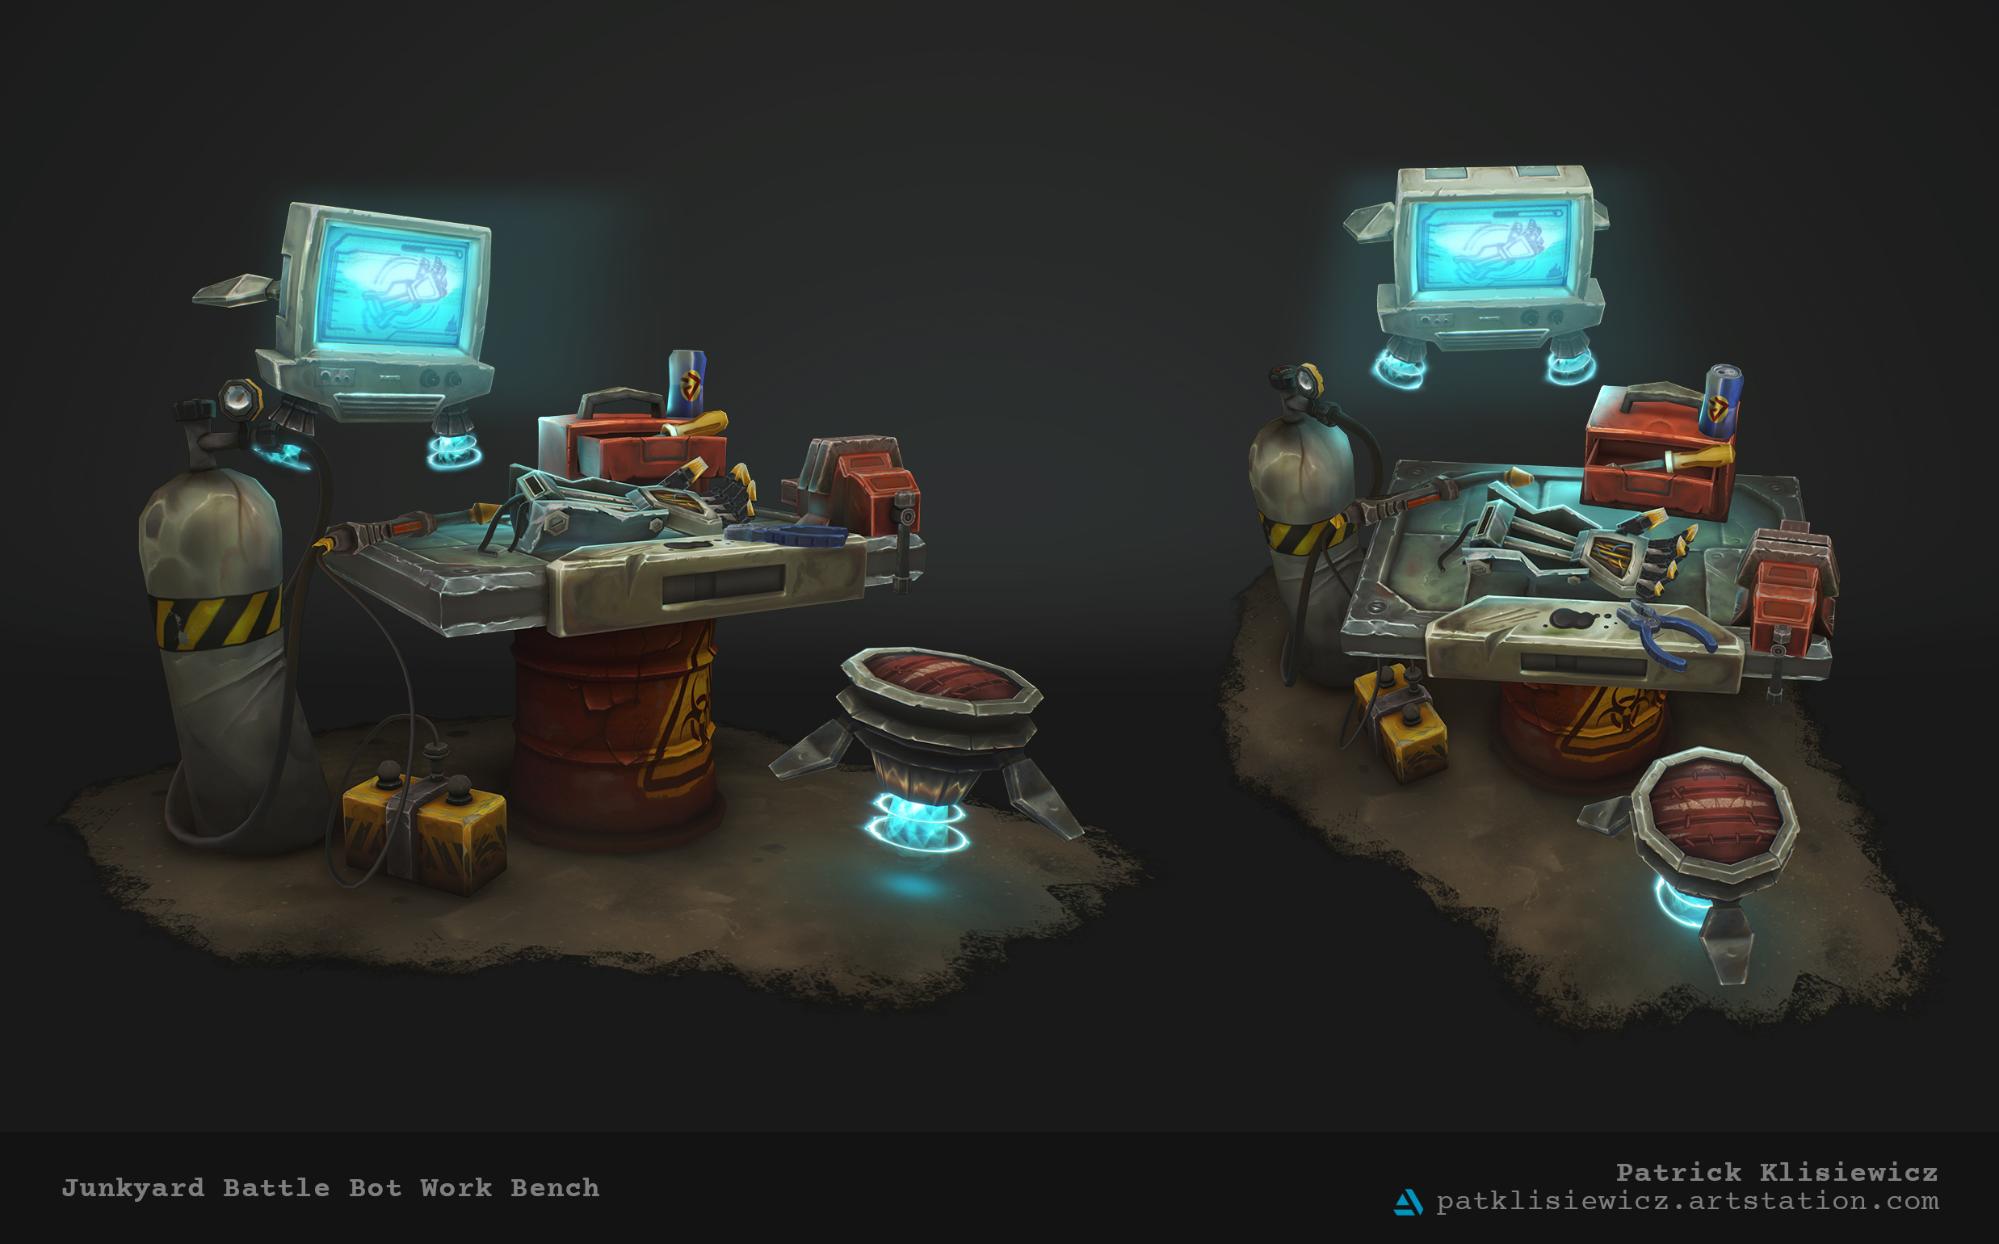
Here are my final portfolio shots!
And that is it! Thanks for reading and I hope you enjoyed or learnt something from this breakdown.
I’d like to thank Sketchfab for giving me the opportunity to write this and share some of my process.
Please check me out on ArtStation, Twitter or Instagram for more of my works from CGMA and other upcoming stuff.
