In this post, we will give you information about our shooting set, camera, how many pictures we shoot, how we shoot, and what kind of computer/software set up we use in order to effectively capture our clients’ menu. If you like our models on Sketchfab and love food as we do, you should keep reading.
As hardware manufacturers enable content developers to push limits, we hear more and more uses of virtual and augmented reality technologies in our daily lives. On the content creation side of the business, 3D artists are working on creating CGI (computer generated imagery) to create scenarios for virtual and augmented reality applications. But designing models on computers isn’t the only solution; by using photogrammetry or 3d scanners we can convert any real life object to a CGI 3D models, which enables us to work on a virtual and augmented reality development environment.
Photogrammetry
After taking 360 pictures around the objects, you can create point cloud data with textures than build a mesh using related software to create 3D model.
3D Scanners
Until recently, 3D scanners have been mainly used for industrial and professional applications like scanning an architectural site or creating digital models for film. The technology is becoming more advanced and accurate than ever, but at the same time, it is also becoming much cheaper.
At Kabaq.io, we create 3D models of food by using photogrammetry technology and present them in augmented and virtual reality environments. To get best quality models, everyday we test different scenarios with different food items in different shooting sets with different cameras.
Our System
Shooting Tent: Fotodiox LED Studio in a Box


We use dart targets and full markers on our turntable to make the conversion process easier.
Computer: Puget Systems for Agisoft with Dual GPU
We use a powerful computer solution to make the process faster but you can easily use your daily computer and create amazing scans.
Software for Photogrammetry: Agisoft Professional
Software for Editing 3D Model: Autodesk Remake,
Camera: Canon Mark iii
We use anything from a $300 to a $3,000 camera and we will try to show the differences with an example below.
Lens: Canon zoom lens ef 24-70mm 1:2.8 L USM
Pay attention to
- Lighting: The most important piece is in photogrammetry, is the lighting.
- Focus: Sharp pictures will convert into sharp 3D models. Setting your focus on the model is the key when shooting small items. That’s when an expensive lens comes in handy.
- Pictures: Don’t forget to take pictures all around the item.
Quick Process on Agisoft
Add your pictures to your project on Agisoft and Align your cameras. At this point you should see a low quality model of your item surrounded with your pictures.

Once you build Dense Cloud your model should look more realistic.

Next step would be building a mesh to match those dense point cloud data and create little triangles. You can zoom in to see the details.
 Last step is to build a texture around the item.

Voila and you have your first photoscan, upload it to Sketchfab with a touch of a button through Agisoft.

Today’s Test
We performed the test with a special Hotdog from Schaller’s Stube Sauage Bar in New York. We shot the same hotdog 4 times to compare the effects of picture quantity and quality (I wish we used a direct light source while shooting under the bread but still these models give you an idea about the test).
- Samsung S7 | 109 Pictures
Using a Samsung S7 we shot 109 pictures on the continuous turntable.
- Samsung S7 | 311 Pictures extracted from Video | We shoot a video and extracted images
We shot a video using a Samsung S7 of the hotdog and extracted the images from the video with Adobe After Effects. Why did we do this? We are trying ease the ways of smoothing and fast scanning for entry level scans.
https://www.youtube.com/watch?v=61TOHMcFMi4
- DSLR | 43 Pictures | Stable Turntable
Shot 43 focus pictures on a stable turntable
- DSLR | 211 Pictures | Continuous turntable
Using Agisoft Pro and following basic process; Align Pictures, Build Dense Cloud, Build Mesh, Build Texture functions. You can use Autodesk Remake or similar applications to start testing on photogrammetry.
Below are the models:
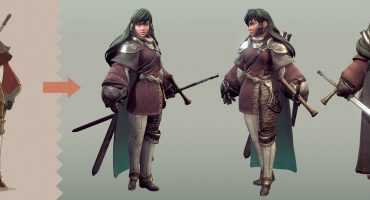
We didn’t have enough time to make this specific hotdog ready to post but at the end we usually end up with quality as below:
Please let me know what you think of the quality of the scans from each shooting.
Best,
Thank you, Alper! Seems like food photogrammetry is possible for all– does this inspire you to document your meals more? Be inspired from KabaQ and leave a comment or question below!
About the author
Seori Sachs
Community Person!