In Art Spotlight, we invite Sketchfab artists to talk about one of their designs.
Hi there! My name is Andrey. I’m 25, and I live in small town near Moscow, Russia. I have always been a pretty curious man, especially in terms of how technical things can be used to make art – like music concerts, videogames, light shows, etc. This is the most inspiring thing for me. I originally graduated as a microsystems engineer, then I worked as sound designer. I have been working as sound engineer for acoustic music recordings and TV shows for a few years. One day I suddenly found Sketchfab and thought – “Wow! Can you really watch 3D models in high quality right in your browser? That’s so cool! I must learn how to do it!” And surprisingly, I found my passion working with 3D. Right now, I’m temporarily working with video hardware as an engineer and spending all of my spare time getting better in modelling for real-time apps like games or VR.
Today I have the opportunity to present my latest project and to share a few tips with you.
Concept / Design
Believability is the most important aspect that I look for in every fictional model I see, especially vehicles. Even in a crazy world with weird creatures, there are some rules that this imaginary world follows, and everything should follow these rules.
I wanted to make a stylized, disproportional vehicle that looks a bit exaggerated, but still realistic and believable. You can see something similar in Hayao Miyazaki movies, but with a more classical approach. I wanted to make something I’m not familiar with yet so it would be a personal challenge ;) Let’s make a plane!
First of all, there should be a concept and a few reference images to give you a basic idea of how things should look. Googling really helps you with getting designs, so I took these two images as references and main mood concepts. Sadly I have no credits for artists who made it :(


Modelling
Now, let’s jump into Blender and start roughly blocking our plane. I’m familiar with 3ds Max and Maya as well, but prefer to use Blender for my work. I liked idea of making the plane feel fat and heavy – almost unable to lift itself off the ground. In this case, we have to have a big chunky middle part – like this.

What else is almost useless for plane? Definitely wheels. Let’s make them bigger then normal, but big enough to hold the plane’s weight on the ground.

Nice! What’s next, what’s next… the plane must fly, so it needs an engine. First, I put a propellor on the nose cone, which was the most logical place, but then it started to look too busy in the middle. So why not put two propellors on the wings? And guns, big guns!
It’s taking shape, but in this situation we have a fat useless fuselage. This is wrong. There is no reason to make it so fat. We wont forget about believability, right? So we need a reason – what if this plane also has a reactive turbine to get it off the ground? Let’s imagine a huge turbine engine inside to give it a speed boost in the case of dog fights or a bombing rush. It’ll definitely overheat, so we need few openings at the front to let airflow cool the engine. It must also have an exhaust system, so I added pipes going from the nose underneath the wings, ending between the main wings and the small tail wings. The pipes make the plane a bit dieselpunky, which is exactly what I’m aiming for.

Metal Panels
One important thing that will increase believability is constructing the metal panels that the airplane fuselage is made of. There are two ways I thought they could be made – either by painting directly onto a normal map or by modeling them as highpoly then baking them into a map. I’ve spend a lot of time trying to paint panel edges and bolts and didn’t get good enough results. So I’ve decided to model everything. Curved panels on curved surfaces – you might think this is not an easy thing to do. Not this time – there is a easy trick I’d like to show you for how to make similar panels.
Just add a simple plane, subdivide it, then shrinkwrap it to the surface you want. Keep it above the surface with a small offset to avoid glitches. Then, add a solidify modifier and push it through the fuselage. Then bevel it to make the edges rounder, and do one more subsurf modifier.


Workflow
Here I want to pause and tell you a bit about my workflow. There are a few ways people work – some start by making a high poly mesh, then retopoing it. Others work from low to highpoly. I prefer to make both at the same time. I work with a mesh – let’s call it “midpoly” – with a clean topology, and store it on the bottom layers in Blender. I also work with a high poly version of the same mesh with modifiers and additional details on the top layers.
For the next step, I make UV’s, and add details to the highpoly mesh. Then I start testing the normal map baking to see if there are any issues I should fix. For baking, I use Substance Designer – you can mix an average normal map and direct normal map to make the final map clearer. When I’m finished with baking, I remove unnecessary polygons on the “midpoly” mesh to get my final lowpoly model.
Texturing
For texturing I used Substance Painter – it was a great choice for this model. Normal maps have been taken from previous bakes from Designer, the rest baked in Painter.
The texture is the place where we can tell a story about our model. What is it going to be? Let’s think about it – this plane is definitely for combat. It’s also well built – it’s probably used in a service or air forces in some country or empire. I imagined a scene like a classic American city in the 1940s or 1950s, with tall concrete buildings, metal bridges, monorail train systems at different heights, and a lot of diesel-powered cars. Our plane fits this theme.
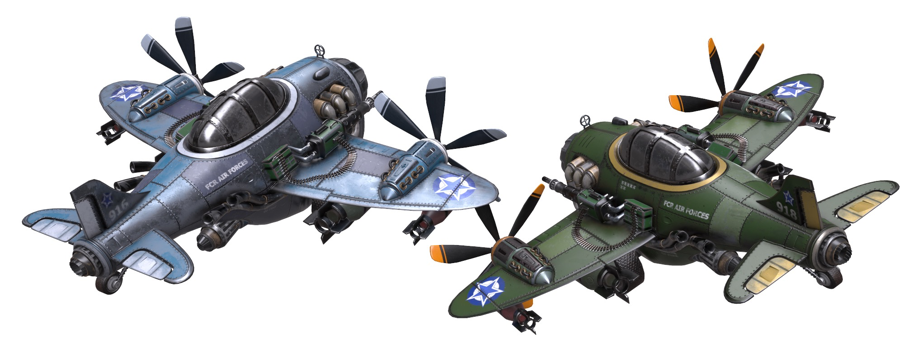
In this case, the plane must have military aircraft insignias on the tail and wings. I like how the old Soviet red star looks, but it didnt fit the theme – our imaginary country is English-speaking. The result is simply a combination of both Soviet and British signs :) I manually painted a bunch of welds, text, oil leaks and scratches using a Wacom tablet to break up the procedurally generated texture. I haven’t decided which color theme fits more for this plane – blue/white or green/orange – so I did both :)

Then textures was exported to Marmoset for renders, to Unity for game tests, and then to Sketchfab. There is a feature in Substance Painter for exporting final textures directly to Sketchfab, which makes sharing even easier.
Conclusion
Sketchfab is a great service that allows you to share your 3D creations in just a few clicks. Big thanks for giving me the opportunity to share my work to the community, you’re all awesome! I hope my little story about this plane was helpful and will inspire you to make something interesting :)
If you like my work and would like to see more, please visit my ArtStation page or my website and follow me here on Sketchfab. If you have any questions, feel free to leave them in comments below or tweet me at @overlaps.
Thanks Overlaps!
See more of Overlap’s work here on Sketchfab or on his personal website. You can also follow him on Twitter and Facebook.
About the author
Bart Veldhuizen
Community Lead at Sketchfab. 3D Scanning enthusiast and Blenderhead.