About me
Hello everyone! My name is Hossam, I’m a 3D game artist from Cairo, Egypt. I’m a self-taught 2D artist, and I have joined the video games industry after completing ITI’s 9-month game art diploma in 2019, where I learned all about 3D for games. Right after graduation, I worked on Autoliv Explore as a 3D Technical Artist for 9 months, and at the time of writing this, I’m freelancing in several projects.
Backstory
I’ve been into drawing characters since I was a kid. Growing up, I realized that there had to be a set of rules to make a realistic-looking character, but never knew what these rules were.
That was until a friend and I came up with the idea of creating our own comic book. Comics are cool, right? Well, they’re cool, but surely not easy to make. That’s what we learned the hard way. The quality of our comic book was so bad; the characters I drew looked more like Michelin’s tire-man than realistic characters. So we started seeking feedback from more experienced artists, one of whom suggested we study “anatomy”. I had no idea what “anatomy” was. So I started researching the subject and still am researching to this day. It surely takes time… and it’s so worth it!
Studying anatomy had a great impact on my art, and it has helped me level up my tire-men into more-realistic-looking-men!
Fast forward to the present and the latest project in my anatomy adventures, which started as a “quick experiment” and turned into a full study of the anatomy of the human head.
Inspiration
This model is heavily inspired by the book Anatomy of Facial Expressions by Anatomy Next, which happens to have an account on Sketchfab full of references free for everyone. I’ve been stunned by the quality of their work, and how they can deliver information easily through clean visuals.
Proko’s videos share the same qualities, too, and have always been a great help.
I wanted to create a young female, focusing on aesthetics and discovering how the skull and muscles fit on a feminine face, with Anatomy Next’s clean style in mind.
References
First I had to choose the female model the face was going to be based on. I tried choosing a model with very feminine face features since I thought it would be challenging trying to replicate this. Anatomy Next’s Sketchfab was super helpful since I could check my reference in 3D space from all angles. What a time to be alive! Not to mention my main source of references, Anatomy of Facial Expressions. Ryan Kingslien’s videos helped me a ton understanding what I was looking at as well.
For gathering references, I like to use PureRef. It’s an amazing, simple tool—it’s also free!
Sculpting
Heads up: since this was meant to be a study, and has no means to be used in production, I spent most of the time in ZBrush. No manual retopology, UV unwraps, or texturing were done for this model, except for the eyes. With that out of the way, let’s dive into it!
Sculpting the face
First off, I started sculpting the face without much attention to what’s under the skin.
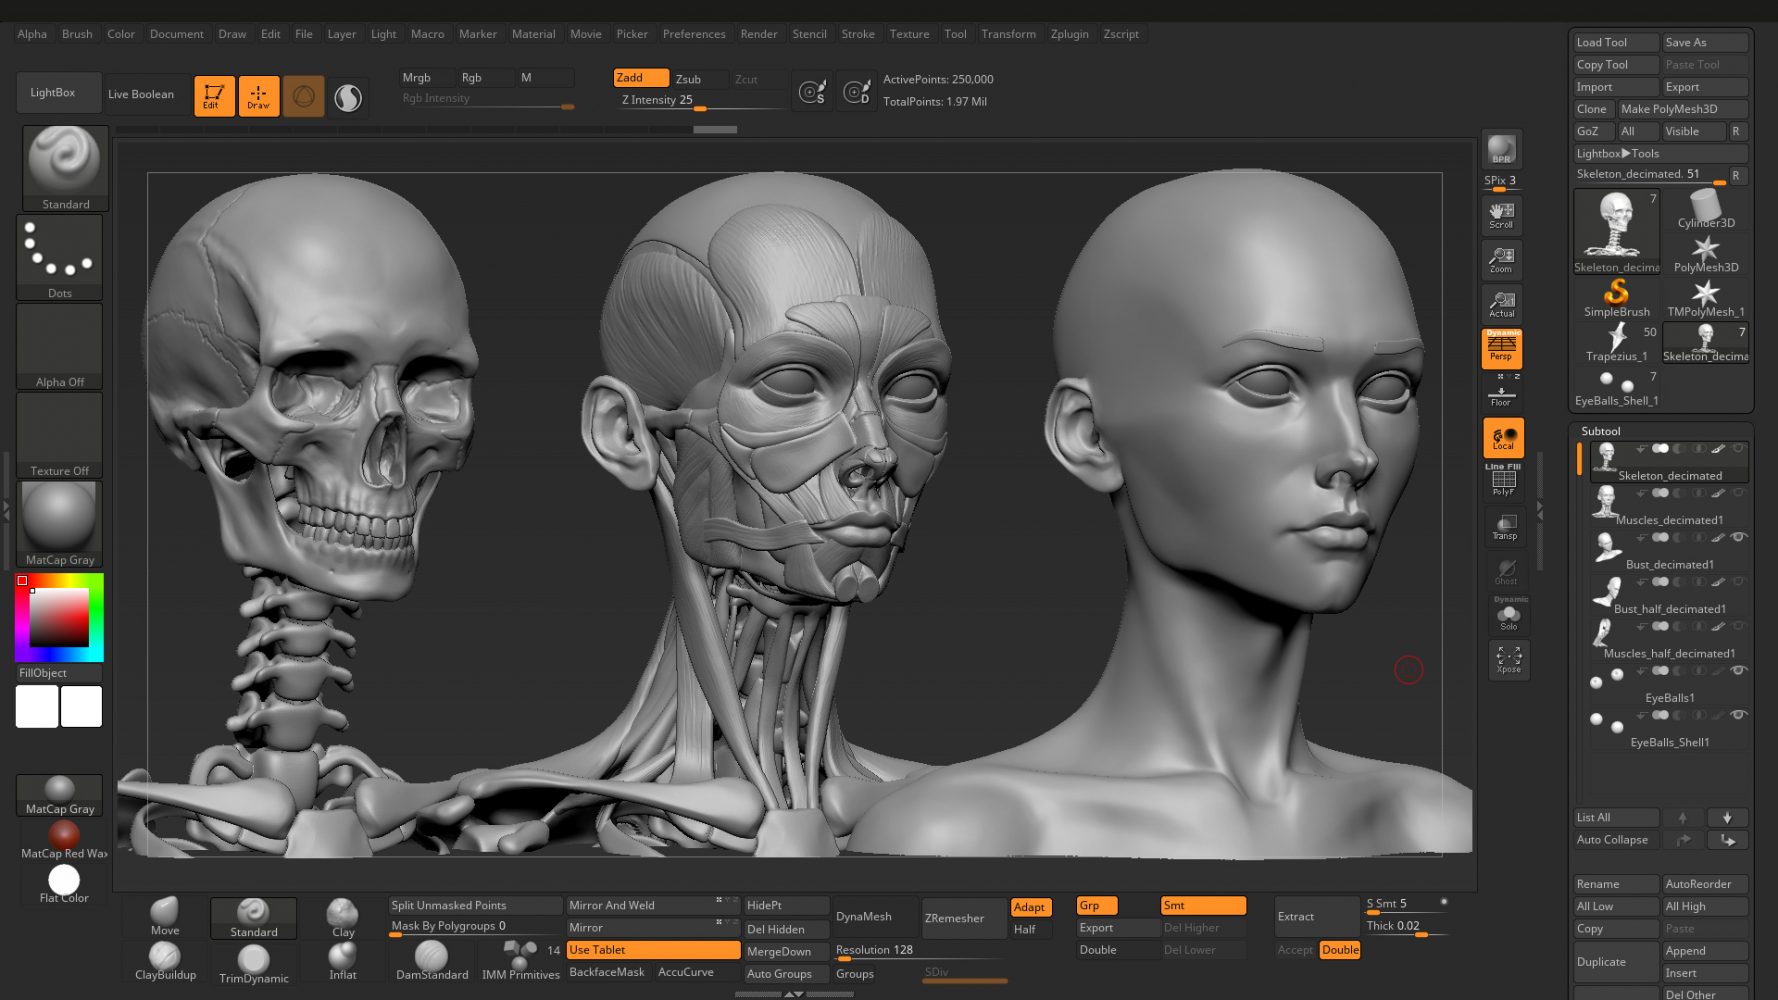
My main focus at this point was trying to stay as close to my references as possible. To make measurements easier for myself, I was using the Transpose Line tool in conjunction with the floor grid with the following options:
- Tool> Export > Scale: 1
- Draw> Floor (XYZ) > Elv: 0 | Grid size: 10 | Tiles: 10
What this does is make 1 unit in the transpose line equal to 1 unit in the floor grid, I used this unit as 1 head…then I could easily measure head units using the Transpose Line.
I hope this makes sense, and oh… these settings come with a bonus! When exporting to Blender using this scale setting, 1 unit in ZBrush equals 1 meter in Blender (with Blender’s default settings).
And for less lens distortion when perspective is on, I make sure Angle of View is set to a low number, e.g., 50.
Sculpting the skeleton
Blocking
The blocking phase was pretty straight forward. I started with simple shapes, trying to fit everything under the skin while keeping space for the muscles and fat in between.
I knew that the final piece wouldn’t go far below the collarbone, but I thought it’d help with accuracy if I sculpted a little bit more than what I needed.
Refining
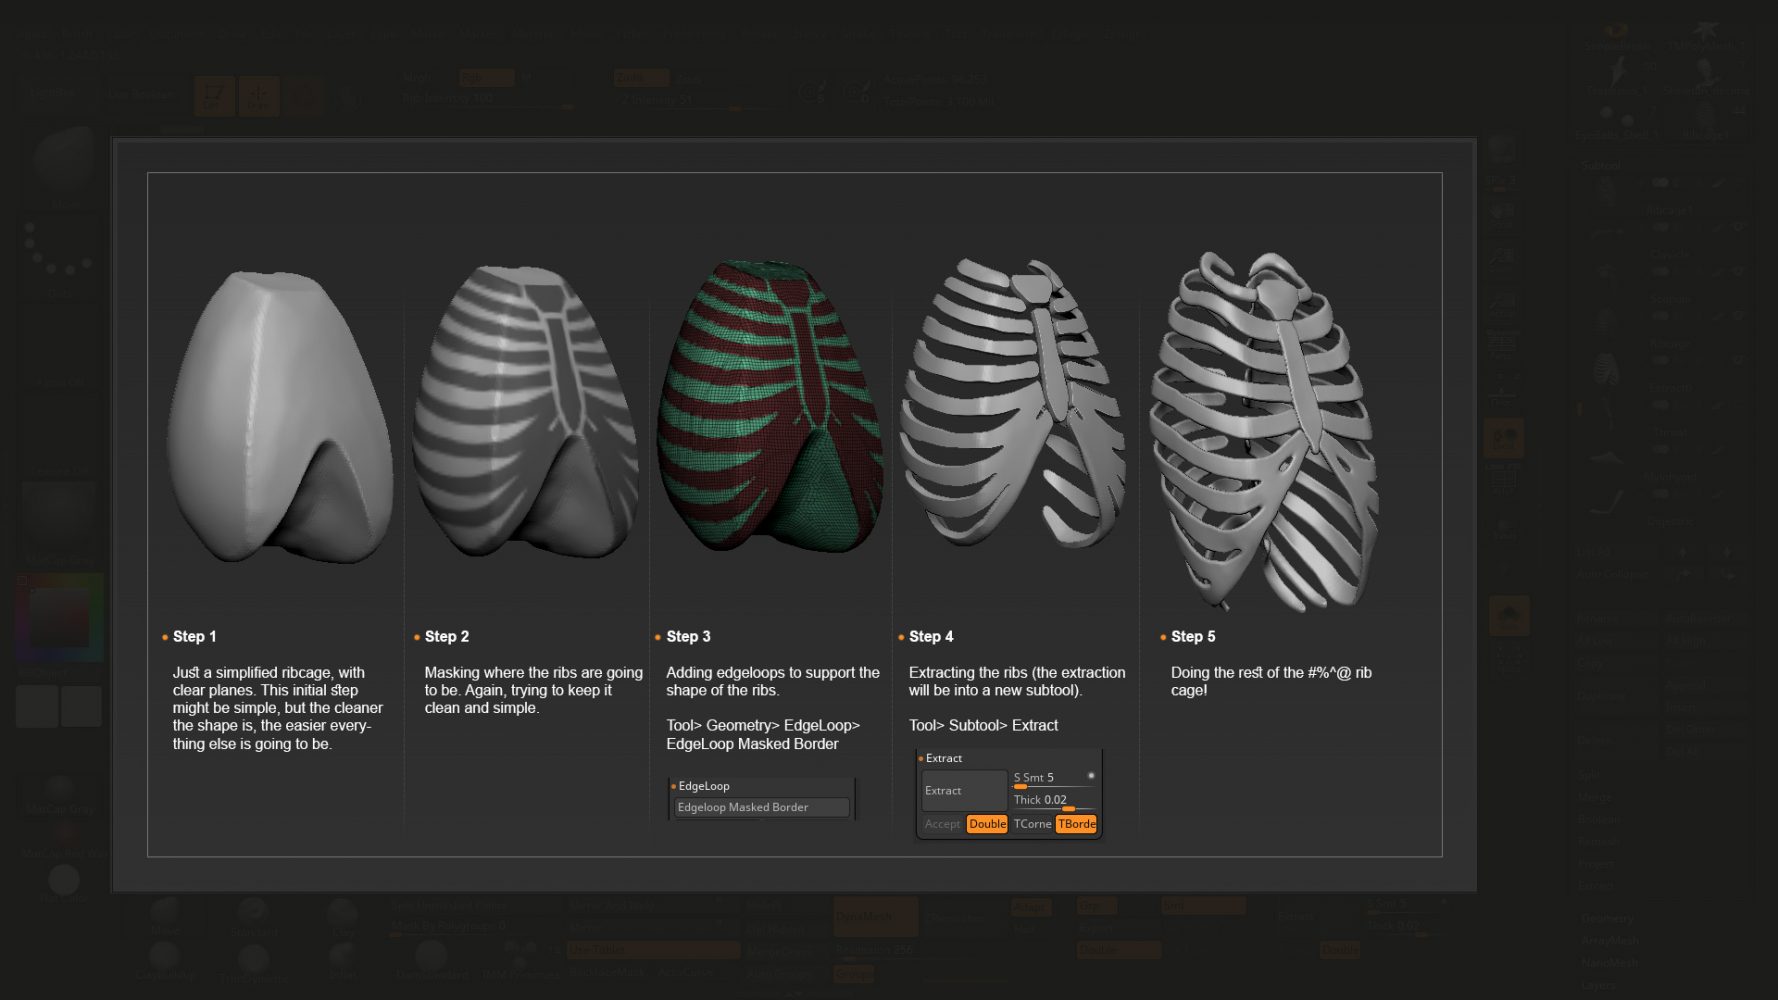
Here I started adding more details to the skeleton. No need to be too precise, though, since I’d come back and re-adjust everything later. I was worried that detailing the rib cage would be time-consuming, but the use of masking and extraction features in ZBrush made this task quite simple.
The jaw and teeth were extracted from the skull with a similar method. It’s also possible to use Dynamesh with “Groups” on after step 3 and deleting the unwanted parts.
Sculpting the muscles
After I had enough details on the skeleton, it was time to move on to the grand finale—the muscles! My main focus on this point was the origins, insertions, and general shape of each muscle, without much attention to fine details. Something that helped me visualize how the muscles are fitting into the face was having half the face on most of the time.
Most of the muscles were done by either masking an area and extracting it from the skull, or by using the CurveTube brush, then refining the shape until it fit.
The eyes, nose, lips, and ears were an exception; they were cut from the original face and modified accordingly.
Polishing
This is it, the big moment, now that everything is roughly in place, it’s polishing time, yay!
First off, I had to make sure that everything fit together. That’s when Transpose Master (Zplugin> Transpose Master) came to the rescue. It allowed me to easily manipulate all subtools at once, which, in the end, helped everything fit nicely.
Next, I had to go back and readjust almost everything, including the face itself, since now I could understand the forms better, and why some parts are shaped the way they are. That, of course, in addition to adding all the fine details that I had kept for the end, took time!
Most of the brushes I used through polishing and even initial blocking are found on the bottom left corner of the custom UI layout.
After I was happy enough with the results, I merged different subtools accordingly, so I could have an easier time editing them later.
To get these clean cuts in the final piece, I used the SliceCurve brush on each subtool separately, deleted unwanted polygroups, and used the Close Holes feature (Tool> Geometry> Modify Topology> Close Holes) to close any opening.
Optimization
The total polycount at this moment was 6.6 million vertices. The quickest way to cut this number down was using Decimation Master (Zplugin> Decimation Master), which is great for lowering polycount while preserving details. There’s no need to UV unwrap or bake normals. The only downside is that the topology couldn’t be of much use in production. That was fine since this model is not meant for production. Using Decimation Master, vertex count was cut to 600K instead of 6.6M, without a visual difference to be seen.
Next, I imported the decimated version into Blender, UV unwrapped the eyes, assigned materials IDs, and modified some pivots.
Sketchfab
I’m usually very excited about this part—I finally get to publish my work! In 3D! Isn’t that cool?!
As a real-time artist, I really like having a portfolio platform where I can show my work in real-time, and the viewer is free to check my art from all angles!
Materials
Since my model has no textures (except for the eyes), I basically did the shading in the Sketchfab editor. I had the materials named properly in Blender, so I only had to tweak the settings in Sketchfab. The editor had everything I needed and more. It was cool trying the subsurface scattering feature for the first time on the skin and fat, looking forward to doing more with it in the future!
Lighting
The lighting was entirely in Sketchfab as well. I encountered an issue when I wanted to make a rim light to separate the model from the background, but it looked good only from one angle. The feature that saved me was the “Attached to camera” option when using Directional/Hemi lights; it allowed me to land the rim light properly from all angles. This feature can be found under: Lighting> Lights> Light Properties> Directional/ Hemi> Attached to camera
Post-Processing
For this model, I used SSAO & sharpness to make concavities more pronounced, while tone mapping helped make everything look brighter and more vivid.
Final Thoughts
This project has been a great learning experience, ZBrush-wise, and anatomy-wise. It helped me build a much clearer understanding of the human face and its forms. And it’s inspiring me to study more anatomy! If you’d like to see more of this model in X-Ray, you can do that on my ArtStation!
So.. guess this is the end of our little walkthrough. I would like to thank the Sketchfab team for inviting me to write this article, and I would like to thank you for reading this far! I hope it was entertaining and we both have learned something from it! If you have any questions or comments, please do not hesitate—write it down below or contact me on my email.
If you’d like to see more of my art and studies, please feel free to follow me on ArtStation and Sketchfab. Stay safe! 🙂


