Hello, my name is Yara Rocha, I am 22 years old and I currently live in Belo Horizonte – Brazil. I am a 3D artist and I love to draw on my free time. I graduated from Pontifical Catholic University of Minas Gerais in Digital Game Design. During the course of studies my focus was character design and 3D modeling, but in general I had contact with the whole process of game development from concept to animation. Today I will show you a little of the my process, what I’ve learned.
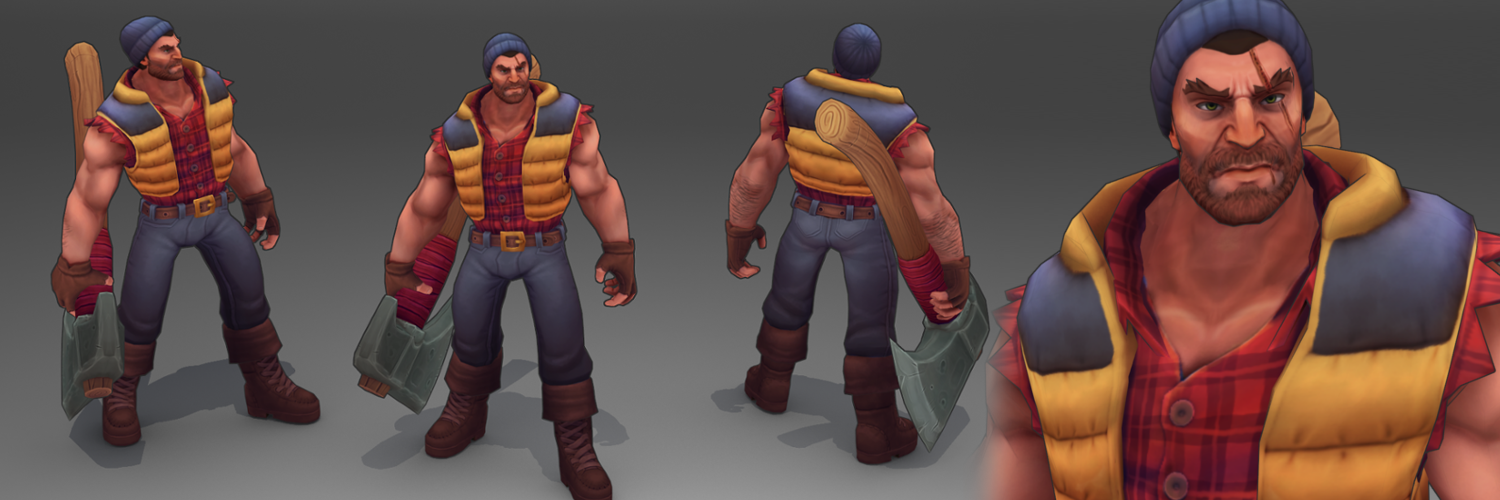
This 3D model was made for the “Riot Creative Contest 2017” on polycount.com in the Character Art category. I had the idea to create a skin for Darius, a character in the game “League of Legends” whilst sharing the whole process. With the help of a friend I chose the Lumberjack skin line. It was a simpler concept than I initially intended to do, but it contained elements that I knew I needed to practice, such as the male anatomy and stylized proportions.
First I made a reference sheet:
A reference sheet is always very important before creating your concepts, this way you keep your ideas in check and avoid getting sidetracked from what you have proposed.
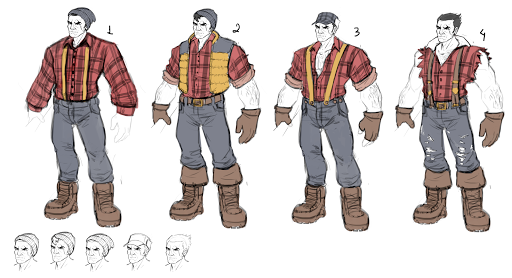
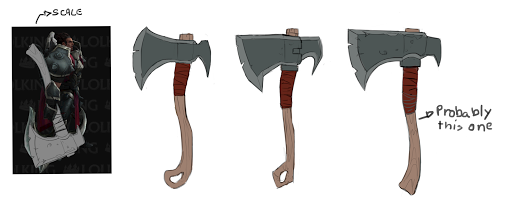
Then I started developing the concepts:
With the help of the polycount community and my friends I had enough feedback to merge elements that they and I considered important such as thick beard, triangular shapes (in the cut shirt) and square shapes (on the face and vest).After all it was Darius, the bloodthirsty and unshakeable commander.
After deciding on the shapes I did a quick paint test under the Summoner’s Rift map to see if the colors and values were working as intended:
Blocking:
Using Zbrush I took a body basemesh that I already had and started working proportions and muscles. Some time during this process I usually separate the character’s head and hand from the body in different subtools for optimization and to have a better workspace.
Some time later I had the first version of the body and head blocked, but there was something bothering me:
After incredible feedback from a friend I was able to identify what was bothering me and I reworked his face to what I wanted.

Next step was to make the clothes blocking:
I started with polygonal modeling instead of sculpting so I would have an easier time visualizing a simple blocking in polygons ready for subdivisions. In this part one of the polycount users advised me to test the character silhouette with his original hair. From that moment I decided to go till the end with both versions of the head: with and without a cap, to finally choose which one I would submit.
- Silhouette Test
Highpoly:
After finishing the blocking I began refining the mesh in ZBrush itself:
- Always checking the top view to see if the shapes are working as planned.
In this part of the process there was something bothering me a lot in the anatomy, arms and torso but I did not know how to solve it. My intention entering this contest was to work on my weaknesses and it frustrated me a lot not knowing what I did wrong. So I decided to take a break from working on the 3D Model and instead spent the next 2 weeks or so just studying anatomy.

I did not come back knowing everything but now I had a better understanding of the structures that were confusing to me. For example, I could now see that the head was much smaller than it should be.
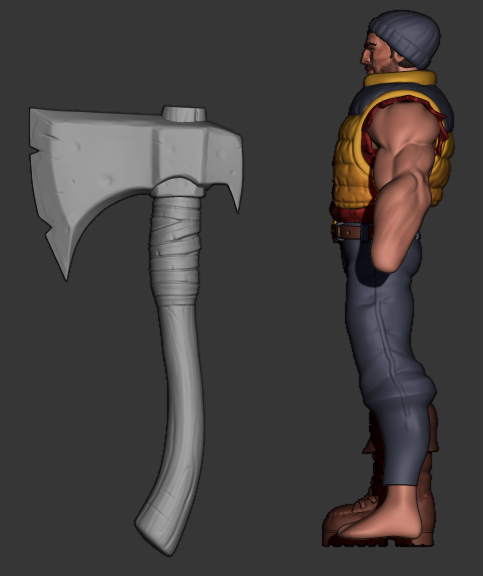
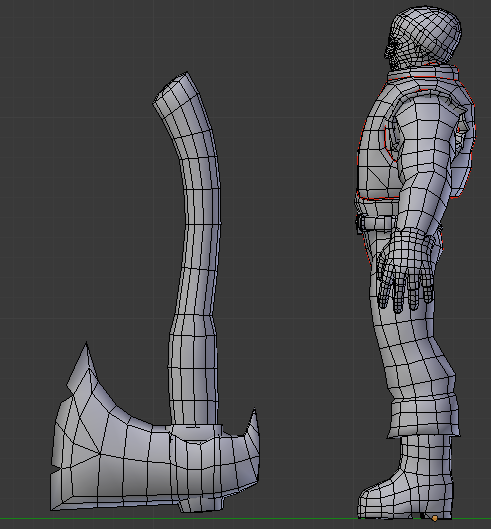
With the body ready my next step was the axe. I made a basemesh within ZBrush and worked on the details:
Retopology:
After finalizing the high poly I started the retopology. For me, this is one of the coolest parts, it’s like solving a puzzle.
For retopology I used Blender and the usual process: snap tool activated with the Face element and Shrinkwrap being activated only when necessary. I also used a very useful addon called RetopoFlow. I recommend researching about it, it’s really wonderful.
The UV settings were also resolved within Blender. Before opening the UV I applied the mirror on everything that was asymmetrical.
Bakes:
One of the requirements for Riot Contest was a AO map to serve as a reference for painting. I made the necessary maps within Blender:
For painting I used 4 reference maps: AO, Normal Map, Curvature Map and Color Map.
The color map is actually a bake of Vertex Colors. The colors were already assigned into the highpoly (I did a quick polypaint inside ZBrush as soon as I finished the sculpture).
And the Curvature Map within Blender is a Dirty Vertex calculation that you can activate by selecting the highpoly and clicking here:
And just like the Color Map I made a bake of the Vertex Color.
In the end I have these 4 baked maps:
The last bake is the main AO taken straight from the lowpoly with 2 subdivisions to smooth the surface:
This is the result of the AO, it merges the individual AOs of each part of the model + the main lowpoly AO.
Painting:
Painting is my favourite part. it’s where all the design and silhouette problems have been solved and now I’m free to bring the character to life with colour. I tend to use Blender but this time I decided to learn and use 3D Coat. It is a great software for painting, as it integrates with Photoshop. You can literally paint in either software and it will save and update on the other software. Layer blends also work exactly with the same calculation.
So in Photoshop I merged the layers that I would start working on and imported them into 3D Coat:
I did a quick test placing a simple render on the Summoner’s Rift map:
Here you may be wondering: okay, why do I need a normal map if the shader used in the characters is unlit?
A: The normal map calculates through the RGB to where the normals of the vertices are turned. The colour G corresponds to the Y axis. You can extract from this normal map the colour G and work with this map a basis for light painting, for example:
You can also extract the other colours from the normal map and use as you see fit. :)
The Curvature Map I used was in Overlay blending mode. This map can help you give depth to the texture in certain areas.
I then continued painting normally:
I wasn’t satisfied with the arm texture so I worked on that a bit more, I also received feedback to increase the colour saturation on the cap.
After finishing the axe, I applied the changes I thought were necessary in the character’s body, for example giving volume to the arms, and fixing the cap saturation.
The final texture map looks like this:
Rigging:
For the rig I used a simple armature since I only needed to pose the character. I would probably do a more complete rig if I was going to animate. A dear friend named Matheus Almeida helped me in the rigging process. We used Blender.
After taking all the necessary screenshots, I uploaded the 3D model to Sketchfab to allow others to rotate and see the model more closely. Sketchfab being integrated to Artstation and Polycount allowed everyone to preview my model without having to load a new page. I was also able to share it with the League of Legends community on Reddit, /r/leagueoflegends, where I received lots of positive feedback and tips on how I could improve upon this Skin concept.
You can check out the reddit post here.
I am very grateful to the Sketchfab administrators for their attention. Thank you.
You can find me and more of my work on my social media.
