Background
Howdy! My name is Christian Henderson (a.k.a Zcythe/Albazcythe). I’m currently a QA Tester for a video game developer in Chile.
Ever since I was a tiny human, my interests have been cast to making video games on my own and with my own assets. As unwise as it might have been, however, I taught myself a little bit of everything to accomplish my childhood dreams. Owing to this fact, to the lack of self-knowledge, and perhaps to my susceptibility to peer-pressure back then, I believe I ended up picking the wrong career. Throughout the years I’ve come to discover my growing passion: creating fantastic, emotional experiences through immersive atmospheres, deep stories, and unforgettable characters. Those include more than mere modeling; design, music, writing, animation, and interaction(programming) follow tightly behind. My path is still young, and although my hairs are falling, I’m still finding my style and workflow.
Video games have always been my original inspiration from both the developer and player standpoint, but it’s really the emotion that drives me. I’m still learning to make it all come to life as my ambitious imagination envisions.
Ori And The Blind Forest
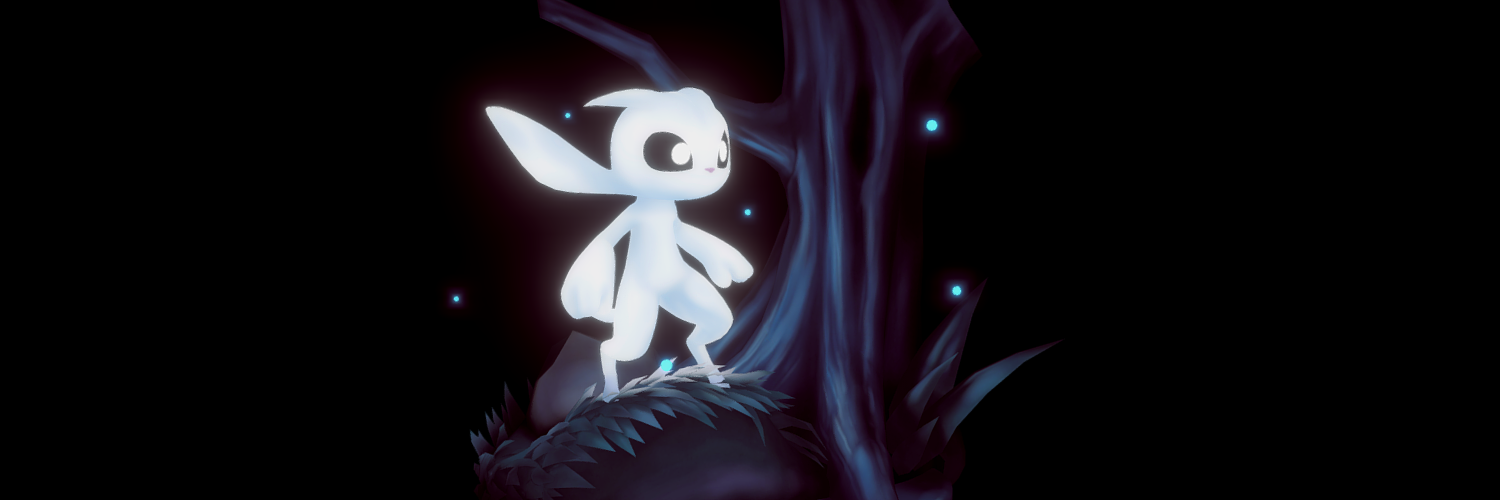
Many games have awed and inspired me throughout my life. Ori did so big time. The game is beautiful in every aspect. Without watching trailers, it only took a title screen to convince me that I was going to love it. The responsiveness of the character was amazing and the skills were fun to use. The animation and SFX were so well-made. The game and level design were fantastic. I had a blast jumping and climbing and dashing through the gorgeous landscapes of the interconnected world map while listening to the enchanting music.
My heart raced like crazy when watching the trailer for the sequel: The Will of The Wisps. I was so happy and inspired, so I went for the fanart which, actually, had a long time coming. I wanted to show some appreciation for the game, and I wanted to model my own Ori and see how it would come out, luckily the character’s design wasn’t complex.
Modelling Ori
The first and only thing that was in my mind was modeling Ori, so that’s what I went for. The model was eyeballed using the game itself as the primary reference. I modeled in Maya.
I’m a fan of low-poly, so I went for the best low-poly version starting off from a sphere. Then I continued adding loops, tweaking every vertex, connecting, dissecting, more loops, endless tweaking, and so on. You know the drill. Ori is symmetrical, so we only needed to take care of half of it. I knew I was going to animate the model, so I kept that in mind when doing the edge flow, also knowing, however, that it wasn’t going to be used for extreme poses.
I went on until I had the basic shape of the body. The first iteration wasn’t so pretty… just look at that thing! But we got there eventually. Really, though, the eyes do all the magic; those were a separate object. 
When I was happy enough with it, I moved on to texturing. At first I wasn’t sure if I was going to actually need texturing for Ori, but if you look carefully, his body isn’t actually a solid color: it has some shading, and I also needed it for the nose. UV mapping was at hand.
I made a front planar mapping, did the seams, and unwrapped the UVs using Maya’s Unfold3D. Painting was done in ZBrush with a standard mirrored brush. More detail on ZBrush workflow later.
I didn’t work on the animation right away. I wanted to have the environment ready first. To the concept-mobile! *batman transition*
The Environment
I always loved to go back to the Sunken Glades level. It’s the first place you’re thrown into after that introduction to the story. The level carries a lot of meaning, a lot of memories for both the character and players alike. Later in the game, the place pretty much becomes Sunken Nostalgia. The feelings wouldn’t be possible without such magnificent art, sound, and music. For this reason, I wanted to go for an environment loosely inspired by the Sunken Glades level.
Yes. That was the 2-min “concept” for the closed environment. I didn’t need much more to begin experimenting. I did not worry about color yet; I first wanted to have a working model.
The original idea was to have a tree, some undergrowth, a rock, some water, and a little hill for Ori to stand, giving it all the gloomy feeling in the Sunken Glades. Starting off from the ground, I did the tree and then the rest. Maya doesn’t really have a good custom mesh-painting tool to paint stuff like custom grass on top of another surface, so I ended up downloading a plugin called spPaint3D to do just that. It has great brush options and it is pretty easy to use. I recommend it!
 I took the UV’d model to ZBrush for painting. Unlike most texture painting software, here you’ll be painting vertices instead of the textures directly. ZBrush has grown on me when it comes to painting shadeless lowpoly, mostly because of the keyboard shortcuts, mesh isolation, and (part of the) workflow.
I took a screenshot of the Sunken Glades level to use as reference and to define a color palette. I was not looking to copy the same painting style of the game artists, but I did want some resemblance.
So then I had my first sketch:

I knew it wasn’t ready, but I was not happy: the lighting was dull, the colors were off, the grass was too messy and distracting, there were too many elements, and the hierarchy was all over the place. That wasn’t the Sunken Glades. This is what happens when you rush the initial concept. Mistakes were made.
Alright, time out!
Music
I knew I was going to add music. I had to; it was a crucial part of the atmosphere I wanted to create. But there’s a lot more to it: I am mostly driven by music when it comes to making things. If I (or anyone, really) would have not watched the trailer for The Will Of The Wisps with music (and SFX), I would’ve felt little to nothing. Gareth Coker did a magnificent work with the music. Again, I can hardly describe the emotion I felt with that trailer and during The Blind Forest. I love it. I love the power of music and symphonic orchestras. I might work well with motivation, but the inspiration that I get from music is what really fuels my ambitions.
I needed some fuel, then! No, I was not going to go for the Sunken Glade’s theme. I felt like creating a humble cover of Ori’s main theme, but also combining it with the song Inspiriting, part of the game’s soundtrack, which I find beautiful.
I wanted to make something simple yet faithful to the original songs. It wasn’t really difficult as the melody was pretty clear. A harp, violin, and bell would be enough for what I wanted. The reverb was also a fundamental part for a piece that appeals to sadness and/or memories. I then added some light wind in the background as well to go in combination with the animation. Finally, there wasn’t much EQ to do, but it was done.
I’m no real music composer, but I’m learning the craft with Cubase Elements. I cannot afford professional samples, but, for now, I’m satisfied with what I have. There’s still a ton to learn, anyway. I love being able to create my own music.
We’re fueled! Now back to 3D.
The Real Environment
Aware of the mistakes, I went for a second version. Once satisfied with the new model, I did the UVs and took it to ZBrush for our painting session.
The idea this time around was to have Ori as the only source of light in the scene, thus having a lot of dark sides. I knew this model was going Sketchfab’s way and I wanted to have it surrounded by a black background so as to blend with the darkness. Although attempted, I was not looking to bake actual light emitters; the idea was to have it all hand-painted.
I did, however, bake an ambient occlusion map to use in combination with my painting in ZBrush. This was specially aiming to give more depth to the grass, and it did, but it left a lot of undesired dark lines due to clipping. I corrected that in ZBrush with the Projection Master. The idea was to obviously blend the grass with the ground, that’s why cleaning those dark lines was crucial.
I played around with colors a lot though and even tried an alternate non-gloomy, daytime version.
In the end, however, I was content with my new gloomy version. In Maya, I added a few tiny white spheres resembling the spirit light particles from the game. They looked lame without VFX, but I was aware that Sketchfab’s renderer was going to fix that.
Rigging
All good. Rigging time! A very basic rig would do with some handlers and constraints. Not necessarily pretty, but useful for our purposes. I used IK (RP solver) handlers, aim constraint, and pole vectors. I then bound the skin with default Heat Map settings, then did some paint weight corrections.
What about the environment? I always knew I was going to add wind to improve the atmosphere and stick to the way the game looks, that’s also another reason why I chose to paint the overhanging grass. So, I went ahead and added some bones to the grass, because the grass has “bones” and to the plant as well. I bound with default joint distance settings, then did some paint weight corrections.
Animation
The animation in the game is also so fluent and well made. I love it. I wanted my Ori to be part of that liveliness too.
I set Maya to 60fps and animated a 2-sec loop for both the grass and Ori. Have you seen Ori’s idle animation in the game? It’s quite active and bouncy and squashy and stretchy; I was not looking to recreate it, however, as my scene in particular had another feel to it, but I did want my animation to be similar. Ori was not going to be affected by the wind. The foliage, on the other hand, was going to dance along with it. I could’ve chosen to go with some wind physics, but in the end I decided to do it manually. The light balls move a little bit too.
The whole set was ready! I was happy, but the real magic was missing.
Sketchfab!
I fell in love with Sketchfab the moment I first arrived to the website, and even more after playing around with the 3D Settings. It is a great way to showcase all kinds of stuff in lively and creative ways. I was very happy to find out about the audio integration; I knew it was going to be a huge improvement and I really wanted to try it out.
So I baked my animation and exported from Maya in .FBX, uploaded to Sketchfab and began meddling around with the many 3D settings. I love how friendly and easy-to-use the 3D settings interface is, and it is not short in options.
I wanted black background, low FOV, no lights, shadeless material (Emission), looping animation, and, of course… looping audio! But what could one do without some Post-Processing Filters? I added some very light SSAO to add some more depth, sharpness, a light vignette, some tone-mapping and color balance, and the most important of them all… Bloom! There’s no Ori without glow.
And there you have it!
Perhaps my model did not require Sketchfab’s full set of features due to the shadeless materials, but I had just what I needed, and I could’ve gone with real time Lighting if I wanted. I sometimes wish Maya or Blender had something like this. I am only beginning to use Sketchfab for real. There will be a lot to come and I plan on experimenting a lot with the available features.
Afterthoughts
I am happy with the result, but after looking at it many times I realized there were things I would’ve done differently or paid more attention to. I’m always a critic of my work. One can learn from the process and final result. These are the most relevant things I found out:
- The overall lighting was perhaps still too dim.
- More highlights.
- There were still some dark edges in the grass.
- The root looks like it is standing on top of the water instead of submerged.
- The grass loop keyframes weren’t particularly well distributed.
- Eye blinking would have been a good addition..
- Ori’s tail was perhaps a bit thin and short.
- The “hairs” on Ori’s head weren’t modeled correctly and leave little space to manipulate them like the game does.
- I was initially going to add a wink at Will Of The Wisps by adding the Owl or some feathers to the tree, but I never did. It’s actually in the “concept”.
- I actually removed the Vignette because it was adding too much darkness.
- I think there might be some slight timing issues with the music.
Regardless of this all, it was fun to work on this fanart and I will surely be doing this more and Sketchfab will remain my home.
Contact
That’s about it! You can find me at:
ArtStation (I just created the account :P)


