Who am I?
I am a freelance graphic designer and illustrator for 7 years now. I am specialized in the creation of characters, decors, concept art, 3D modeling and texturing hand painting.
I make a lot of personal creations in order to work on different processes and have a new approach. In short, stay curious!
Mainly focused in graphic arts, cinema and video games, I am close to friends who are specialized in motion design and communication. Together, we aim to create a creative agency to bring together all our skills and know-how under the name of “Woot” agency.
Creation Steps
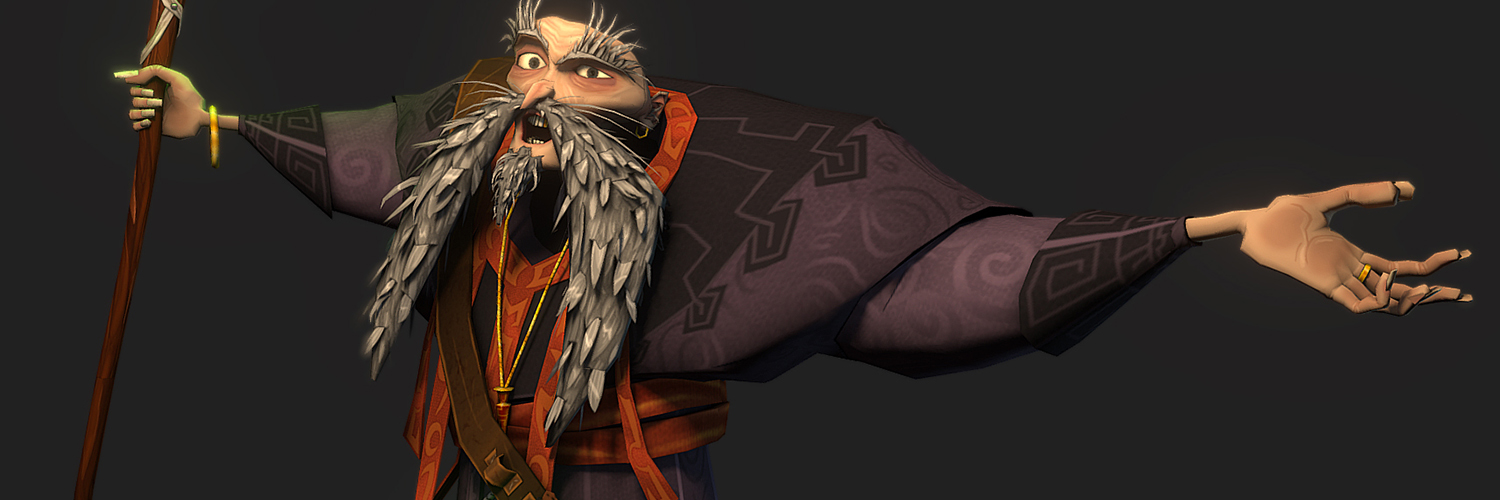
I had long wanted to make a character in low poly and try harder the style as much in details, textures as final rendering. I wanted to get closer to a character in the style of a Jafar (Aladdin) or Merlin (The Sword in the Stone), so I started making sketches to define a shape.
I had a clear vision of what I wanted, so I modeled a base directly under 3D Studio Max. I played a lot on the curves, as much on the shoulders, arms as on the extension of the robe.
I started by modeling the head and I added a big mustache and disheveled eyebrows.
To create the piles, I made plenty of planes where I will draw the piles afterwards, playing with the alpha to cut out the shapes.

Body & Objects
To make the body, I started working on the bust. Once I had a convincing shape, I did everything else: dress, arms, hands and legs hidden under the dress.
About the objects, it was much easier since the body was made. I just had to follow the main shapes and create my objects based on it. Once finished, I placed a pedestal like the figurines to lay the structure.

Textures
I grouped the elements in 3 parts: the head, the body and the objects. Once done, I made the UV mapping on each part in order to have 3 textures in the end.
Once the mapping was completed, I make all the texture part by doing everything in drawing, without using photos etc.

Morphing & Skinning
In order not to have a too static character for final rendering, I realized different face expressions to make it more realistically unsymmetrical and adding a facial expression.
When the facial expressions have been completed, I created a skeleton by using bones on the whole character to be able to do my skinning.

I placed bones on the main parts and also on the secondary parts in order to animate everything if necessary. (Belt, mustache, satchel, etc.).
To check the skinning quality, I did quite a lot of different poses to see if all the parts were good.
When everything was good, I finished with a final pose (that of the result) that will serve me as a definitive one.

Render to Texture
In order to get the final result, I placed 3 directional lights around the character and 1 omni light for the stick light. I used Mental Ray and the photometric lights.
Among the 3 lights, there is the main light or I place a slightly orange color and I activate the shadows in “ray traced shadows”.
1 sky blue light at left rear, and 1 light pink light at right rear. For the light of the stick, I used an omni where I placed a fluorescent green.When I activate the “high quality” view, I get this result:

At this stage, the work is almost finished. It only remains to render the final textures, thanks to the “render to texture”. For each one, I rendered a “complete map”. There will be all the information of diffuse, light, shadows, occlusion in 1 single image.
When they are calculated, I remove all the lights from my scene and I apply the new textures to control.
Mission accomplished! My sorcerer is definitely complete!
I only have to export my file in .fbx on Sketchfab, apply my textures, do my post prod and it’s done.

Sketchfab
The integration into Sketchfab was very easy and very fast; I had only 3 textures to integrate!
With the new features in the app, I was able to use the option of z-depth in order to have a focus on certain parts of the character. The biggest advantage: the post prod options like the filters, the colorimetric alterations are really good and intuitive.
Sketchfab has helped me a lot to present my work and gives a new dimension to admire the community works.
Keep it up!
Contact Me
You can find all my work on my blog or on my website.
Facebook
Twitter
Instagram
Sketchfab
Woot


