Hi my name is Riley van Heeswyk! I am a 3D Artist and teacher working primarily in video game industry creating environment art. I have a passion for 3D art and games and love how Sketchfab creates the ability to showcase my work and students work in an easy to use and view platform.
I started the Spitfire Texturing Challenge quite late, before I started I spent time studying what other people were planning on creating for the competition and quickly realised that the vast majority of competitors in the competition were texturing the Spitfire in a realistic fashion. This made me want to try something different. So I tried by thinking outside of the box and planned on creating something with a more stylistic approach. Rather than that of a standard realistic texturing workflow I wanted to create something that looked like an actual comic.

Inspirational images
I was heavily inspired by traditional black and white comics. I looked at an array of drawings of aircraft for inspiration.

Reference images
I spent quite a lot of time looking at reference material, looking at things such as blueprints and high resolution photos of different variants of Spitfire. There being over 19 versions of Spitfire and 52 sub-variants being produced throughout the Second World War, made it somewhat hard to nail down the exact version of the model. This step is very crucial in my texturing process.
The first thing I did when I downloaded the model from Renafox was to examine both low poly and the high poly and checked both the supplied AO map and normal map for existing details, that I could utilize whilst texturing. Having the model provided allowed me to focus on the texturing the purpose of the competition.
There are many different texturing pipelines available. I decided to utilise 3D-Coat as I find it the best program for creating stylised hand painted textures.
Initially I loaded the model and provided textures into 3D-Coat, I then used 3D-Coats ability to sync with Photoshop to quickly convert the normal map into edges using Filter>Stylize> Find Edges, to create base for starting the texturing process. I could then figure and details I wanted to add and or remove from the asset.

Converting normal map to “edge” map
I also knew I wanted to create a very flat shaded cartoon style, so I had no use of the normal map or AO beyond the initial setup.
Once I had this “edge” map I proceeded to clean up the details in 3D-Coat by hand painting over the top of the layers, using 3D-Coat’s paint stroke and selection tools.
I then began utilizing blueprints to block in additional details. For that I used 3D-Coat’s smart materials to project blueprints directly onto my model. I then proceeded to tidy up the projections manually, using 3D-Coat’s line and spline tools. The number of variants of the Spitfire also made this somewhat difficult in finding blueprints that aligned well with the actual mode and details from the high poly. I spent time reworking a lot of the initial line work from the “edge map” to work better with the projections from the blueprints, emphasizing forms with line direction, and refining a few areas that had UV issues.

Projecting blueprints using smart materials
Once I had the base line work and major forms of the Spitfire done, I then proceeded to add detail to the texture such as nose art.

Adding rivets, which I ultimately scrapped as I felt it made the texture too noisy.

Using the ability to replace geometry in the scene to use cylinders as guides for painting bullet holes.

For the environment I was tossing up between two ideas, an aerial combat scene or a hangar scene. I originally began working on creating an aircraft hangar scene and had completed the hangar, but after some texture tests of the methods I planned to texture the environment. I realised that this would either take far too long too texture, or not give me the result I wanted. So with the deadline fast approaching, I decided on a quick and dirty environment.
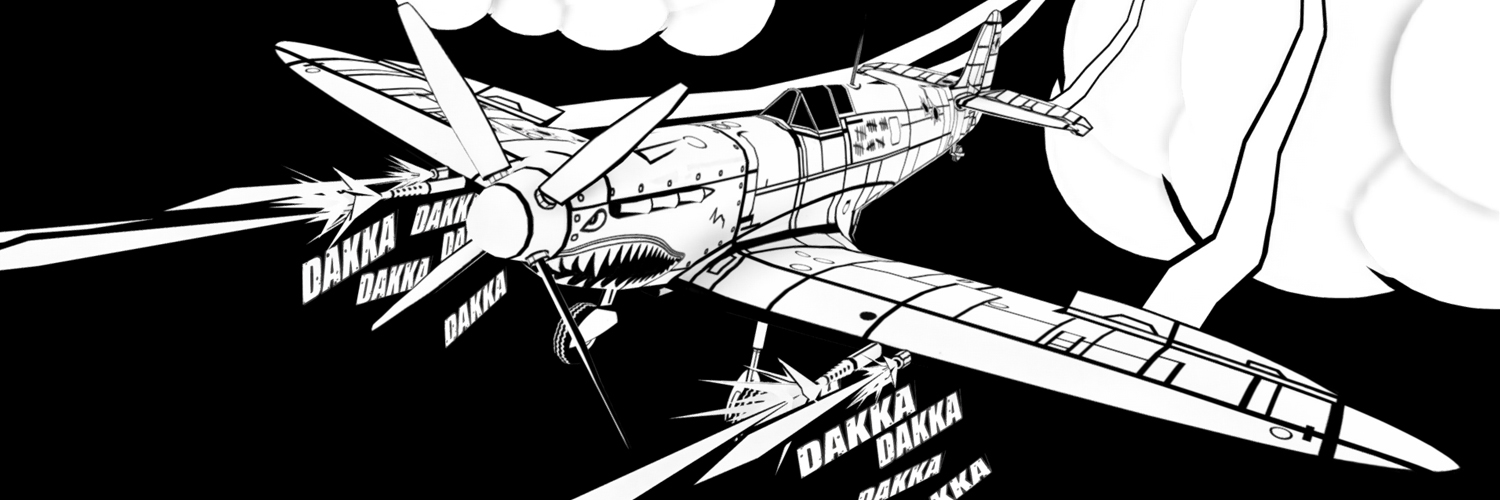
I modelled some basic clouds, muzzle flashes and bullet trails. Using simple white and black materials to create a Sobel Edge comic look, by creating a duplicate of the mesh, inflating the vertices of the mesh, assigning a black material and then reversing the normals. I only applied the outline effect to the environment as I felt doing so to the plane might breach the no modification of the mesh rule.

Outline effect
Once I had my textures and scene setup, I uploaded to Sketchfab and setup materials. As I was going for a flat shaded comic look I made sure to set the shading to Shadeless and for the black material used for the outlines single-sided rendering. I then spent time tweaking the final composition. Which in the end of the day I was not all that happy with, but had run out of time.
Final Scene and Texture
Sketchfab’s ability to render things in real-time, makes it a highly valuable tool for 3D artists. It helps greatly to be able to showcase your work in a real-time environment and I use it constantly with my students as it allows others to easily view, comment and learn from your work. This scene is a good example how flexible Sketchfab is as a platform to make your art look awesome and unique, and also a powerful medium to share content, thanks to Renafox for sharing this model for the competition. I also recommend using Sketchfab as brilliant source of reference material, being able to examine a model and the way it has been constructed is an extremely useful learning tool.
If you have more interest in my art, you can find me on my website, LinkedIn or here on Sketchfab.
About the author
Riley van Heeswyk
Winner of Spitfire Texturing Challenge