Hello Sketchfab!
I’m Glen Fox aka glenatron, and I’m a videogame artist, currently working as a Principal Environment Artist at Rare, pirating about on Sea of Thieves.
I really enjoy creating stylised dioramas for Sketchfab, and exploring/experimenting with various ways of creating stylised art.
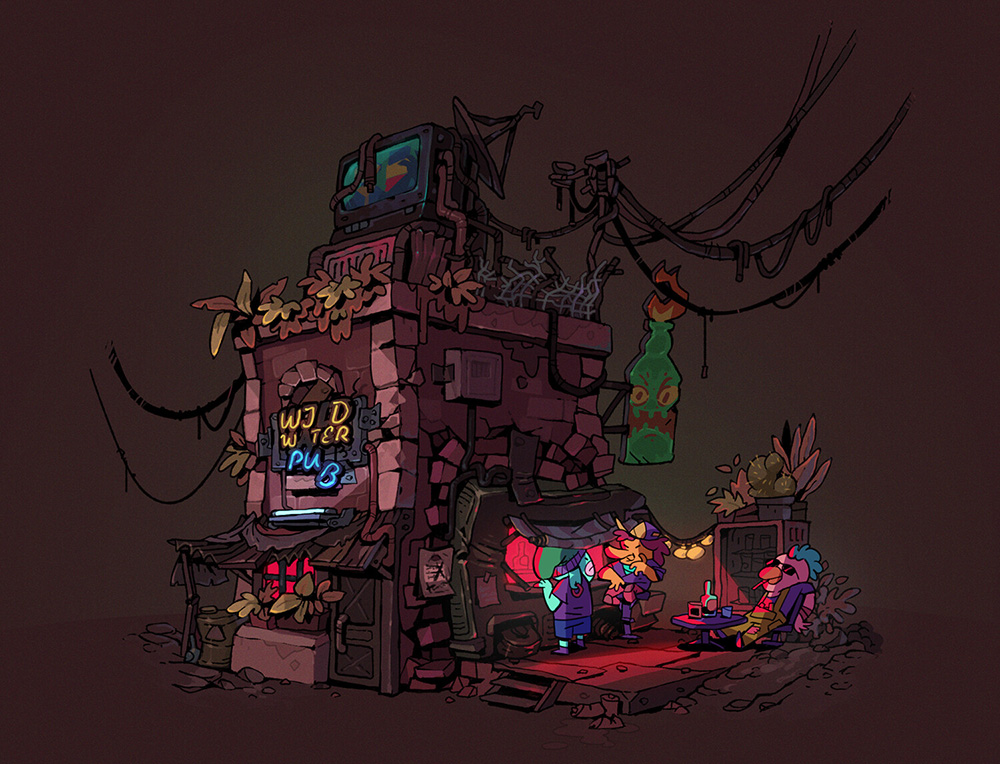
I have been following Krzysztof Maziarz on ArtStation for quite a while, am a huge fan of his work, and decided to finally recreate one of his concepts in 3D. He has a very distinct art-style, with chunky dynamic shapes, crisp lines, and bags of character. I figured his Wild Water Pub would translate especially well to a small diorama and I loved the ambiance, so decided on that.
Modelling
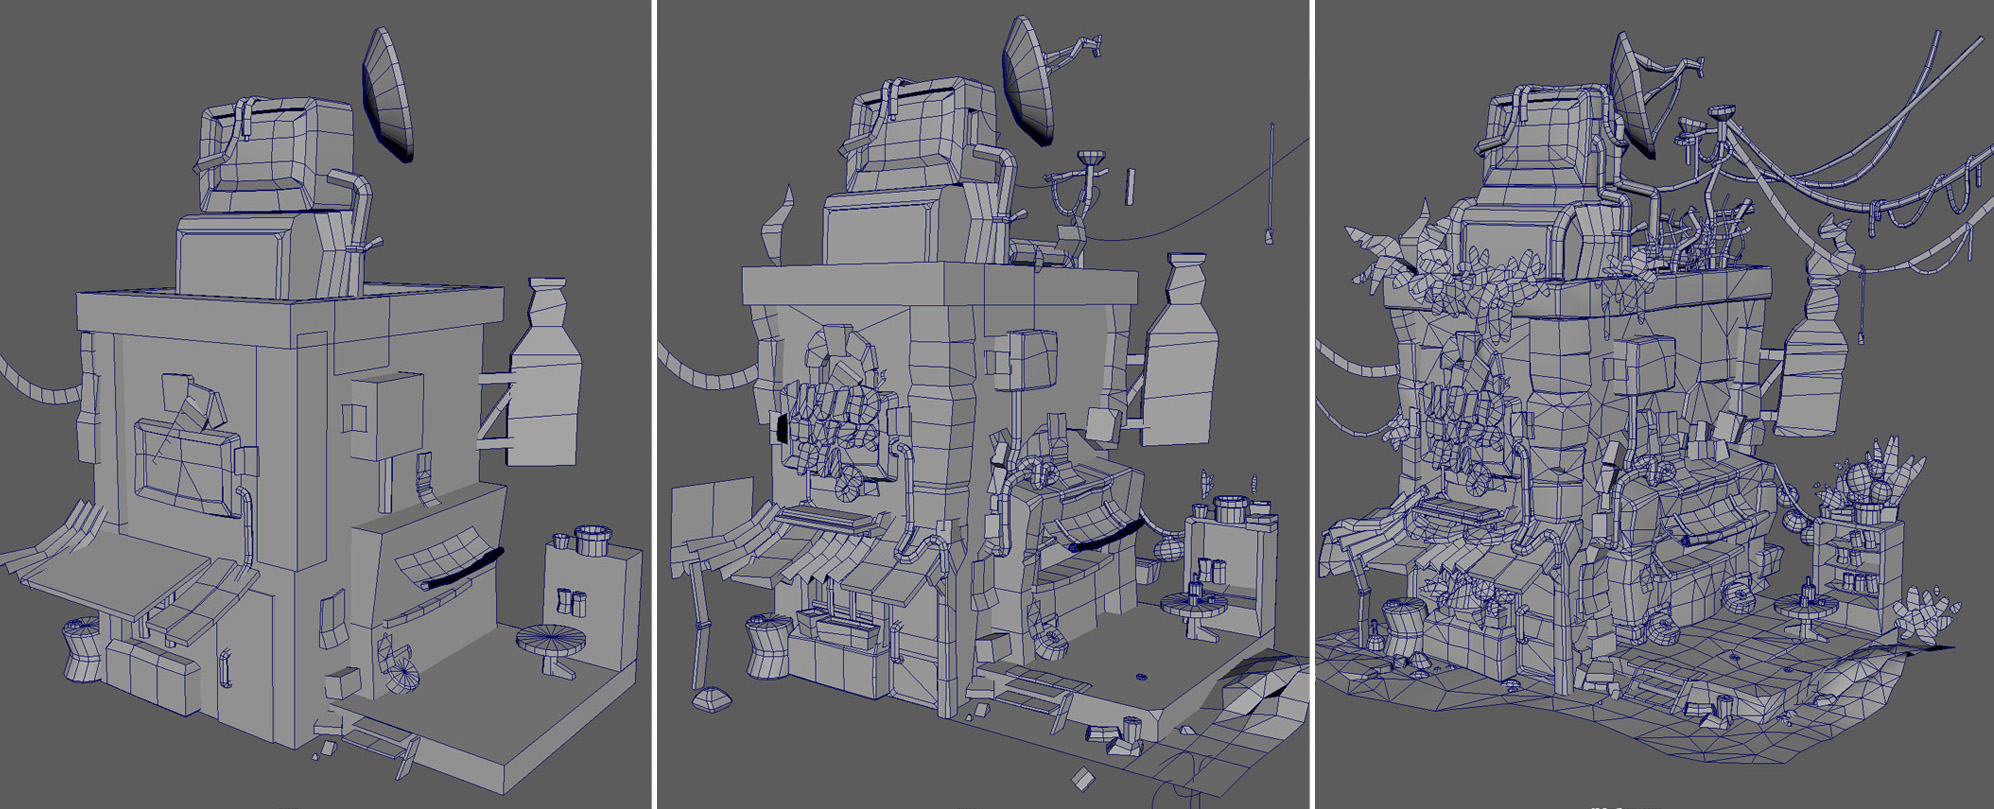
I started in Maya by blocking out the major forms, referring to the concept as much as possible. It’s much easier to fix any fundamental scale or layout problems in these early stages, so I didn’t cut in too much detail near the start. Everything mostly starts as boxes or very primitive shapes. These are cut into and refined as I work. Once the larger shapes are done, I move onto the smaller shapes, again starting with basic proxy meshes, before cutting into and refining them.
Krzysztof’s concepts have very interesting and dynamic silhouettes, so I focused on adding plenty of detail to the edges of meshes. There are very few long straight lines.
Edges are beveled to soften them. A softened beveled edge is as cheap as a hardened edge, as long as the UV points aren’t split, so I take advantage of this. This also helps when texturing, as these edges will be able to receive soft highlights without the need for a high poly model.
It’s worth noting that despite the final mesh not needing to be shaded, I still need edge smoothing correctly set, so that bakes will come out looking correct.
UV Unwrapping
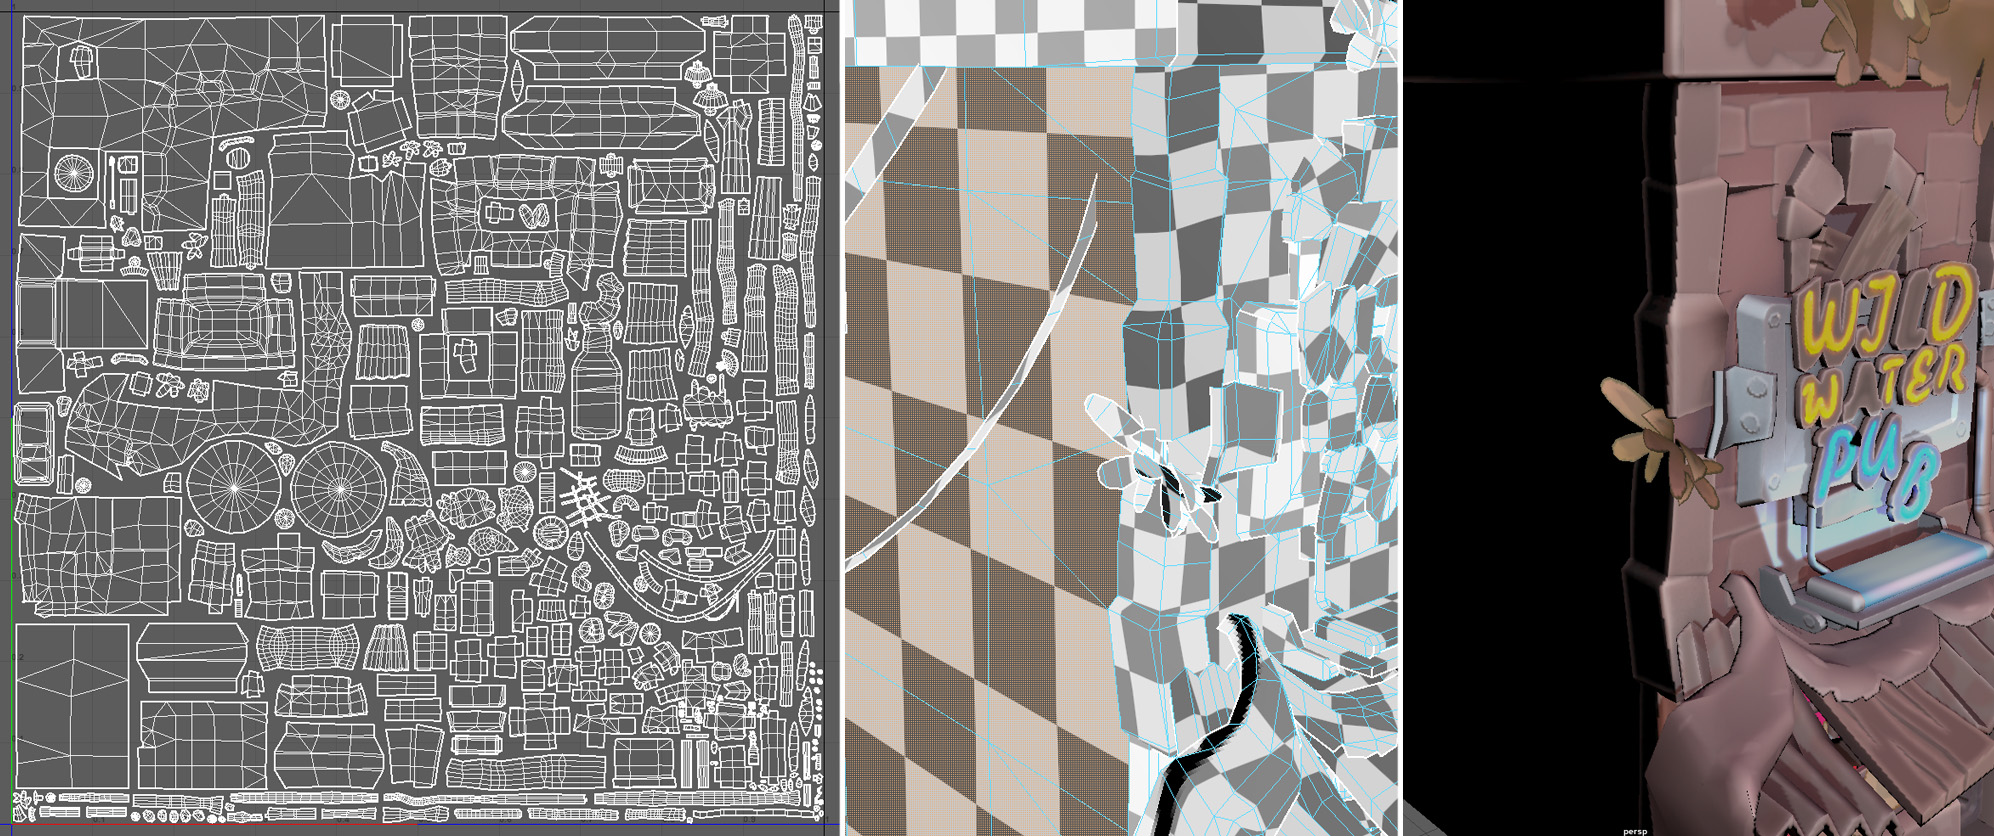
Everything’s unwrapped to a single 0-1 texture space. As a rule of thumb I try to keep these smaller dioramas to a single atlas, unless there are materials that will need tiling. This means there are fewer draw calls, and the mesh will load faster. A few things share the same UV space (which slightly increases resolution and also means you only have to texture once), but most things have to be bespoke, especially if the texture is also going to contain lighting information.
I also make sure that the texel density is consistent across most of the model, as you can rotate and zoom around the mesh. The exception to this are the faces that will be in complete shadow, at the back of the model, which receive less texture area as it’s not needed (I could have gone even more extreme than this).
Utility Map Baking
I use Marmoset Toolbag to bake base textures, ready to be taken into Substance Painter. The interface is simple to use, the baker is quick with high quality results, and what you see is what you get, so it’s very easy to iterate. I bake the following textures:
- Ambient Occlusion
- Curvature
- Wireframe (for use in Photoshop)
- Position (just in case…)
- World space normals (these are rebaked in Substance Painter with extra height details)
Texturing
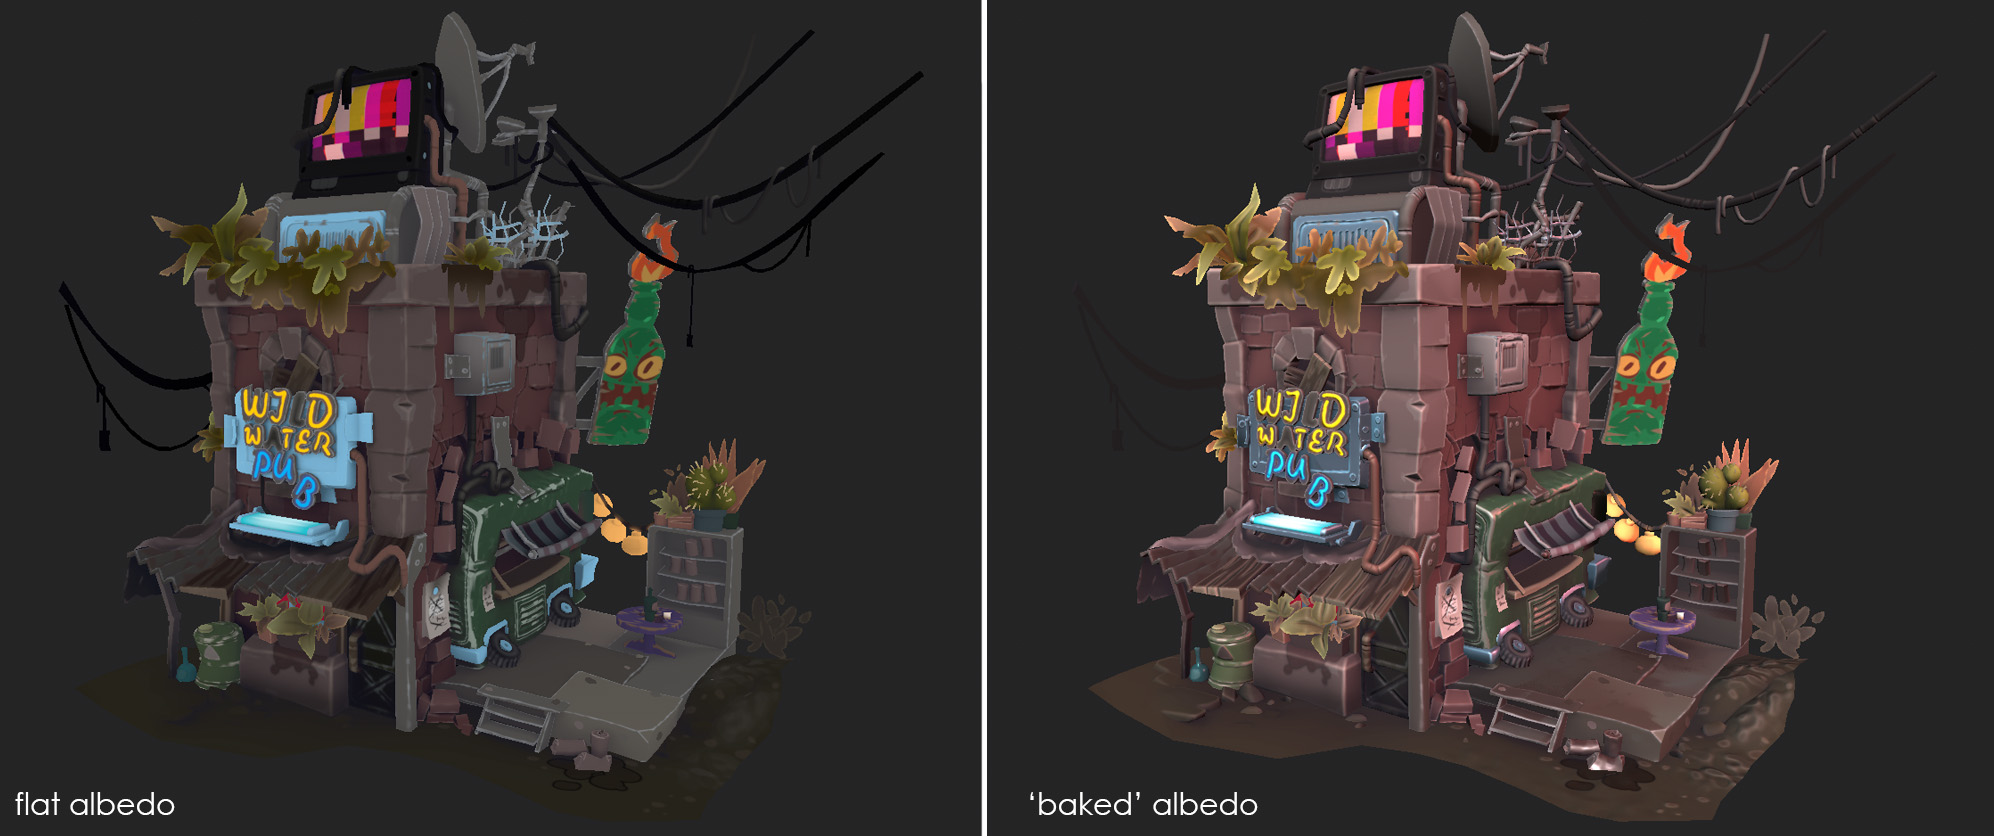
I use Substance Painter to texture this particular diorama, because I want to include baked material properties (specular, reflections, and self shadowing).
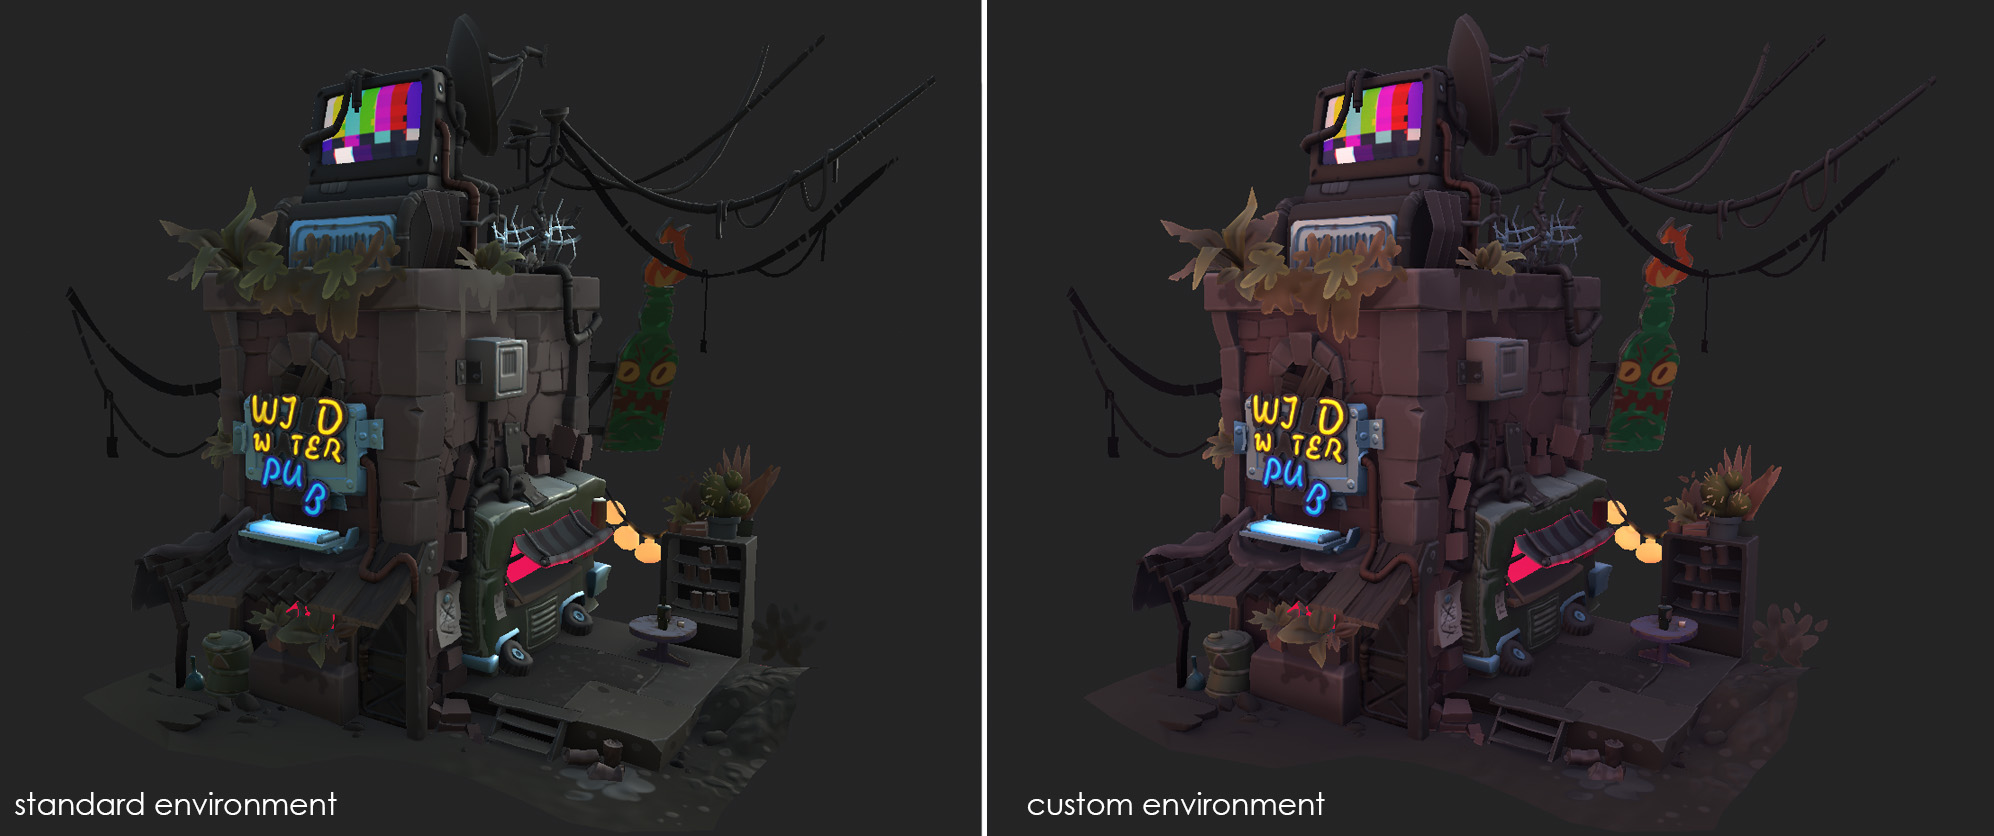
I import a custom reflection environment into Painter, so the viewport render is more representative of the lighting that will be present in the final piece. I find this crucial if I want to get close to matching the material values/properties of the final concept.
Most of the materials are very simple flat or gradient materials, with some simple AO, cavity, or edge detailing added. For a few materials I add some slight surface detailing or variation, mostly to cut up surfaces.
For most layer masks created in Painter, I mask using AO/curvature maps, overlaid with some extra (soft) noise, and then enhanced with levels and blur, to almost chunkify these details.
A few details (the TV, the bottle sign, etc.) are created in Photoshop, then placed in Painter as decals.
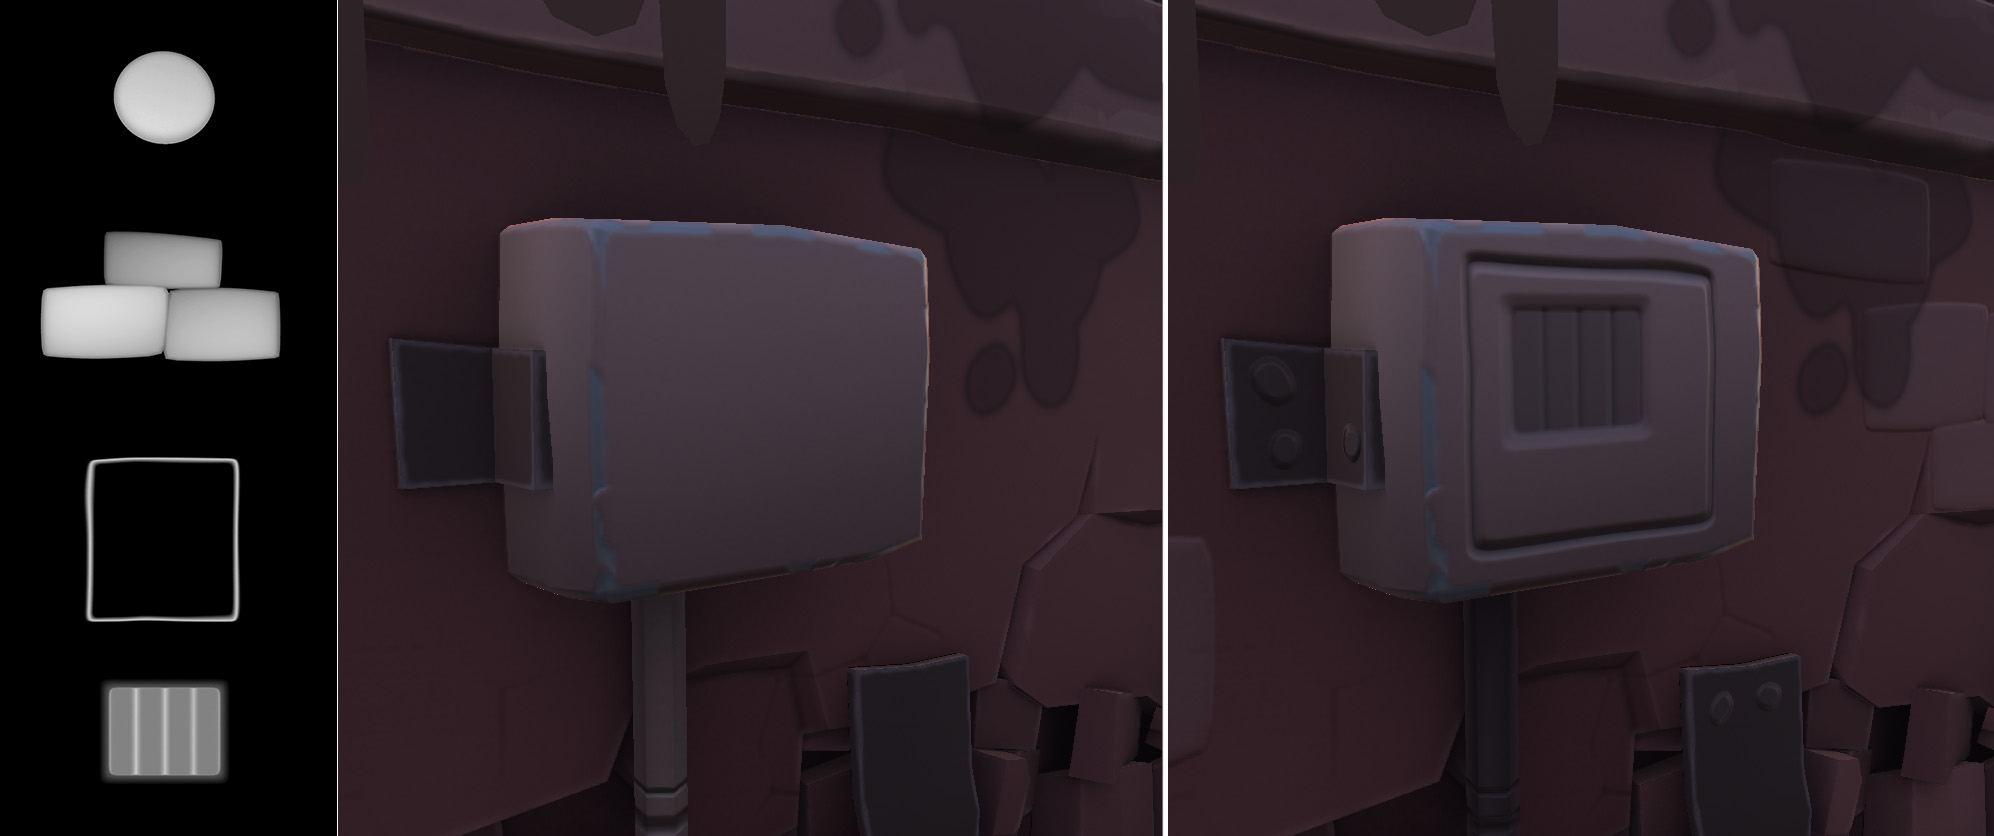
Small details that require normal information, such as panel lines and rivets, are stamped on a layer in Painter, using simple alphas created in Photoshop. These alphas are either simple shapes drawn in Photoshop, or simple little high poly swatches that are baked down to a height map. Creating these details in the high poly mesh of the building would (in this instance) not be worth the time that it would take to create them.
These normal details are required to allow for Painter to produce edge/cavity wear, and also for baked lighting highlights. Once the normal details are placed and I’m happy with them, world space normals are baked in Painter, and the normal information is no longer required.
Baked Material
Painter has a ‘Baked Material’ layer, which allows me to bake down lighting and reflection information to the final diffuse. The layer isn’t powerful enough to produce the full lighting solution for the scene, but I was able to capture the feel of real materials by angling the source light to where I knew the key light would be.
Outlines
A defining feature of Krzysztof’s artwork are the crisp dark outlines. These lines help to separate elements in the artwork, and lend an illustrative feel to the works.
For all the geometry outlines I use the same tried-and-tested technique of:
- duplicating the mesh
- pushing out the vertices based on normals
- flipping the normals
- rendering these faces as single-sided
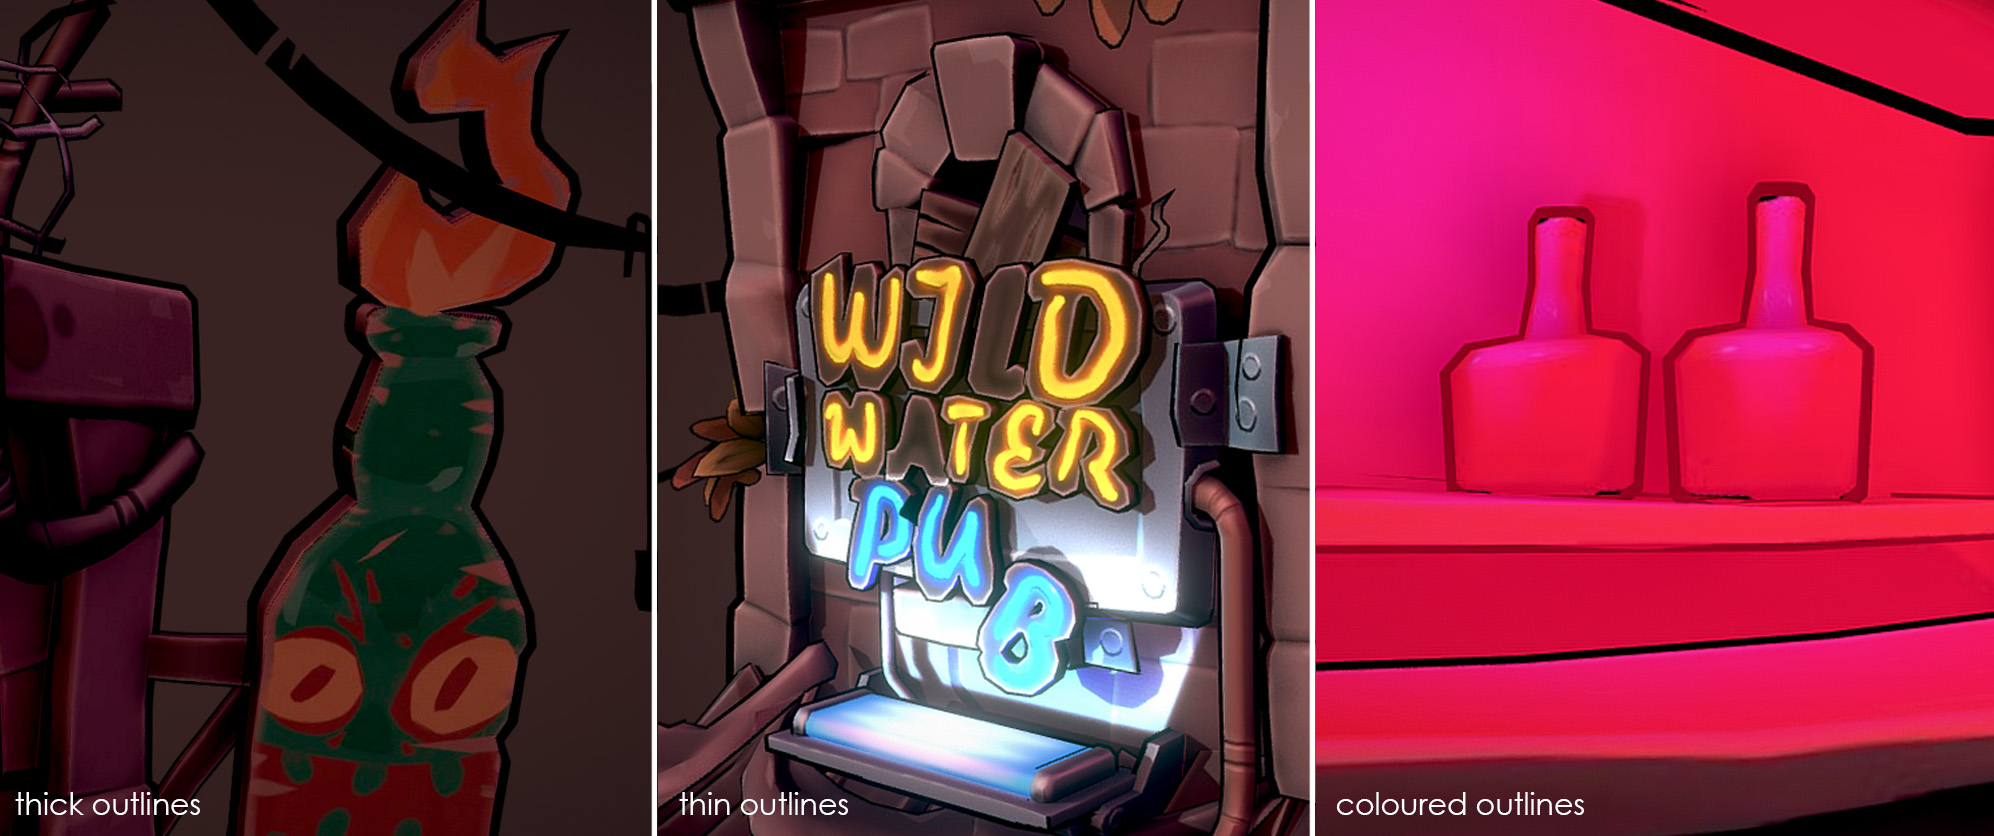
I do this in three passes. The big shapes such as the facade of the building/van/decking are pushed out a large amount, to create a thick outline. The smaller and more incidental details are pushed out a smaller amount to make a thinner outline, so areas with high detail still read from a distance. The outlines around the pink and yellow lights are pushed out, but then given their own complimentary colours, so they blend better with the bright colour behind them.
Outlines around foliage are made in the texture itself, by selecting the UV shells and adding an inner glow (this is also coloured slightly so it looks less harsh).
Lighting
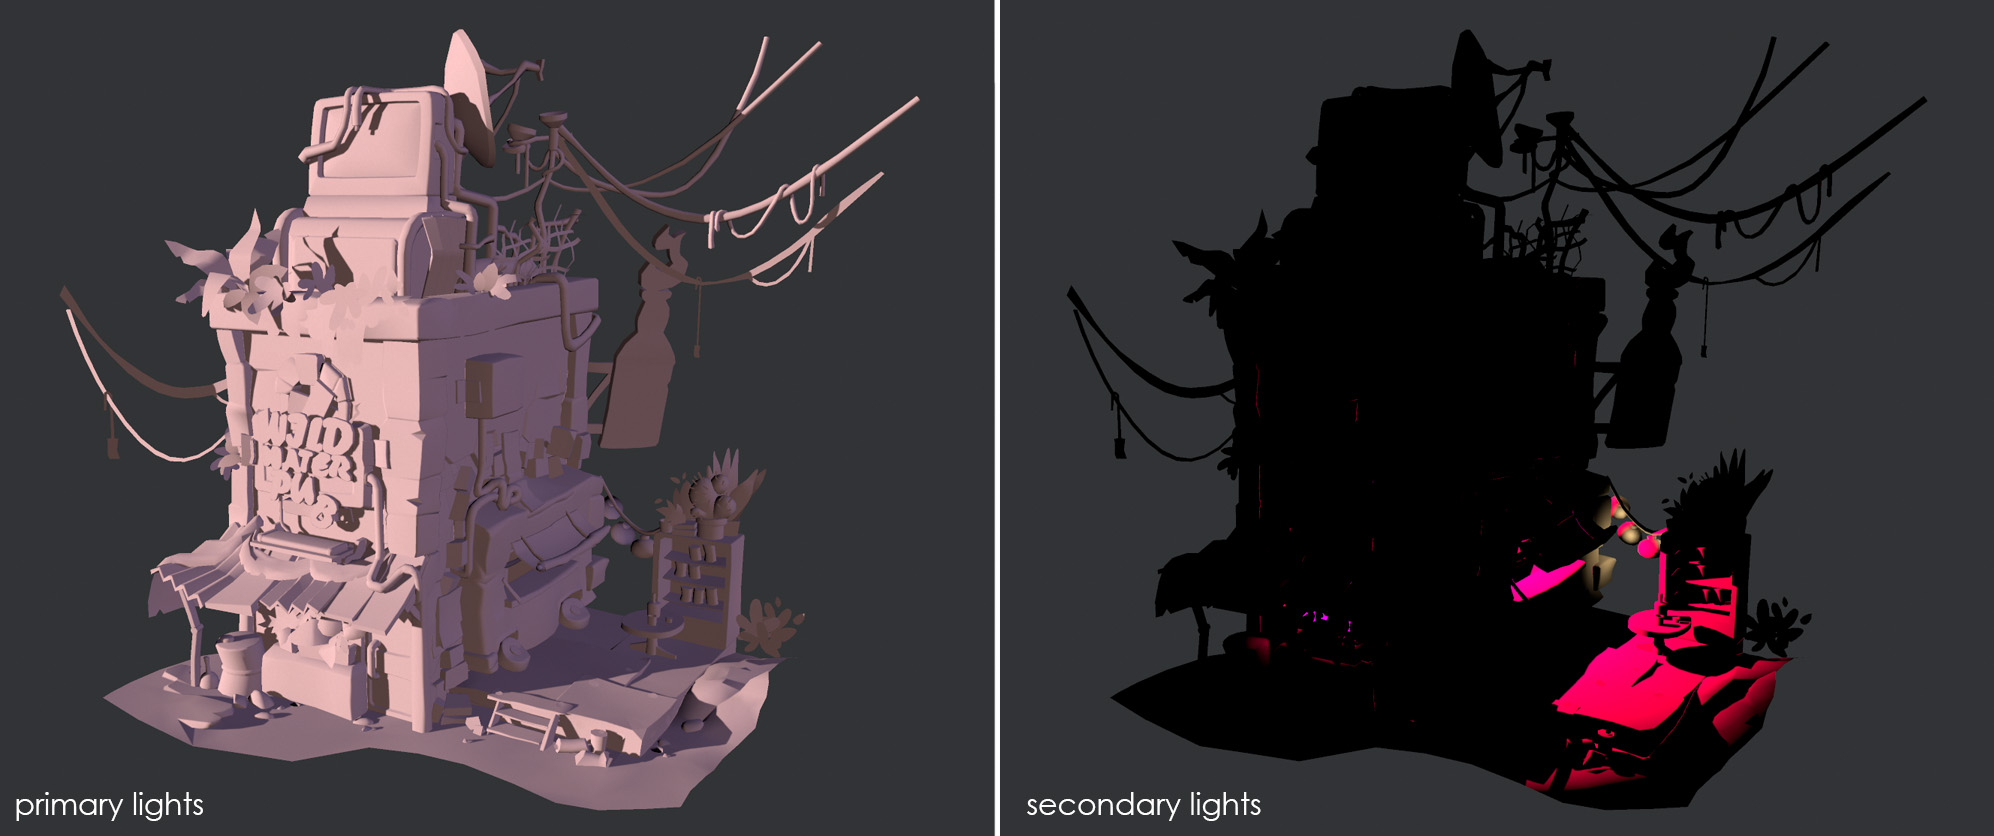
The lighting for the scene is baked in Marmoset Toolbag, done in multiple passes. These passes are layered up using blending modes in Photoshop, so I can have more fine control, without having to re-render.
The first bake contains the environment lighting, namely the key light and fill lights. The key light is a slightly warm directional light and is the strongest of the main lights. Then there are the two fill lights, one warm and one cool, to introduce ambient light to the scene. These are dimmer than the key light, so they don’t overpower it.
Smaller feature lights in the area are added as a separate pass. These include the light in the van, the fairy lights, and the light from the window. Having these in a separate pass means that I can slightly colour correct these and alter their intensities without having to re-render.
The cathode light on the front of the building is actually stamped on in Painter itself instead of being baked, purely because I got smoother results, closer to what I wanted, by doing it this way.
Final Texture Composition
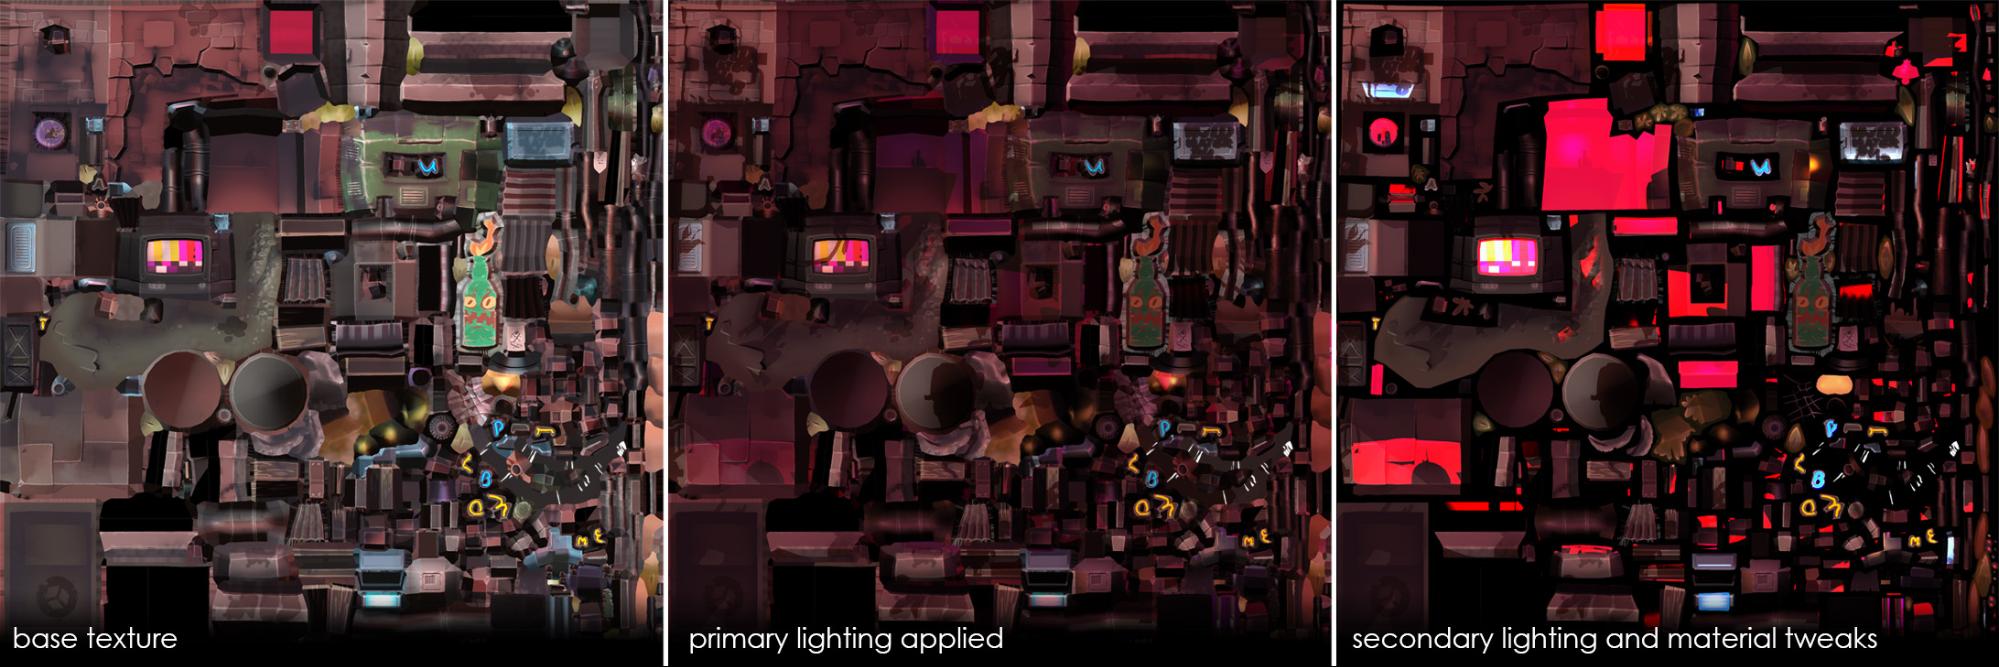
Once I have my baked diffuse, and my lighting passes, I can layer them up into a single texture using Photoshop, and add any adjustments or post-treatments.
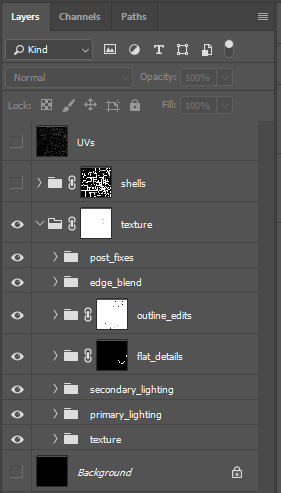
Here is a glimpse of the texture as it is layered, and a rundown of the layers present in my final PSD (from top to bottom).
- UVs – Useful to see where texture islands lay in Photoshop.
- Texture – The composited texture is placed in a group so parts of the wiring can be made transparent.
- Post_Fixes – Here are any small material tweaks I make after everything is composited together and in Sketchfab. They’re usually just adjustment layers, and doing this here reduces the amount of re-export I have to do.
- Edge_Blend – This is a soft painted layer around the edge of the terrain, the same value as the background colour in Sketchfab, to ensure a seamless blend between mesh and background.
- Outline_Edits – Here is where the foliage is masked out and an inner glow is added, to give the outline effect.
- Flat_Details – Some wires and leaves are completely flat colours and are masked out here with a solid colour layer.
- Secondary_Lighting – Contains the secondary lighting layers, including any colour/strength adjustments. These layers are set to Colour Dodge.
- Primary_Lighting – Contains the primary environment lighting, including any colour/strength adjustments. These layers are set to Hard Light.
- Texture – The flat baked texture, from Substance Painter.
Sketchfab Setup
For this particular scene, Sketchfab setup is very quick and simple. As the lighting is baked into the texture itself, the shading model is changed to unlit, and all lighting/shadows/environments are disabled. This all makes the scene very cheap to render.
Post-Processing
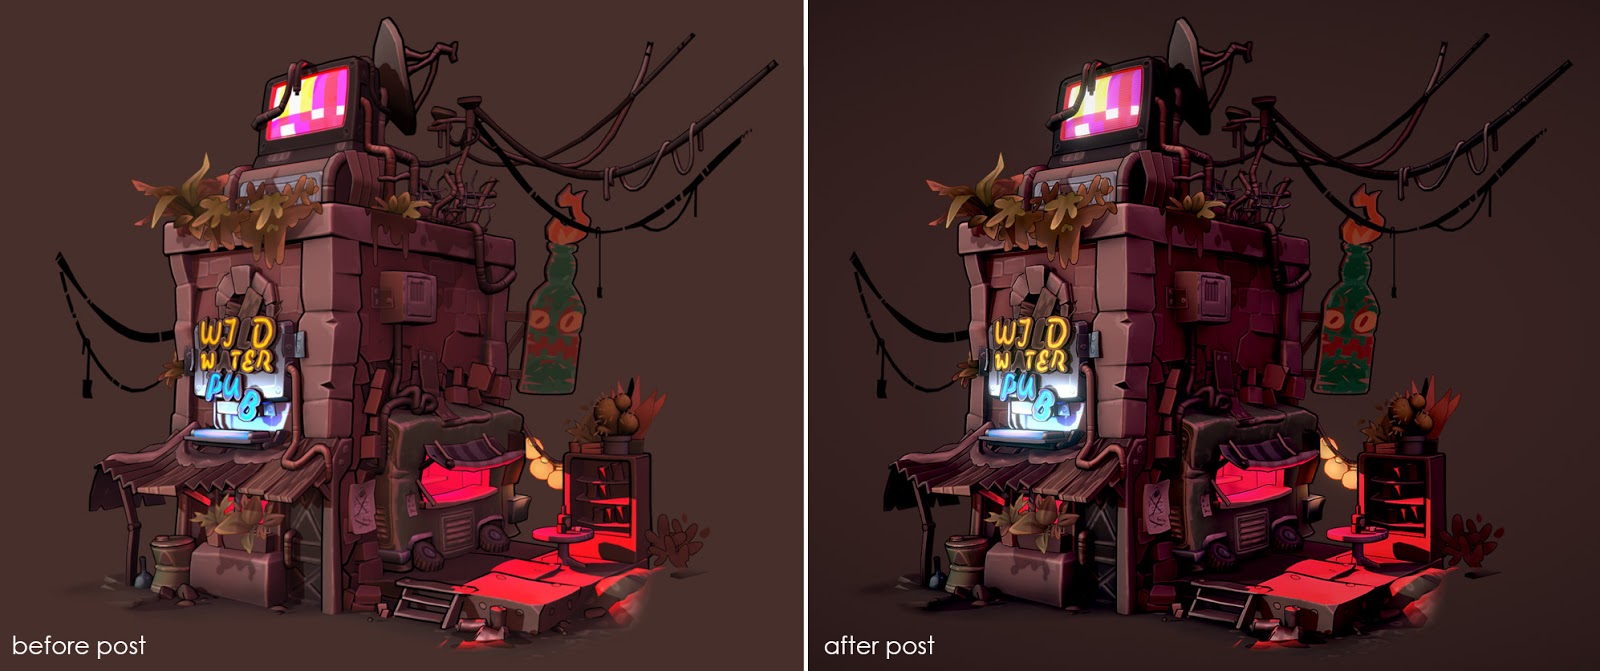
Sketchfab has a pretty extensive and powerful set of post-process tools, which I use a lot of to really spruce up a model. Post-processing can be expensive to render, but because this mesh is cheap and only uses a single texture, I know it will still load fast and run smoothly despite multiple post-processing passes. Here is a rundown of the post-processing filters I apply for this particular scene, and why.
- Sharpen – This helps to make the image pop and makes textures lovely and crispy. I think this filter lends itself well to painterly/illustration style artwork. I try not to overdo this, though, as it can start to make the image a bit too difficult to digest.
- SSAO – This is fairly expensive, but adds some nice depth to the scene, and helps to separate things a bit. I usually have AO baked into the scene itself as well, so I can have fine AO baked, and softer/broader (screen-spaced) AO on top.
- Vignette – I usually add this just to soften the edges of the image a bit, and help draw the focus to the centre of the frame.
- Bloom – This helps to emphasise the lighting in the scene and make certain areas look ‘hot’. I only add a small amount with a small radius, otherwise the scene can look a bit too dreamlike, and it can make elements bleed.
- Tone Mapping – I slightly increase the contrast of the image, and drop the saturation. This could be done in Photoshop, but requires more exporting/importing of textures. It’s very convenient to do it in the editor, and what you see is what you get.
- Colour Balance – This can be super powerful when used well. In this case I just use it to add a bit of coolness to the shadows.
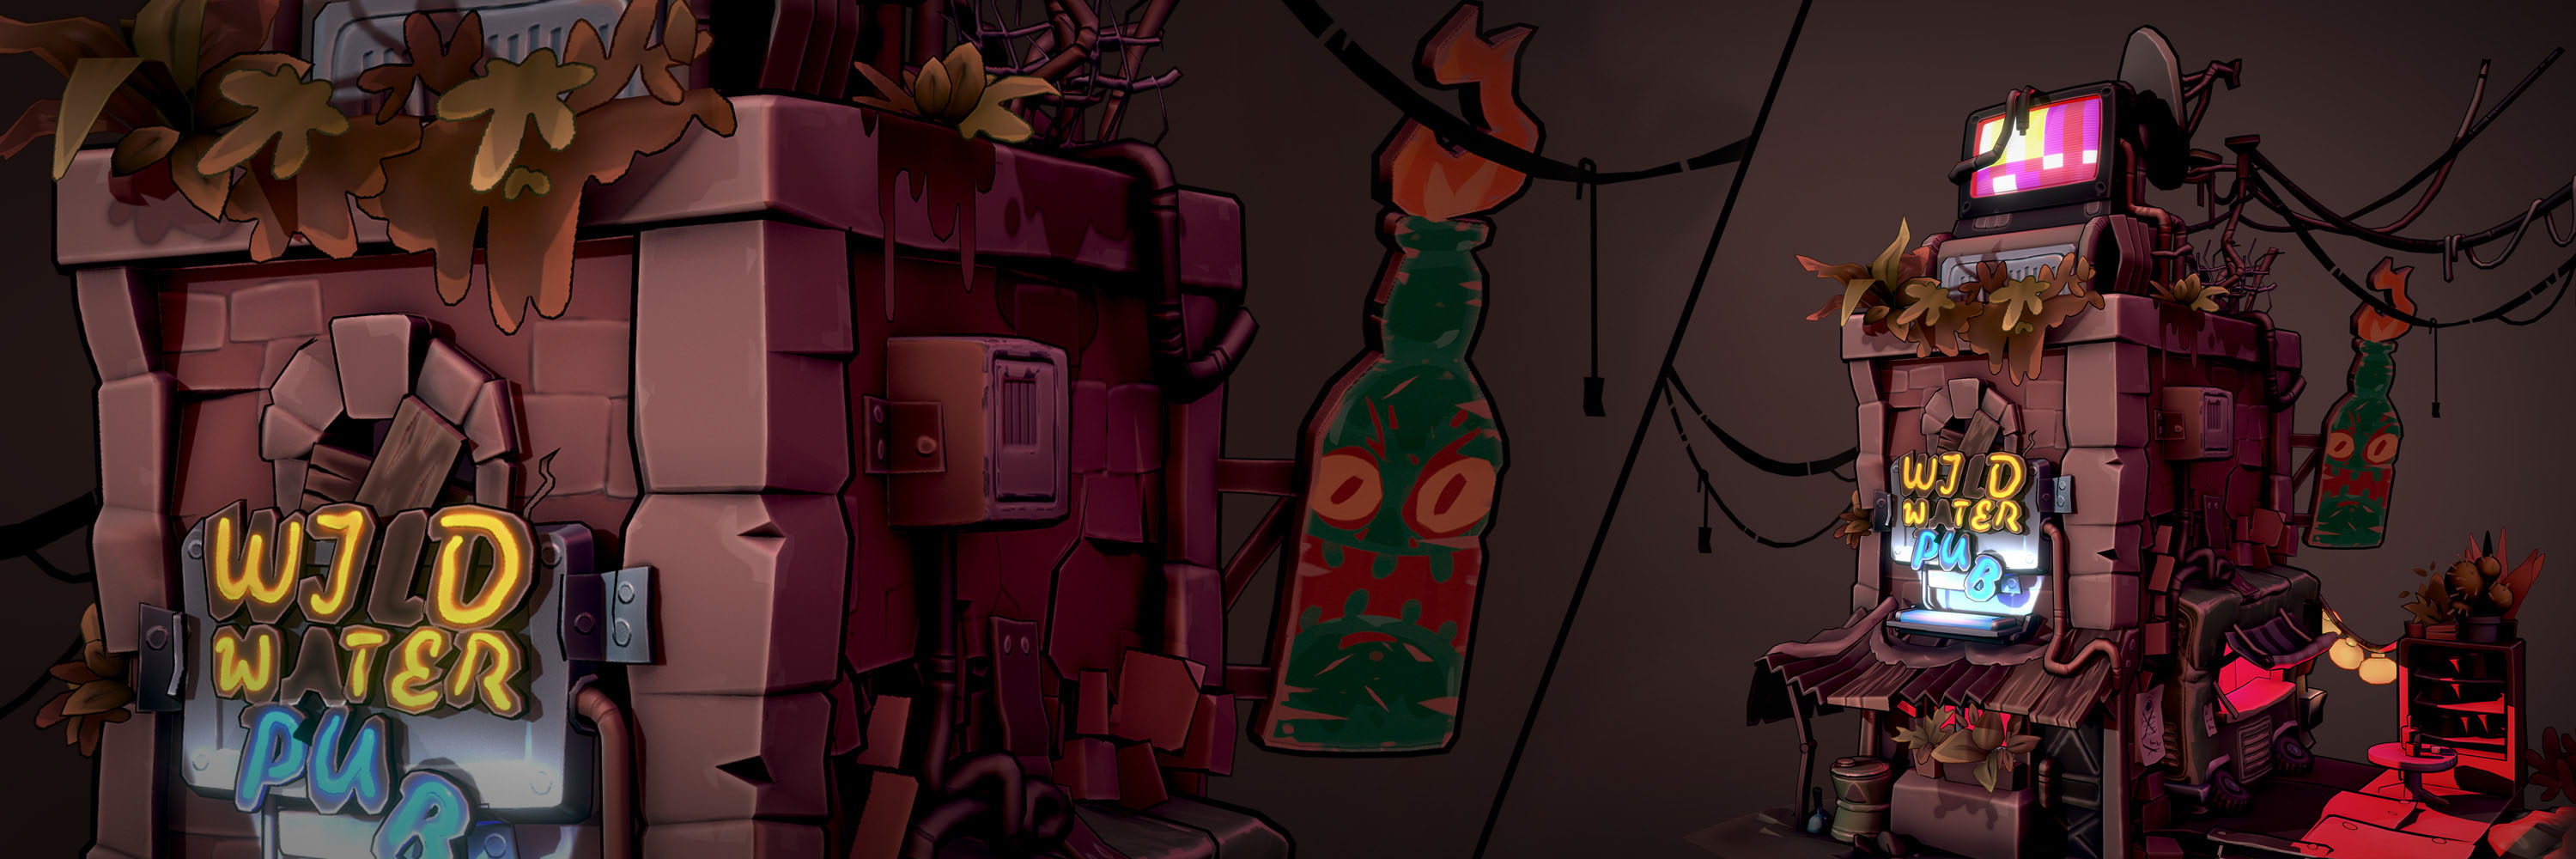
And here is a shot of the scene before and after applying the post-processing. What a difference!
I hope this little rundown has been informative and has given a little insight into how I approach a scene such as this. Please feel free to follow me on here and on ArtStation.
Here is the final version of the Wild Water Pub, I hope you like it!
