About Me
Hi! My name is Conrad Justin. I’m 26 and I live in Warsaw, Poland. I have been making game environments for 8 years for many communities in the gaming world. First for XONOTIC (three of my maps became official!), then for Quake (7th place in a mapping competition—was a disaster!), Unreal Tournament, and now I’m doing asset packs for Unreal Engine users and Sketchfab scenes like the one you clicked! I finished art class in high school, then did a master’s in Civil Engineering, graduated music school (I create soundtracks to my designs and play concerts on piano). I use Blender, Photoshop, Quixel Suite, and UE4. The Wooden Tavern model (part of the pack Wooden Town) was inspired by French Gothic architecture and the game Thief. Read on and I will tell you about my workflow!
First, Let’s Break Down the Scene
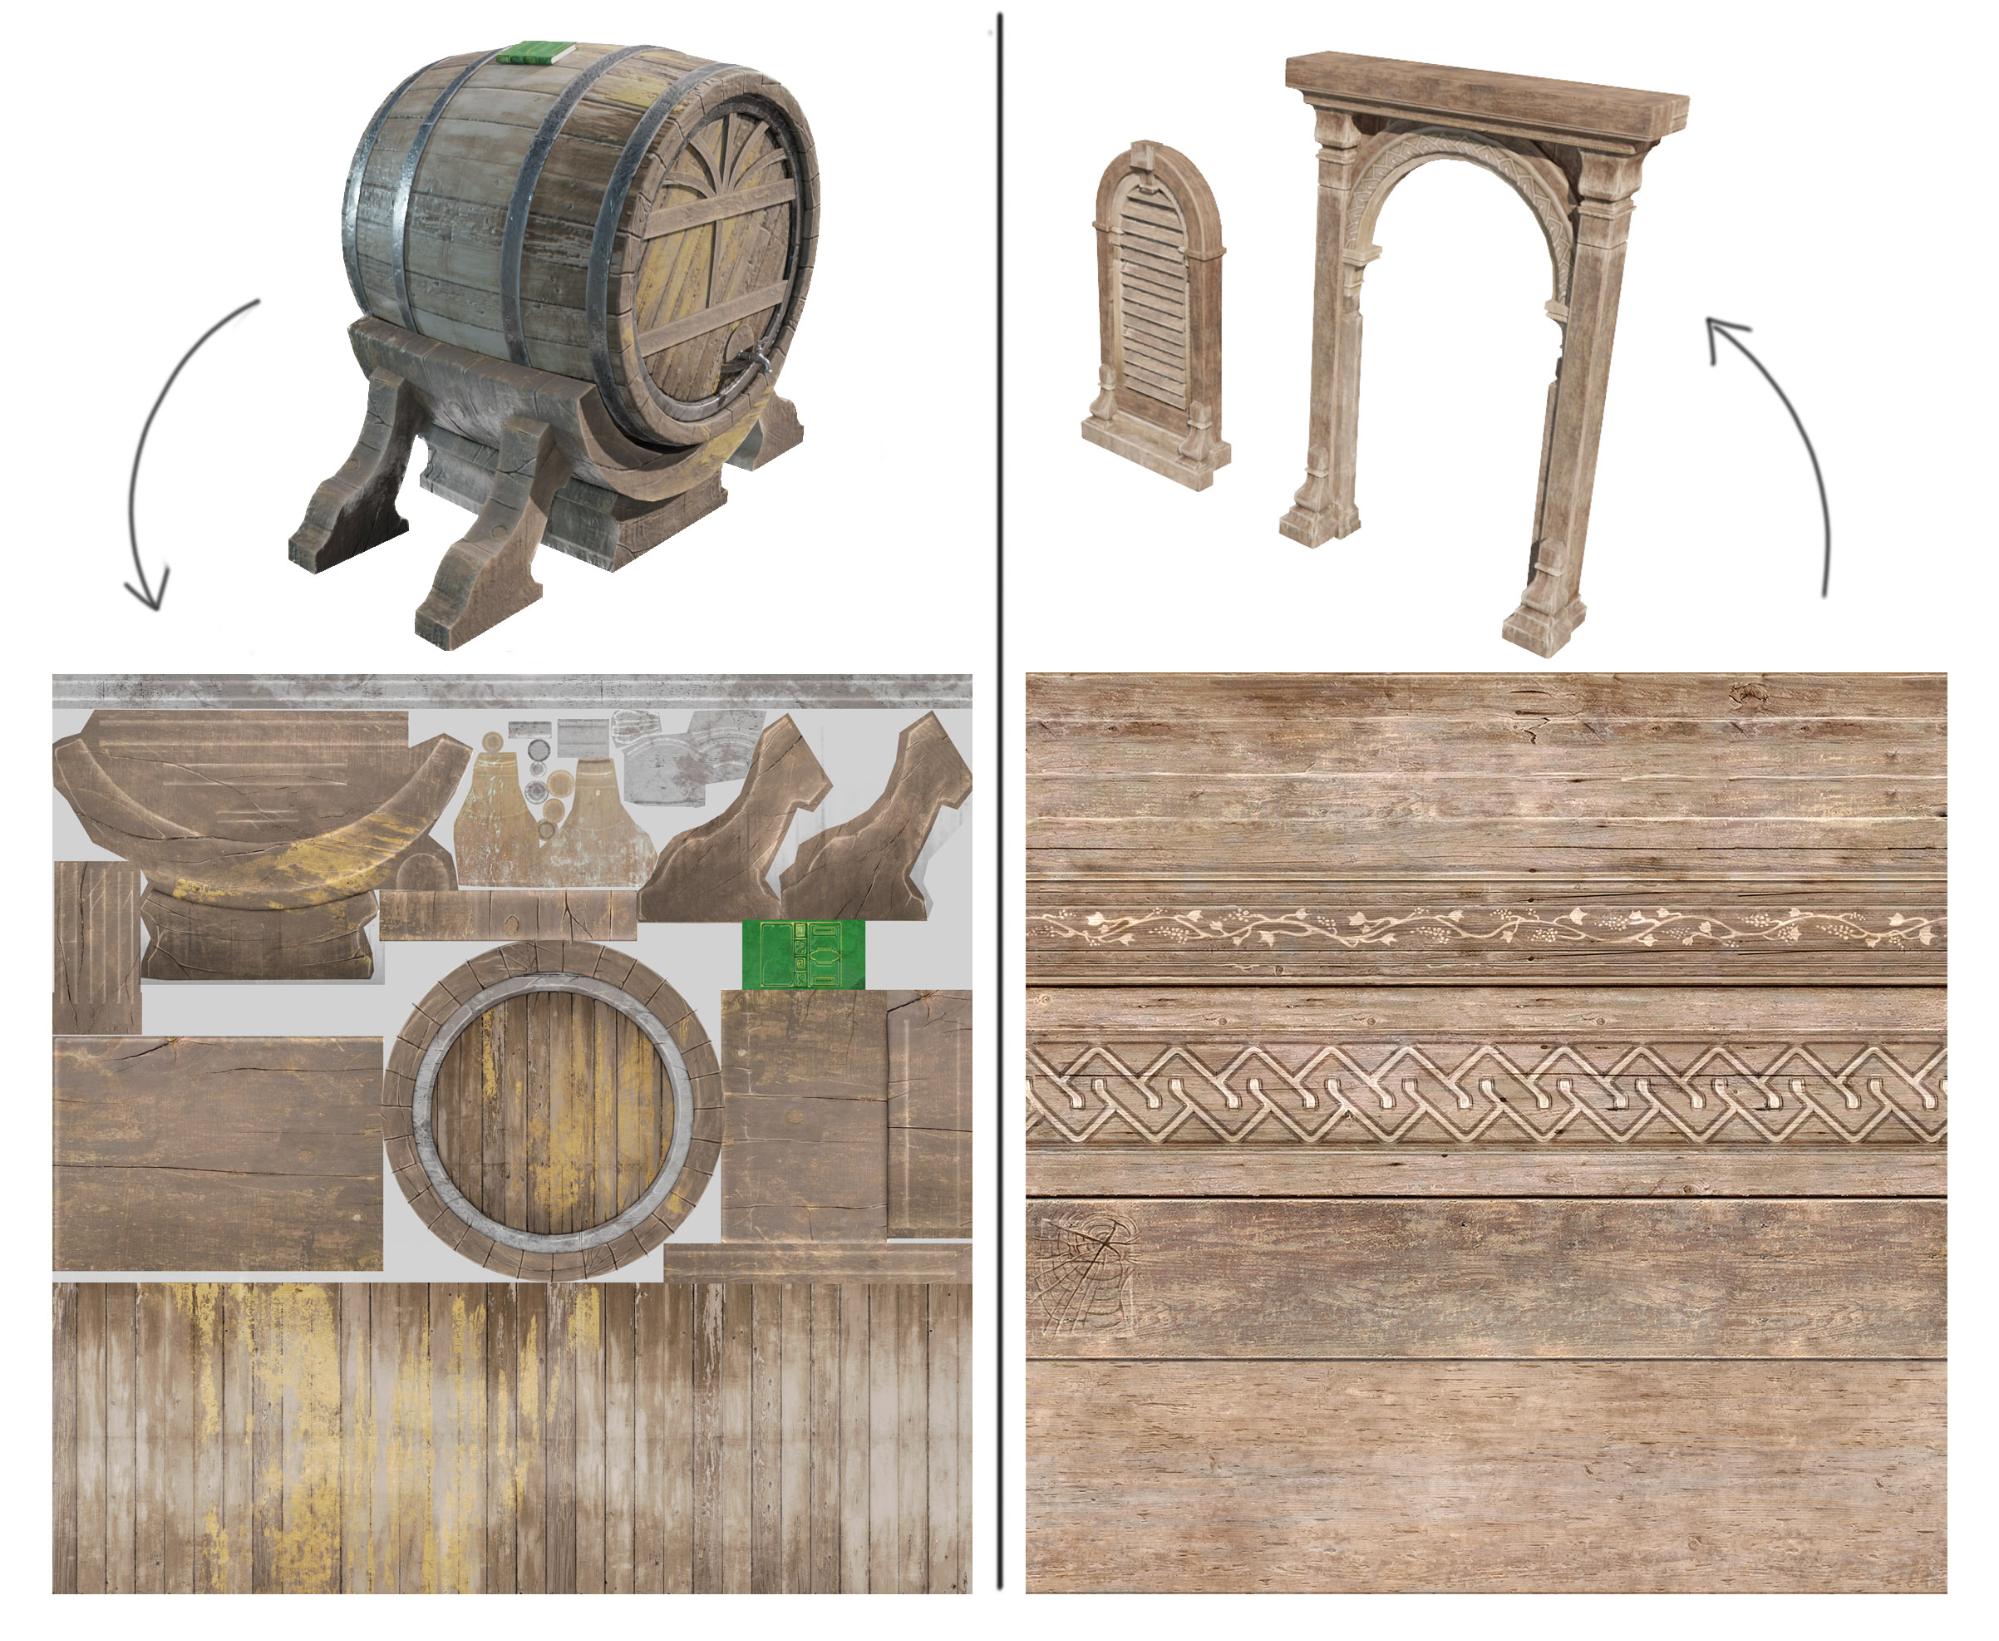
There are two types of models in this scene:
- Unique (on the left): Models that have textures done specifically for them. This way they can be less repetitive but the results are less optimized (in games, textures take up most of the memory)
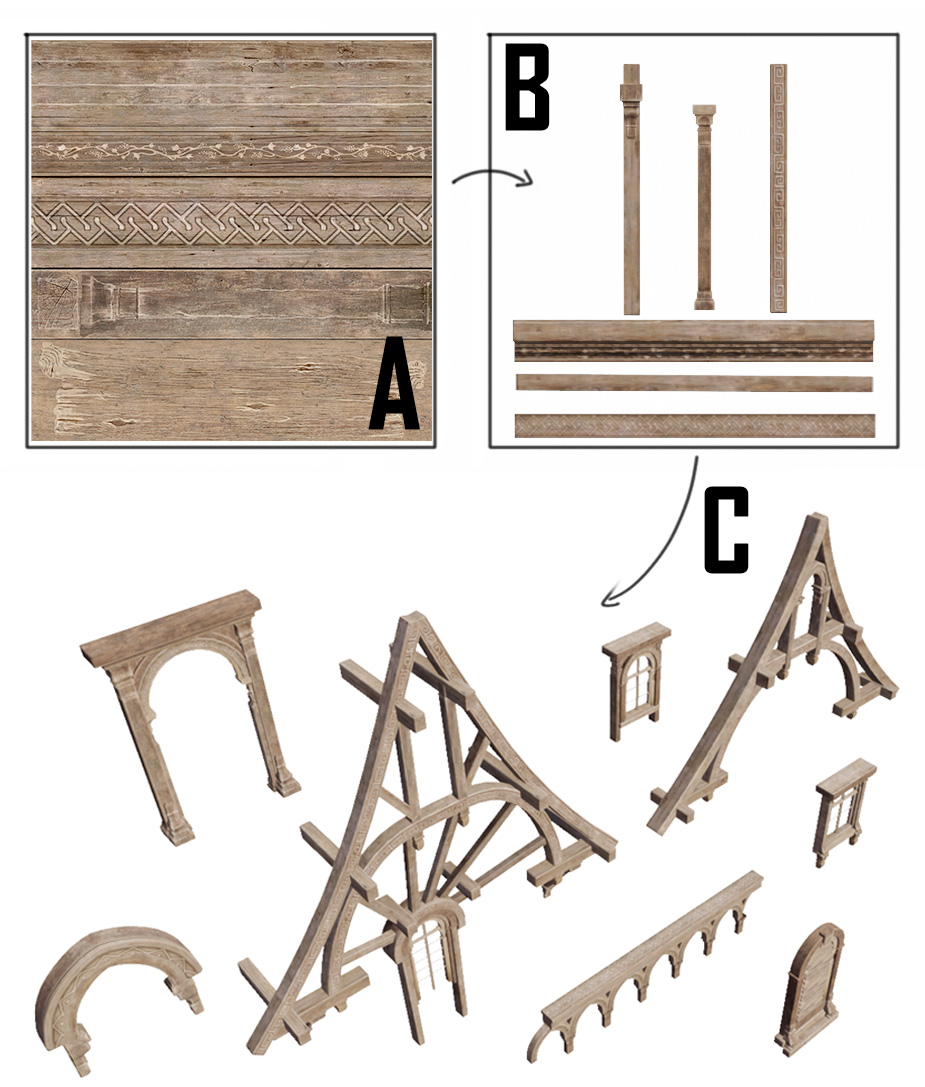
- Modular (on the right): All models in this category share seamless, tileable textures—the building consists of those modular pieces. With minor adjustments, I can create many different buildings using the same elements.
Below are examples of such textures: unique on the left (texture for the huge wine barrel) and modular on the right (horizontally aligned beams, trims, etc.). Only the bottom part of the object on the left could be used as a repeating tileable texture.
Unique Model Workflow (Wine Barrel)
Let’s talk about the huge wine barrel! Below I will explain in detail how this model was made from concept to textures. This is a good workflow for unique models like lamps, bookshelves, desks, signs, etc.
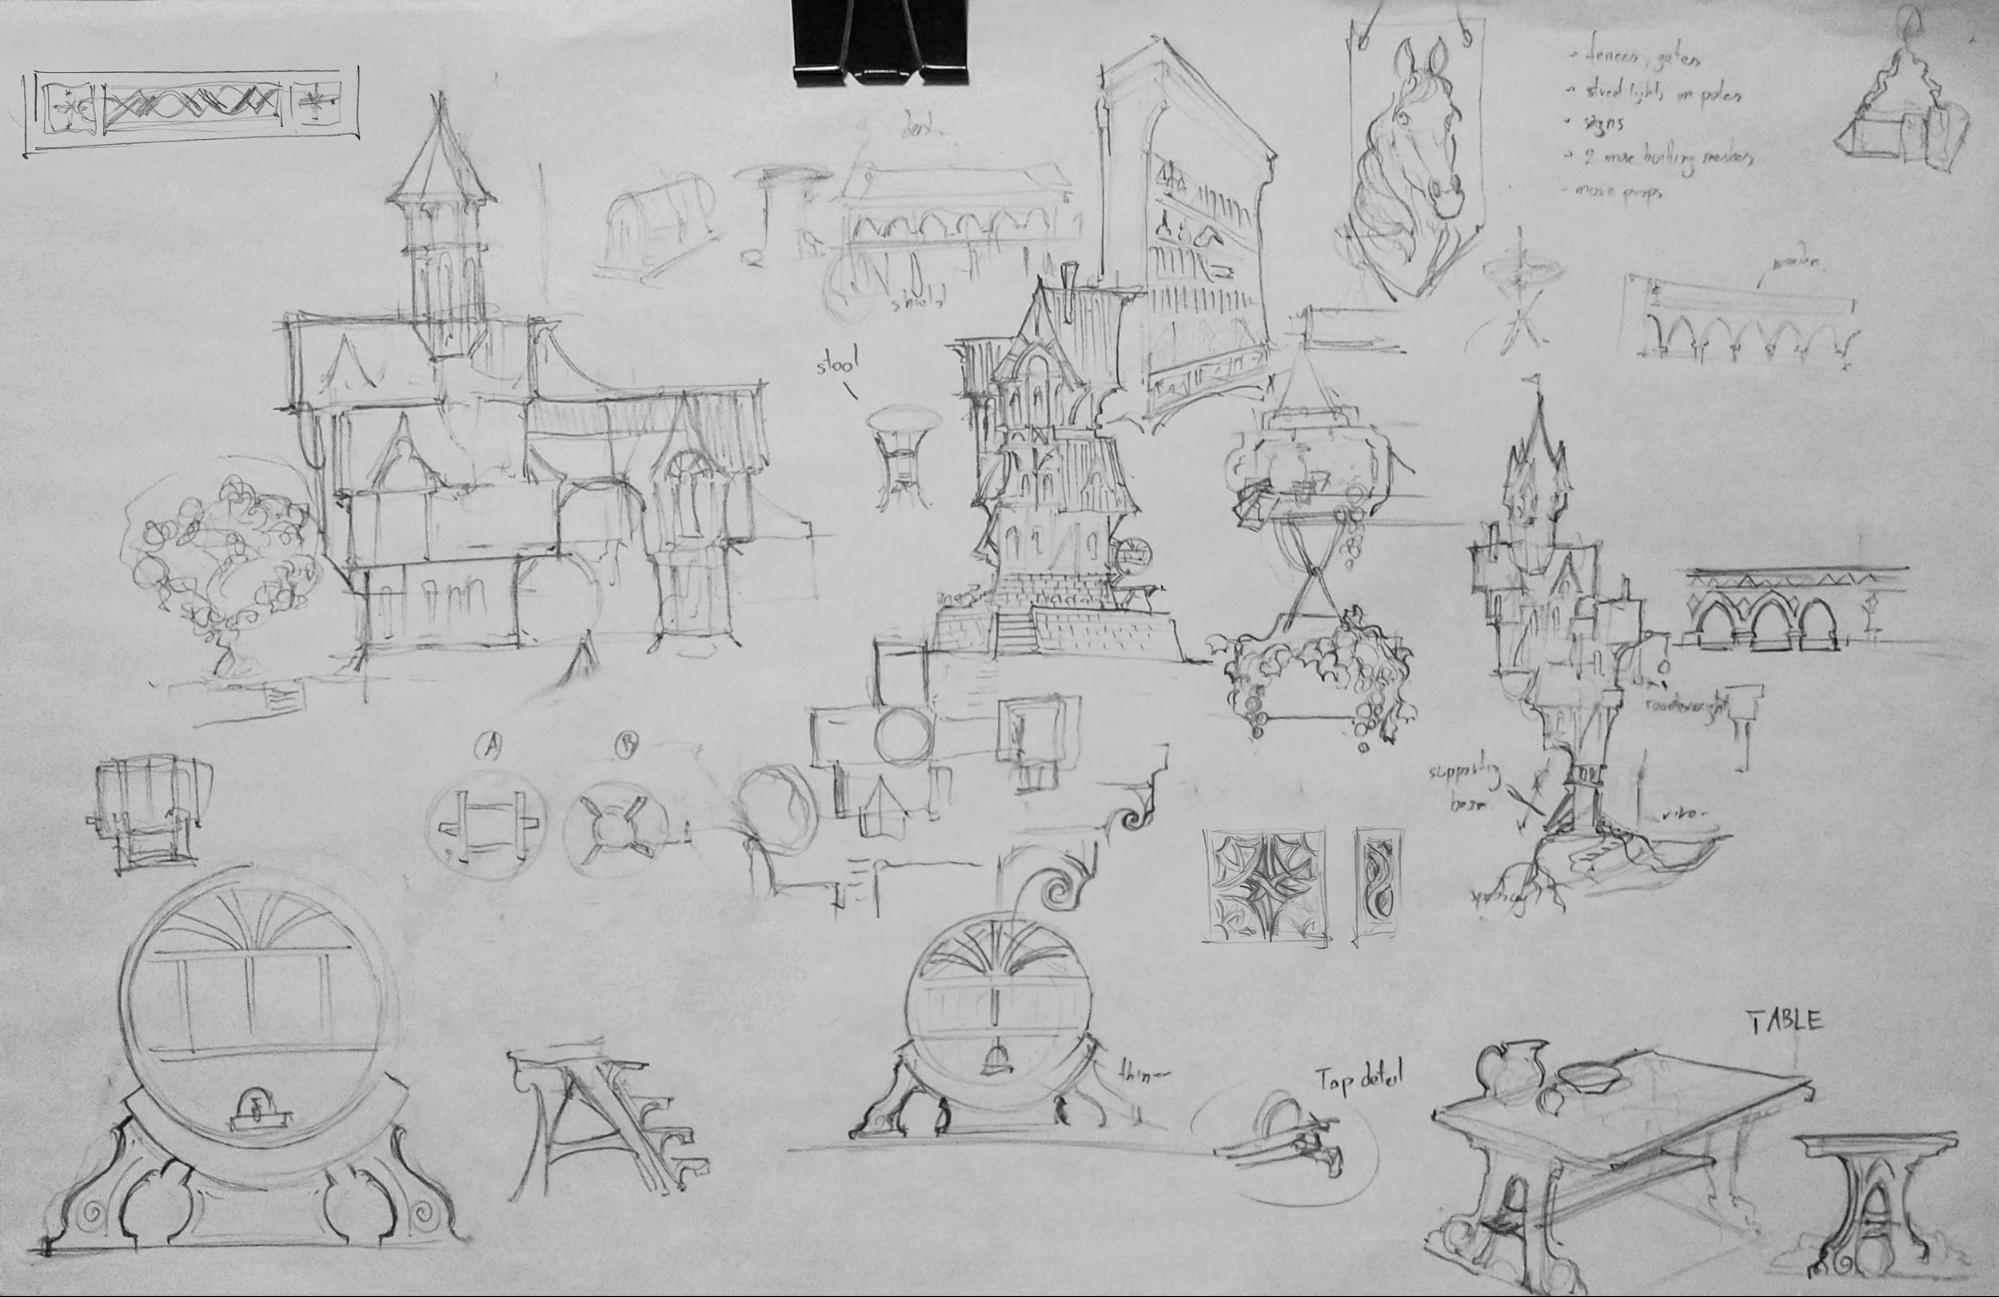
Concept and references
If you can draw something—you can model it… in most cases. Probably.
-ConradJustin 2020
It works very well for me to sketch the idea first. If I feel that I am struggling with the sketch, I go to the books or internet images and browse for inspiration. The sketch does not have to be a finished drawing with proper perspective and good shading. It can be just a few rough lines that compose well and give vital information. In most cases, front view and side view are enough to start modeling! Then you can take a picture of your sketch and drag and drop it into Blender, or you can draw in Blender from the start using the Grease Pencil tool.
TIP: Use a big sheet of paper—at least A3 (ledger size: 11×17 inch) so you can fit as many different elements and details as possible on one page. There is nothing worse than shuffling through dozens of pages to find that one little concept sketch that you made a week ago.
Modeling
After completing the sketch, it is time to begin modeling—every barrel starts with a simple cylinder primitive (24 sides and Ngon on both ends) which then can be modified by adding loop cuts and scaling them or insetting and extruding Ngons. When the basic shape is ready, continue adding primitives (simple cubes for front planks and for a book, more cylinders for a tap and bottles), and modify them until you get a satisfying result.
TIP: Don’t try making everything a single shape—it’s extremely difficult, frustrating and inadvisable. Instead create separate elements—barrel, front planks, tap, metal rings that slightly overlap. Don’t overdo it by separating every plank of the barrel! I tried that and texturing became very painful.
It is important that before you UV unwrap your model you consider which parts of it will share the same UV space. This optimizes Space and Time: space on the UV set and your time texturing it. Look at the stage 4 model—it’s missing three of its supporting legs, some front planks, and a few other areas, like the back of the barrel. They will all share the same texture so don’t duplicate them yet! First, unwrap UVs and bake maps and only then assemble the final model (stage 6). After unwrapping the model (with the help of UVPackmaster) there was still a little room left on the UV map. I modeled additional pieces (book, bottles) and UV mapped them into those blank spaces (optimization!).
TIP: Sharing the same texture for multiple elements is good practice! Some designers say that it’s not realistic enough to have two parts of the model have exactly the same texture. But unless you enter the 4th dimension there is no physical way for you to see all parts of the model at the same time! Players won’t be able to tell (unless they have phenomenal image memory) that this texture repeats on both sides!
Texturing
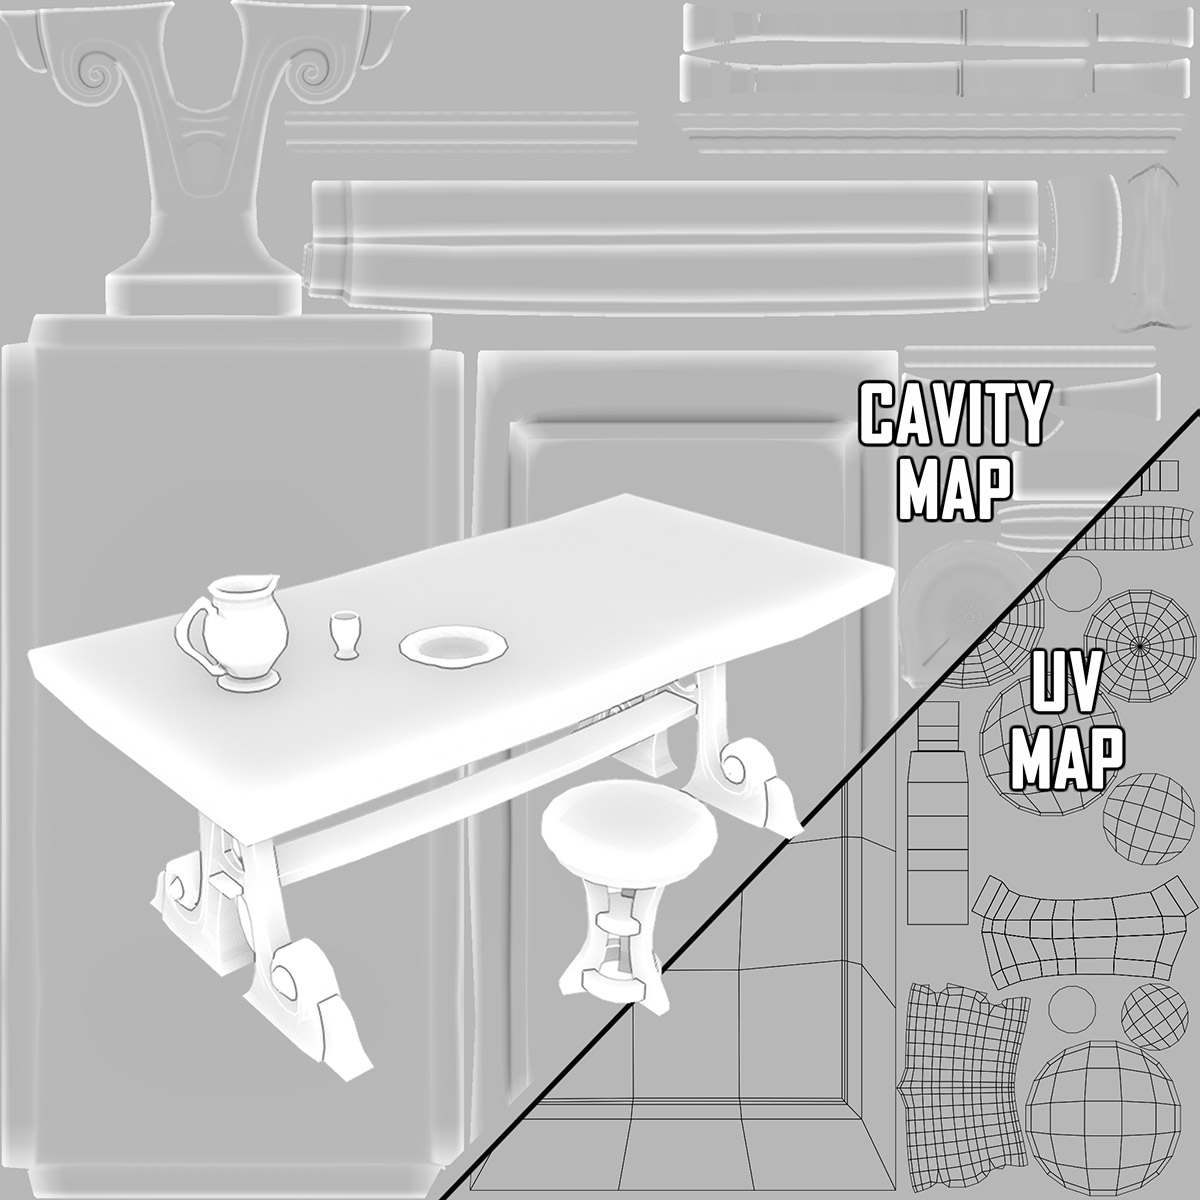
Once you finish stage 4 (model with UV map without overlaps yet), remember to export the UV layout so you know which part of the texture corresponds to which part of the model.
You can bake a cavity map from Blender (you don’t need to do it but it helps quite a bit!)—time for a Pro Tip™:
PRO TIP™: To bake—explode model, use cage, cycles renderer—bake diffuse, just color, 128 sampling, from selected (high poly model) to active (selected model and texture that low poly model uses), make sure there are no overlaps (nor crossing UV boundaries) in the UV map and normals are facing outwards (and normals have the same direction in the cage, high and low poly).
If it sounds complicated, don’t worry! Baking is not a crucial part of texturing. You can always check out some tutorials on baking in Blender—there are plenty of those on YouTube! Armed with UV and Cavity maps you can begin painting in Photoshop!
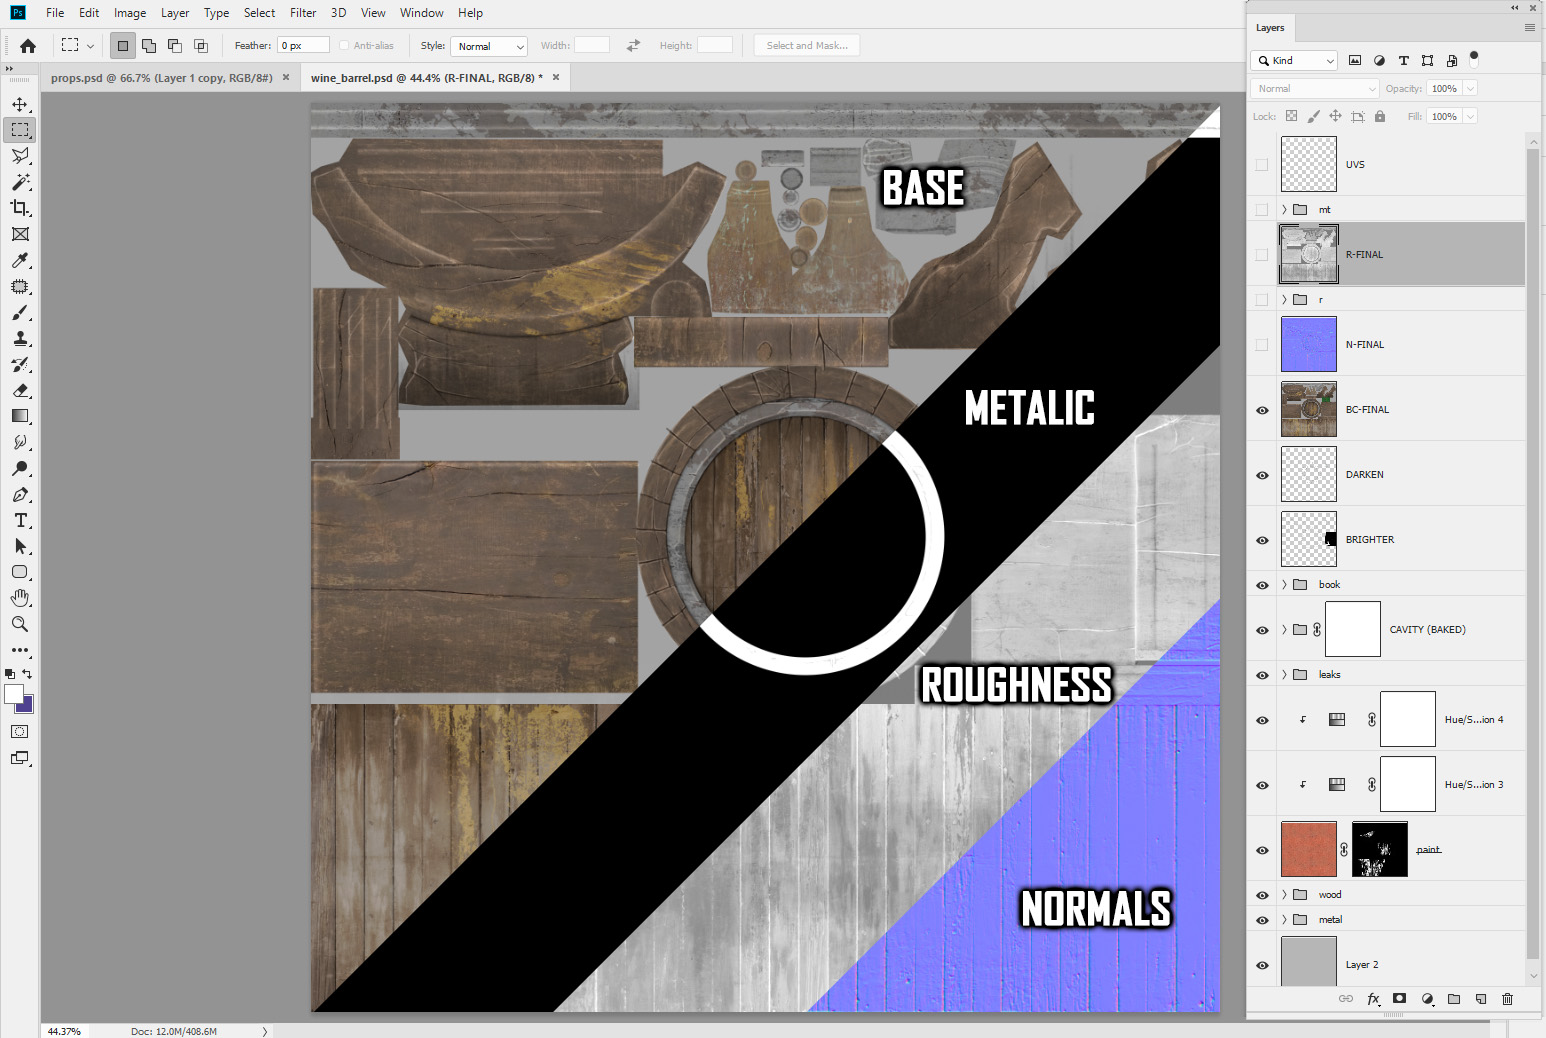
When texturing, from time to time I import the base texture into Blender to see how the mesh looks. On the bottom layers, I keep base textures (usually from photos I took) and on the top layer the UV map! Cavity is added with blend ‘overlay’ and then added again with blend ‘multiply’. I hand-paint with ‘multiply’ on one layer (shadows) and ‘screen’ on the other (highlights). When I am satisfied with the result, I generate the normal map using Quixel (for ornaments, I paint them and Quixel converts them into the normals map—how cool is that!). At last, I create roughness and metallic maps using image adjustments and masks. It feels like a lot of work to create just one model compared to a modular workflow, but the effect is better. Some models just don’t deserve to be modular.
Modular Models Workflow (Tavern Building)
In architecture, every model, no matter how complex, is made up of multiple simple models. The way I make those modular models is by creating textures first. Only then do I build the models and adjust their UVs to match the textures. It can be quite restricting, sometimes even annoying, as you might end up with slightly stretched or misaligned surfaces. Hmm, let’s see how many models I can make with a single texture before I run out of ideas and simply HAVE to make a new one… On the plus side, however, everything in a scene is consistent and similarly themed and adding new elements is fast. Once you have a lot of models prepared with that workflow, you can start combining them together in unique ways!
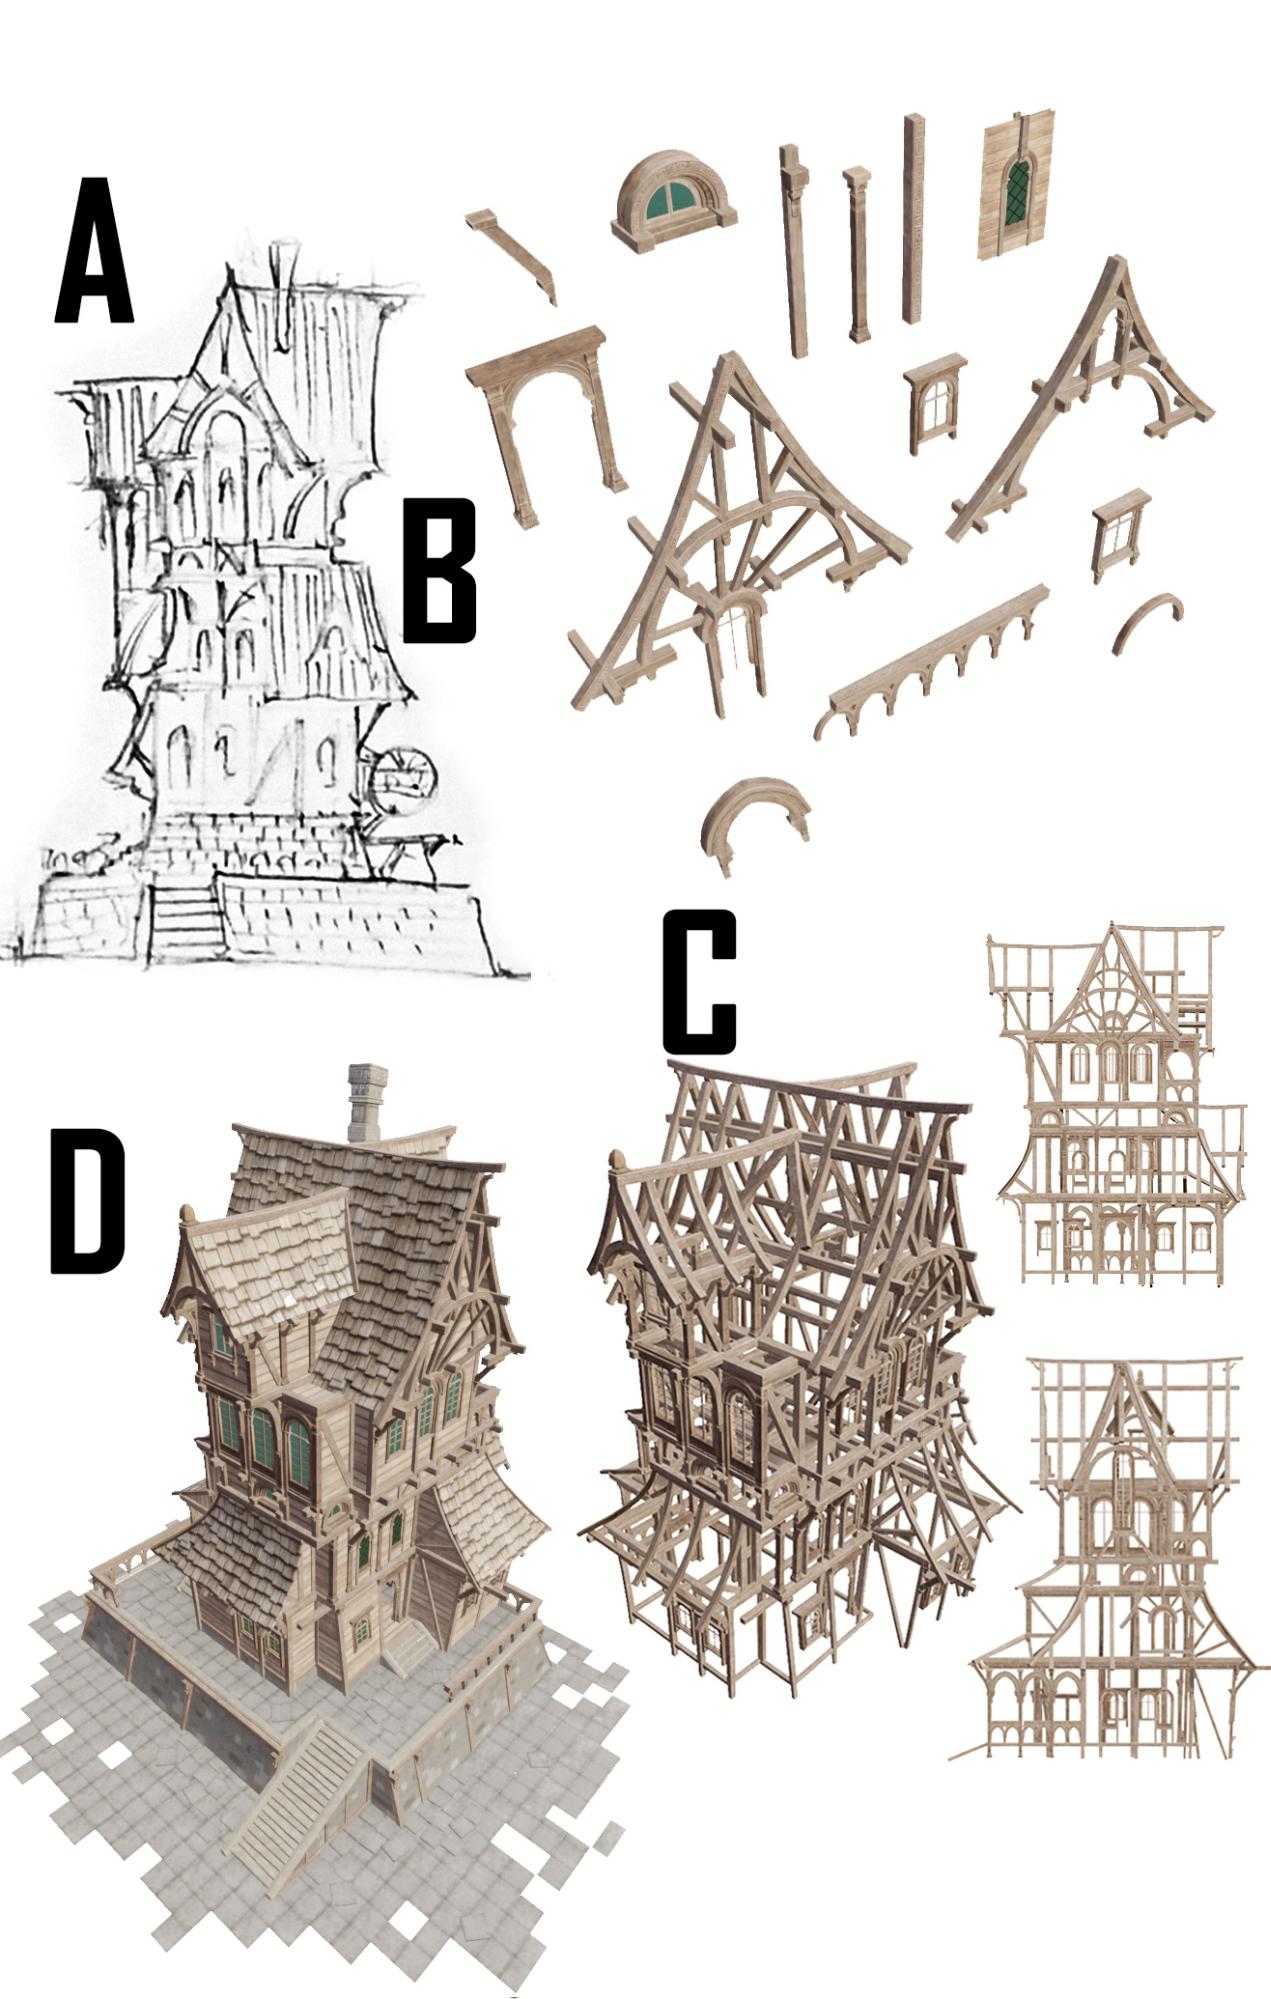
Modeling the tavern looks like this: First I make sure that my scene in Blender has all the pieces (modular beams, rafters, columns, doorways) laid out in a row. Each element has proper topology and has been unwrapped into two UV sets (one for the texture, the other for the lightmap). For Sketchfab scenes, you don’t need the lightmap channel, but if your model is intended for a game, then it should have it. Next, I create a sketch of the building—on a piece of paper or directly in Blender (using Grease Pencil). When the sketch is good enough, I build the 3D structure using the prepared elements. They are copied, stretched, bent, and modified. To get the proportions right, I use side views a lot. When the structure is ready, I add walls, roofs, and floors (simple surfaces) with tiling textures. Only when the building is done can I move on to designing and modeling interior pieces.
TIP: When using a side orthographic view, objects often look thinner than they actually are! Keep that in mind and from time to time orbit around your model in 3D perspective view to see how thick it got. This effect is seen in the picture below. See how the sketch (A) looks compared to the model (C).
Final Scene (hooray!)
Exporting (for Sketchfab)
At this point, I remembered to back up all my project files (very important!) and to make myself a very good black tea with blueberries (even more important).
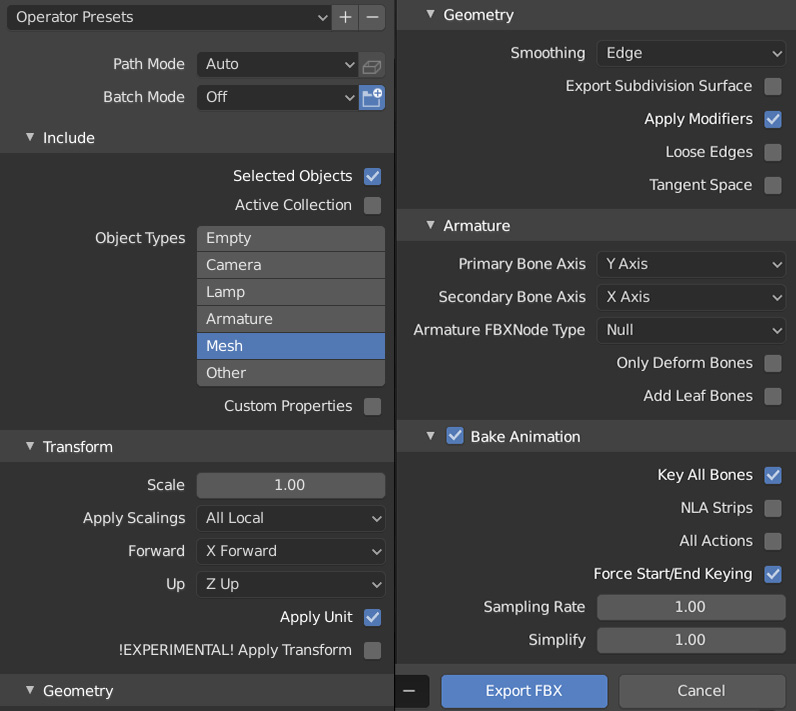
To prepare the scene for Sketchfab, I do some optimization steps (according to Sketchfab’s documentation). I partition all the models in the scene based on materials to ensure every exported model has only one material. This can be done in Blender by merging all the models together in object mode and pressing ‘p’—‘separate by material’ in edit mode. Then I remove the lightmap channel (the backed-up version still has lightmaps) and use the Decimate modifier on some of the elements (to optimize them)! I select everything and export it as a .fbx file. Below there are the settings that I use when exporting. Notice that “bake animation” is enabled since this scene has a simple rigid body simulation baked as keyframes.
Sketchfab Settings
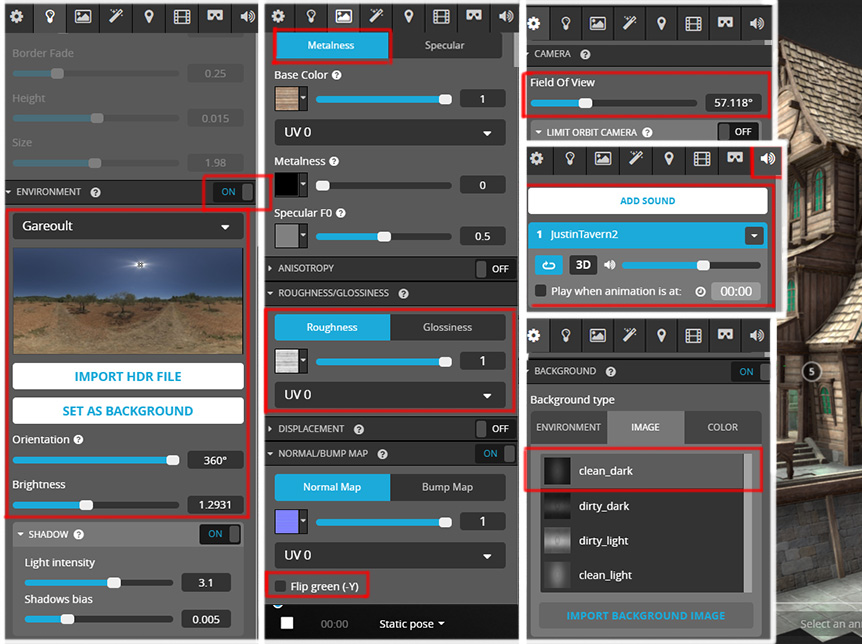
To import the scene into Sketchfab properly, just drag and drop the .fbx file onto the ‘upload new model’ window. To make things more fun, it will be imported upside down but you can fix that easily in settings. If you choose the PBR and metalness workflow, you have to provide Sketchfab with textures: roughness, metalness (if there are metallic elements in the scene), base texture (color), and normal map. If your normals have Y+ green channel, then make sure you uncheck the ‘Flip green (-Y)’ checkbox!
Below you can the settings that were used to make my final scene:
Final notes
Compose music for your scene. Or ask your friend. I usually compose my own but this time I asked friend Aeon to do it for me. He composed a fantastic piece that matches the atmosphere of the scene perfectly!
Finally: why do I use Sketchfab? Because it’s awesome! It lets you do the PBR, with your own HDRI, add cool PP, and, on top of that, phenomenal SSAO…Now you know! ;)
Bye!


