In Art Spotlight, we invite Sketchfab artists to talk about one of their designs.
Greetings! My name is Jonathan Bogart, and I’m a self-taught freelance 3D and texture artist hailing from rural Georgia. I’ve been practicing 3D in some form or another for the past 3 years or so, and my main tools for 3D are 3DSMax, Substance Painter, Topogun, and the occasional use of Sculptris. As of recently, I’ve been earning enough funds from kind commissioners to consider this a part-time job, I’m really grateful for this.
Modeling Shenanigans
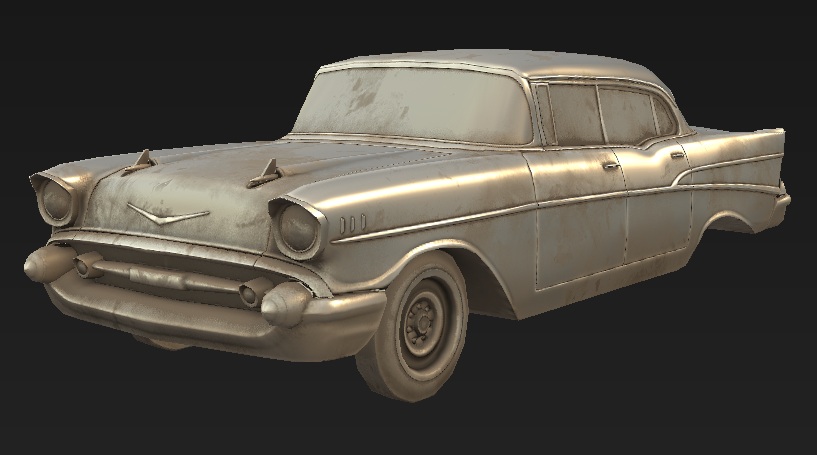
As a self-taught artist, I’d call my methods unorthodox at best, generally, all my models begin as me blocking out whatever I’m modeling using a single object, and chamfering/extruding/etc it into the generally shape of the body whatever I’m making. For this spotlight, my 1957 Chevy Bel-air.

The normalcy stops here, I then apply 3DSMax’s “Shell” modifier to my mesh, and I proceed to cut out details from my blocked-out model using the cut tool. I’ve found this combination is a great way to get complex, curved shapes (like those found in vintage automobiles) easily. The shell modifier is simply there to turn a curvy cut section of polygons into a solid. I then edge loop where needed to get all my mesh strips created with the cut tool to behave when meshsmoothed.
Stuff like vents/grilles/wheels/lights are usually modeled as separate objects and kept under a different shell-free modifier stack.

Shooting a (Topo)Gun
The finished highpoly bodywork (sans headlights, bumpers, and other complex surfaces) is then sent to topogun, where I proceed to draw lowpoly geometry over the surface of my highpoly mesh. I am particularly careful around the glass, as this will be cut out later for an “interior”.

UV Islands, Ahoy!
The UVs for my mesh rely heavily on the Pelt and cut modifiers in 3DSMax’s, generally, I prefer to manually arrange everything after I’m satisfied with the size/arrangement of my UV islands. Only the top, hood, and trunk of the car are kept asymmetrical in the UVs.
 The car and it’s highpoly are now exported to Substance Painter and baked.

Texturing Tips
I generally hold texturing as being equally important to actually modeling the object, and I can spend hours just playing around with texture settings.
One thing I really enjoy putting on models, and that I feel makes them really “pop” is baked lighting, and a spot of ambient-occlusion focused grunge. Even without textures, this accentuates all the baked details that may end up looking flat otherwise.
As for my weathering techniques, I usually try and “copy” the rust/weathering from a photo in substance painter. Despite a myriad of generators and procedurals, I still end up hand-painting the vast majority of the rust and paint wear on my cars. I also have a large number of custom “rust decal” brushes that I’ve made from various pictures of rust I’ve taken, most of which come from a visit to an aircraft carrier. The transparency for the glass is also set up in Substance Painter at this time.

One Last Thing..(s)
The mesh is then sent back to 3DSMax, where an interior is added and UV’d to a black square somewhere in the meshes’ texture. An AO-shadow is then baked, the model gets exported, bundled up, and then uploaded to sketchfab, for all to enjoy.
I must say, I’ve been honoured time and time again by the people of Sketchfab, you’ve all been very grateful and supportive of me, from my earlier days of 3D modeling, and I try and give back to the community by allowing downloads on my models, where possible and practical <3
Thanks Jonathan! Real pleasure having you here! Any favorite vehicles on Sketchfab you’d like to share? Any questions for Jonathan? Leave them in the comment box below!


