About Me
My name is Pauline, I’m 26 and I live in France. I’m interested in a lot of different subjects, so my background as an artist is a bit all over the place! As a teen I drew a lot and I taught myself how to use Photoshop, but after high school I went into science and engineering. It gave me a solid background in mathematics and physics that proves handy now to understand 3D tools.
In 2013 I joined a one-of-a-kind school where the creative sides of animation, web, and game development were taught in addition to the technical aspects. My interest in 3D was sparked when I had to use 3ds Max to make assets for a game project.
Post-graduation I started taking work as a freelance graphic designer, while using my free time to teach myself about different art techniques. I started following a lot of artists on social media, and I discovered Sketchfab and the fact that 3D can be an art form in itself, and not necessarily part of a video game or film. I was especially fascinated by the use of handpainted textures. At the beginning of 2019 I decided to seriously take up 3D by learning Blender. I chose this software because it was free and the online community seemed very welcoming.
Circumstances and Inspiration
As a freelancer working from home, I often struggle with working consistently on personal projects with no deadlines. Contests and challenges such as the ones Sketchfab organizes are a great way to force myself to commit to a piece for a fixed period of time. Nature is one of my favorite themes, so when I saw that there was a mushroom challenge in September I put everything else on the backburner and started to work on an idea.
I realized almost immediately that I wanted to make a botanical plate in 3D. I’ve always loved the aesthetic of 18th and 19th century illustrative plates and the way they combine nature, art and science, and I had never seen one in 3D before. I had also just discovered models on Sketchfab that used a “window” effect to make 3D versions of comic covers (for example Naxyo’s “Spider-verse” Web Comic”) and I thought it would translate well to a botanical plate.
I browsed the National Library of France database to find an old public domain mushroom atlas and picked the first illustrative plate. It was perfect because it showed a fly agaric which is a very visually striking and well-known mushroom, and the three ways it was depicted had nice, unique shapes.
Modeling
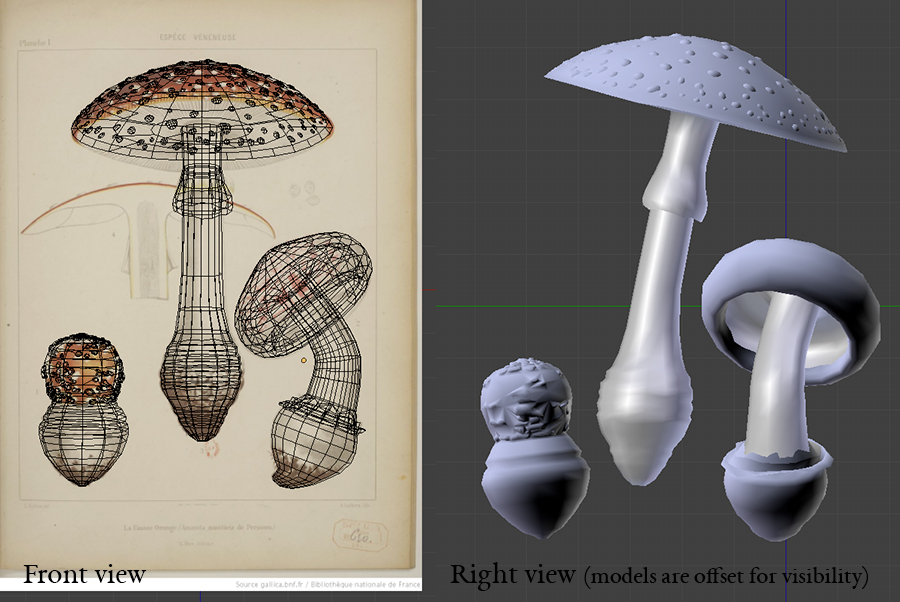
I used Blender to model the mushrooms. With the original illustration defined as background image, I created a sphere and edited it until it looked like the reference. The main tools I used were scaling and extrusion for the main shape, and subdivide and ring cuts to get the amount of details I wanted.
The modeling part was pretty easy since mushrooms are very geometric objects. The most challenging aspect of it was to make them fit the perspective of the plate when seen from the front, but still look good when seen from other angles. To make this happen, I applied different rotations to different parts of the models, as you can see on the right side view.
The Spots
I wanted the white spots of the main mushroom to be part of the geometry and not just textured on, but there were so many of them that I really didn’t want to model them by hand. After digging around on how to do this semi-procedurally, I decided to use a displace modifier combined with a shrinkwrap modifier. The displace modifier turns color values into vertex positions, so I used Photoshop to draw a map in black and white of what the spots would look like on a flat surface seen from above. I then applied a gaussian blur to create grey values on the edges, which would translate to a gentle slope in the displace modifier. In Blender I created a heavily subdivided plane roughly the size and shape of the mushroom cap and applied both modifiers to it, with the mushroom model as target for the shrinkwrap modifier.
For the little mushroom on the left I didn’t use this method, as the spots had much more specific shapes and placements. I just modeled them by hand using the knife tool and extrusion.
Texturing
Texture is the most important part of such a project, as I was trying to imitate a 2D artwork in 3D. To texture the models, I started by UV unwrapping them. I marked the seams in places where I knew they would be easily hidden, either because they were on the back of the model or because I could easily apply the same color on each side of the seam.
I don’t know exactly what medium was used to draw the original plates, but the grain of it is very distinctive. I browsed through the many brushes in Kyle T. Webster’s “megapack” until I found one that could replicate that aspect (I chose the HB Pencil Pro). I also used a homemade paper texture (just a sheet of thick drawing paper scanned at high resolution) and various blending modes and adjustment layers to obtain the right background texture.
I exported the UV maps and opened them in Photoshop, then painted the textures on top of them. I then exported them in PNG format and I gave a material to each mushroom with their respective texture, and then it was just a lot of back and forth between Photoshop and Blender to make it look right! Once again the challenge was to be as close to the reference image as possible when in front view, but also make the highlights and shadows make sense when seen from other angles.
Since my model is pretty low poly, I also used the alpha channel in my textures to create a smoother and more detailed border on some parts of the mushrooms, such as the rings around the stem.
“Page” Effect
After analyzing the models that had used this effect before thanks to the model inspector, I tried to imitate it: I created a big sphere and made the front of it flat, then cut a rectangular hole into it. I made it black to be indistinguishable from a black background. Then I duplicated it and scaled it down slightly, and gave this second sphere the same paper texture I had been using as background for my textures. This was an essential part of the piece, as it made the mushrooms blend into the background and look like they were drawn on paper from any angle.
The final detail was to draw a transparent texture for the rectangular hole in the sphere. It included the lines and text of the original plate, as well as a blurry interior outline slightly darker than the background color to imitate the aged paper.
Sketchfab
I uploaded my model pretty early in the process, because some of the effects I wanted to achieve were a lot easier to set up in Sketchfab than in Blender (for example the transparent textures). It was very reassuring for me to see that it looked good in the Sketchfab viewer. As my goal was to create a 2D effect, there had to be no shadows whatsoever on my model. To achieve this, not only did I set the scene as “shadeless” in Sketchfab but I also put my textures in the emission channel rather than albedo.
I was very happy to see that there was a “grain” option in the post-processing filters. It was perfect to give that extra old-school feeling to my model. I also color corrected the scene very slightly. Finally, I set the initial view to the front, and added an annotation “center cam” to easily go back to this view at any moment.
And it was done! I learned a lot making this piece, and the result and the love it got made me super motivated to make more models and keep improving.
Thank you for reading! If you have any questions or feedback, don’t hesitate to contact me. I go under the name Sarcelle Cannelle on most social media platforms.


