About Me
Hi everyone! I’m Pallavi Maruvada, currently working as a Team Lead Artist at a video game company in Montreal, Quebec. I’m extremely passionate about 3D game environments and props and love creating hand painted art assets and PBR shaders. As far back as I can remember, I’ve always wanted to work on games and create gorgeous looking art for them.
It’s been a long journey up to this point and I’m constantly trying to hone my skills and art style. And with every piece I create, I learn something new. I love the feeling that comes with new exploration and Pusheen was one such piece. I wanted to experiment with a new art style and see the challenges that come with it and learn from it.
Inspiration
A while back, I came across this cute GIF on twitter and immediately knew I had to recreate it in 3D. I love the entire composition, the choice of colors and the feel it gives. I had been wanting to make a 3D scene with flat shading and outlines and this was a perfect concept for it!
☔?????? pic.twitter.com/O36Hj8ShQ5
— Pusheen the cat (@Pusheen) March 2, 2019
Process
I created this piece using Maya, Photoshop and a little bit of ZBrush. I started all of my modeling with low poly meshes, and then, depending on the requirements, added more polygons and details, and at the end optimized the entire scene.
Modelling
I started off with the base modeling in Maya after adding an image plane; then I created a camera and tried to get the composition as close as possible to the original gif. One thing that was tricky was to make sure the models were plausible in 3D space while still looking as appealing as their 2D counterparts.
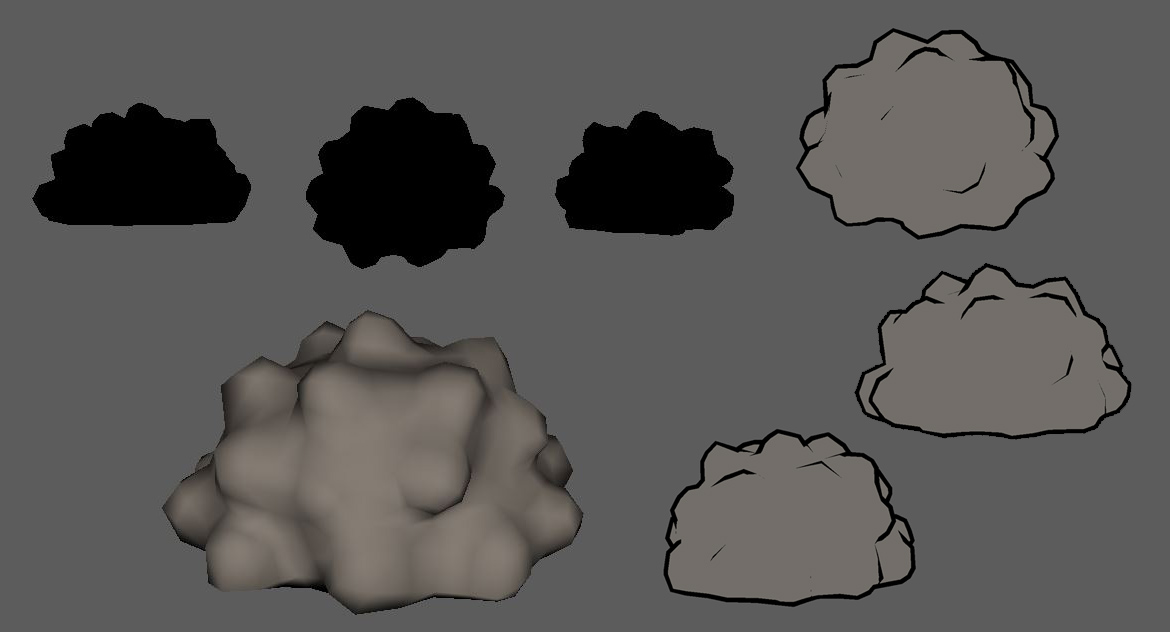
Since this is a flat shaded art style, you only see the silhouette, so for the bushes and trees I wanted to make sure the silhouette looked nice from every angle possible. For me, this was the easiest to do in ZBrush with a quick sculpt and retopo.
The bird’s one foot is partially dipped in water. So I deleted the top faces of the water in the bird bath and flipped its normals to see the interior, and textured part of the foot in a different shade of blue to give the illusion that the foot is dipped in water. The white lines on the pond and puddles are separate meshes to fake ripples, and this also gives a sense of depth. So this way when the camera moves around, it gives a nice illusion of water’s transparency and the ripples on the surface.
The inner faces of the watering can are also textured in blue to give the illusion that its filled with water, instead of having to build a water mesh inside of it, while still being able to see the water from the bird bath flow into it.
Unwrapping
The Unwrapping was fairly simple since most of the assets were flat shaded.
I like to build my models such that they are game ready. And in Unity, the UV vertex count is extremely important for optimization. The greater the number of UV shells you have in a model, the higher your vertex count will be in Unity. So you must try to keep the number of UV seams as low as possible.
So for the meshes that are flat shaded in a single color, I planar mapped them so as to not make any additional UV seams, and in turn create a more optimized asset. (Although in the end, because of the art style, I ended up creating double geometry for the outlines, keeping clean and optimized UVs is always a good practice.)
Texturing
For Pusheen Spring Scene, the texturing was very easy and simple but nevertheless lots of fun. I used one diffuse map for my entire scene. The squares on top are for the flat shaded single colored assets and the textures on the bottom are for more detailed objects, such as the mushrooms, the bird, Pusheen, etc.
Outlines
For the outlines, I used varying thicknesses depending on the scale of the object and its proximity to the camera. For certain assets like the puddles and the buttons, since they were so small and planar in some cases, I faked the outline by assigning the outer faces a black texture.
I also raised the objects slightly above the ground plane, so they didn’t intersect, in order to see the outline at the bottom as well.
Showcasing my Model on Sketchfab
Finally, I exported my model as an FBX and imported it into Sketchfab. For the scene and art style to resemble the original GIF, I used the ‘Shadeless’ shader (basically unlit), changed the FoV to 20 degrees, picked a solid color for the background that would essentially work as the sky, changed the faces rendering to single-sided and tweaked the sharpness a bit in the post-processing settings. And then hit Publish!
Honestly, for a 3D artist, Sketchfab is the best thing ever to showcase their portfolio! I remember the first time I used Sketchfab, I was so happy that my family and friends could finally see my 3D artwork the way it was meant to be seen—in 3D!
Thank you Sketchfab for the Spotlight! And thank you for taking the time to read through the article and checking out my 3D work! You can also find me on ArtStation and Twitter! And here’s my website!


