3D scanning will give you amazingly lifelike results, but the models are often very high poly and impossible to use in a real-time environment. This is where retopology comes in – using a combination of the right tools and techniques you can reduce the mesh density while keeping the ‘deep’ realism. Sketchfab Master Johnson Martin explains in this in-depth tutorial.
Hello, I’m Johnson Martin. I’m a 3d artist and topology fan. I run the blog Topology Guides where I give tips and techniques on how to 3d model. Today, I’m showing you how to use free software to retopologize and re-texture a high resolution 3d scan into a low poly game asset. I’ll be using a downloaded model from from Sketchfab user shadows44 to demonstrate with. You can download it here to follow along.
What is Retopology?
Retopology is the process of rebuilding your model to reduce polygon count and to allow for UV unwrapping and proper deformation for animation models. Retopology is widely used by digital sculptors to convert their models into usable assets in game or film projects. It can also be used on 3d scans for rapid asset creation. Learning the process is quickly becoming a valuable task as more and more game studios are using 3d scans in their asset pipeline.

Instant Meshes for Retopology
For the retopology we’re going to use Instant Meshes, a free quad-based auto-retopology software recently announced at Siggraph and available for free download. At the moment Instant Meshes supports OBJ, PLY, and ALN formats. By coincidence, the model I’m using is already in OBJ format. But if your model isn’t, there are a number of free converters such as MeshLab or online apps if you prefer not to download one.
Import your model into Instant meshes by using the Open mesh button. It may take a while depending on the complexity of the model and your computer specs. Also, don’t worry if your scan has holes, Instant Meshes has support for non-watertight geometry.
Next, select your target vertex count using the slider and press the Orientation field solve button, which will create set of directions on the surface to which the edges of the output mesh will align to. After doing this, you can use the orientation tools. to tweak the results. In my experience, the algorithm does a pretty good job on most objects and doesn’t require any changes in this step, but it’s a good idea to check the model just in case.
Now you can use the position solve button to generate the position field, which will create a map of the position of each vertex to be placed and then applies smoothing for less jagged topology. At this point you can mostly tell how the model is going to turn out, but take note that the grid overlay is not the final mesh, you may notice there are some triangles and that the grid detail is very large, neither will be present in your final mesh.
If there are sharp edges within the model you are using, you can use the edge brush to specify them. In the particular model I’m using, there aren’t any sharp edges or corners. But be sure to use the edge brush if there are any, otherwise they will be smoothed in the final mesh.

Extracting and Exporting
You can now generate the final mesh by clicking the export mesh button and you will be presented with a few more options. The “pure quad mesh” check-box will remove any triangles that would normally show up in the mesh, this will also bump up the mesh detail, so be sure to take that into account. There’s also a smoothing slider that will apply a smoothing algorithm, resulting in a less defined mesh.
Using the Extract Mesh button we can generate the final mesh. Inspect the mesh to make sure there are no issues. If not, save the mesh. Next we’ll use Blender to do any cleanup needed and to re-apply the textures.
Blender for Cleanup
Now that the model is retopologized, you can use Blender (or another 3d software if you prefer), to do any mesh corrections. For the sake of keeping this tutorial short, I won’t go through all the basics of using Blender. But if you want to learn more, there’s a plethora of quality tutorials you can find online.
To import the OBJ into Blender, go to File>Import>Wavefront (.obj) and select the model you just saved from Instant Meshes. 3d scans often have holes or extra geometry that shouldn’t be there, you can fix such problems now using Blender’s toolset of modeling tools. Here’s a few tools that can help, with links to the Blender manual:
- Mesh Bisect
- Grid fill
- Knife Tool
- Bridge Edge Loops
- Fill Tool
- Make Edge/Face
- Merge
- Rip
- Extrude
- Circle Select
- Lasso Select
After you finish cleaning up the mesh, click save, and continue to the next step.
Re-applying Textures
As soon as you opened the OBJ in Instant Meshes, the UV’s were destroyed. As such, we can’t re-use the texture maps by directly applying them to the new mesh. Instead, we have to use baking. If you’re a game artist, this might already be something you do during the normal mapping phase of asset development. If that’s the case, you can probably skip reading this step, it might be redundant to what you’ve learned in the past.
Import the original 3d scan into Blender so that it can be used to bake from. Afterwards, go to the material tab in the properties panel, add a new material, switch to the texture tab and apply the original texture. Now the original is ready for baking.

To prepare the improved mesh, you need to UV unwrap it. Open the UV/image Editor, enter edit mode in the 3d view and press U to unwrap it. I used “Smart UV project”. But feel free to unwrap it however you like as long as nothing is overlapping. Before you exit edit mode, add a new image in the UV/image editor to bake the new texture onto. To preserve the texture resolution, use the same pixel dimensions as the original texture.

Now we can get to the baking. Make sure both meshes are aligned together as well as possible. Then in the render settings, scroll down to the Bake tab and set the Bake type to “Textures” if you don’t see this option, make sure you’re using the Blender Internal render engine. Next, check the “Selected to Active” checkbox. This will allow you to bake from one object, onto another. In our case, from the original, onto the retopologized mesh. Re-enter edit mode on the improved mesh and make sure the new image is in the UV/image editor, this is necessary so that Blender knows what image to bake onto. Next, leave edit mode and select the original mesh, then while holding SHIFT, select the improved mesh. Press Bake, and wait for the bake to finish.
If you’d like to know more about baking in Blender, I would recommend watching this tutorial by Oliver Villar. It goes into more detail and may be easier to understand in video format if you are new to baking.
Conclusion
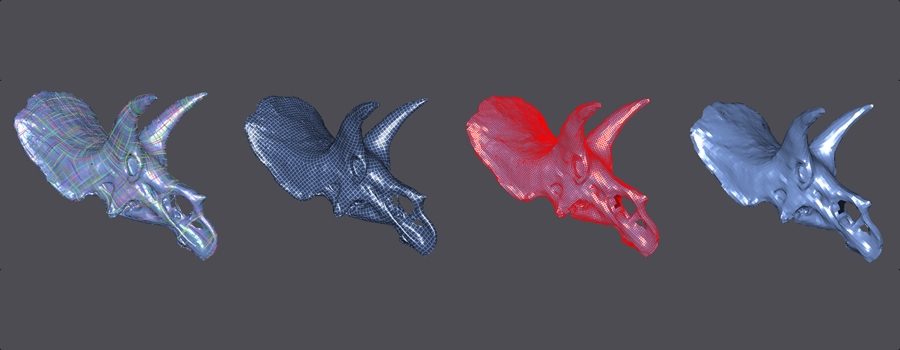
Now all that’s left is to save the image and mesh, then upload to Sketchfab! If everything goes as planned, you should have a result similar to this:
I hope you enjoyed this tutorial and learned something new. Feel free to drop a comment or question below and tell me what you thought of the tutorial!
About the author
Johnson Martin
I'm Johnson, a 3d artist and Sketchfab Master. I'm currently a student, exploring the world of creative arts. I run Topology Guides, a blog that gives tips and tricks for 3d modelers. I'm also an active member of the open source community, using software like Blender and Linux in my everyday workflow. I am a Sketchfab Master.